ExpressLRS – Open Source Long Range radio control system – Complete Guide
ExpressLRS is the Open Source Long Range radio control system, developed by Alessandro Carcione (aka AlessandroAU), Jye Smith Wezley Varty and a number of other developers.
![]()
ExpressLRS offers the best possible link performance for both latency and range. This is achieved with an optimized over the air packet structure. Thanks to this, ExpressLRS achieves better latency AND range compared to other options in the market. For example, on 900MHz band, ExpressLRS with 200Hz will definitely out-range Crossfire 150Hz and ExpressLRS 50Hz will out-range Crossfire 50Hz in watt per watt max range comparison. ExpressLRS supports full telemetry (VBAT, downlink/uplink LQ and downlink/uplink RSSI are transmitted always and full telemetry can be enabled in the configurator).
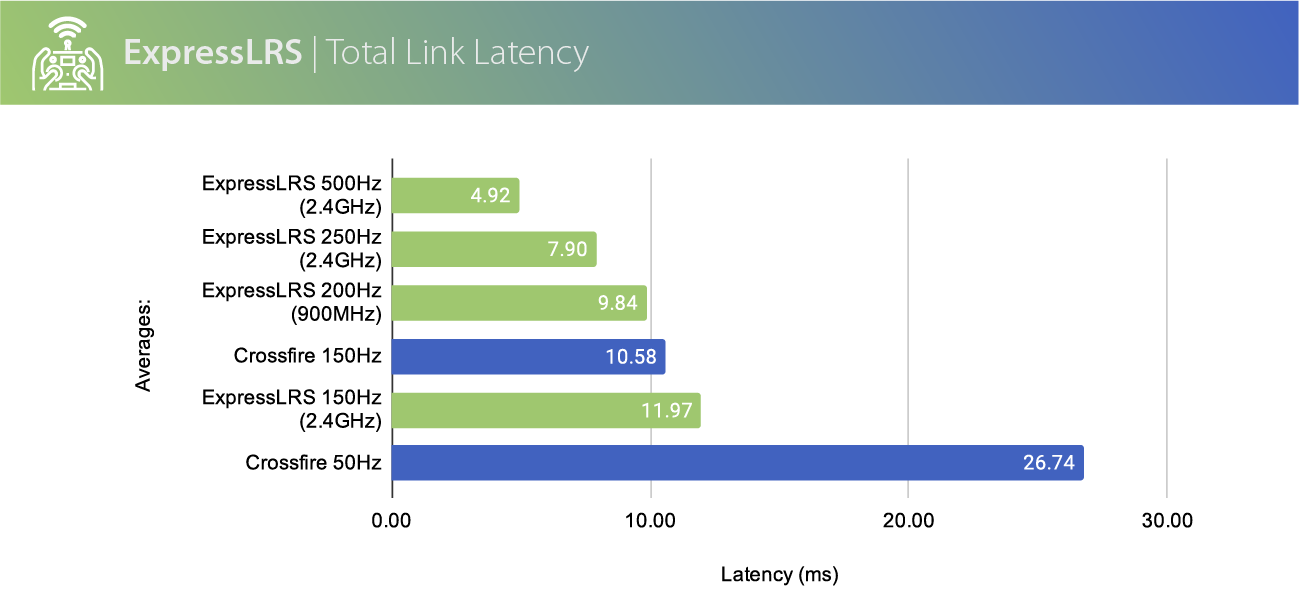
Total link latency comparison (image from ExpressLRS Wiki)
Page Contents for ExpressLRS – Open Source Long Range radio control system – Complete Guide
- 1 ExpressLRS Hardware options
- 2 ExpressLRS 900MHz vs 2.4GHz
- 3 ExpressLRS configuration in OpenTX
- 4 Do you need to update the ExpressLRS?
- 5 How to Flash/Update ExpressLRS
- 5.1 Preparing (compiling) the ExpressLRS firmware for flashing/updating
- 5.2 Compiling Transmitter module (TX) firmware
- 5.3 Flashing/updating ExpressLRS TX via WiFi
- 5.4 Flashing /updating ExpressLRS TX via UART
- 5.5 Compiling receiver (RX) firmware
- 5.6 Flashing/updating ExpressLRS RX via WiFi
- 5.7 Flashing /updating ExpressLRS RX via Betaflight Passthrought
- 6 Problems while flashing/updating ExpressLRS
- 7 Binding ExpressLRS
- 8 How to connect the ExpressLRS receiver to Flight Controller
- 9 How to setup the ExpressLRS receiver in Betaflight
- 10 Notes
- 10.1 Always turn the transmitter first…
- 10.2 Why does using AUX1 for ARM is so important?
- 10.3 Why does the ES24TX have a wifi AP, is there any way to turn it off?
- 10.4 “CRSFShot” or “Sync Pulses”?
- 10.5 Does ELRS support Betaflight lua script?
- 10.6 Will my receiver work with the different manufacturers transmitter?
- 10.7 Why cant I set the the higher power output in Lua script?
- 10.8 How do I fix occasional “Telemetry lost” warnings?
- 10.9 Receiver gets very hot while not connected to the radio
- 10.10 Receiver sometimes does not start properly – solid LED
- 10.11 Receiver sometimes does not start properly – dimmed LED
ExpressLRS Hardware options
ExpressLRS is based on the Semtech SX127x/SX1280 LoRa hardware combined with an ESP8285, ESP32 or STM32. ExpressLRS supports a wide range of DIY hardware platforms, also FrSky R9 system.
Happymodel has released official ExpressLRS TX and RX modules for 900MHz and 2.4GHz frequency options.
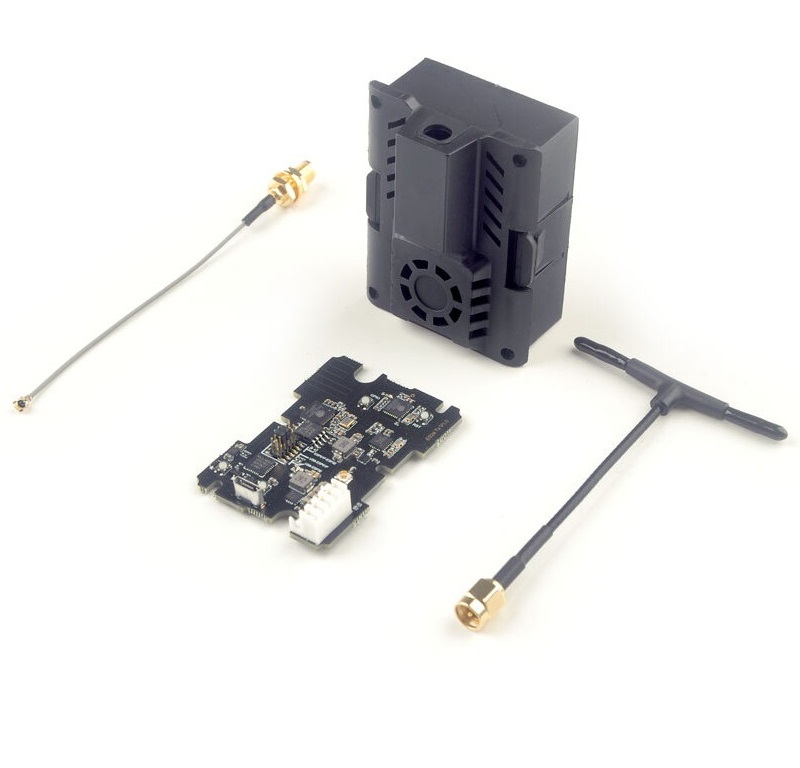
Happymodel EX900TX and ES24TX radio transmitter modules
 |
 |
Banggood: 2.4GHz – https://www.banggood.com/Happymodel-ES24TX-2_4GHz-ExpressLRS-TX-Module
900MHz – https://www.banggood.com/Happymodel-ExpressLRS-ES900TX-915MHz-Ultra-Long-Range-Transmitter-Module
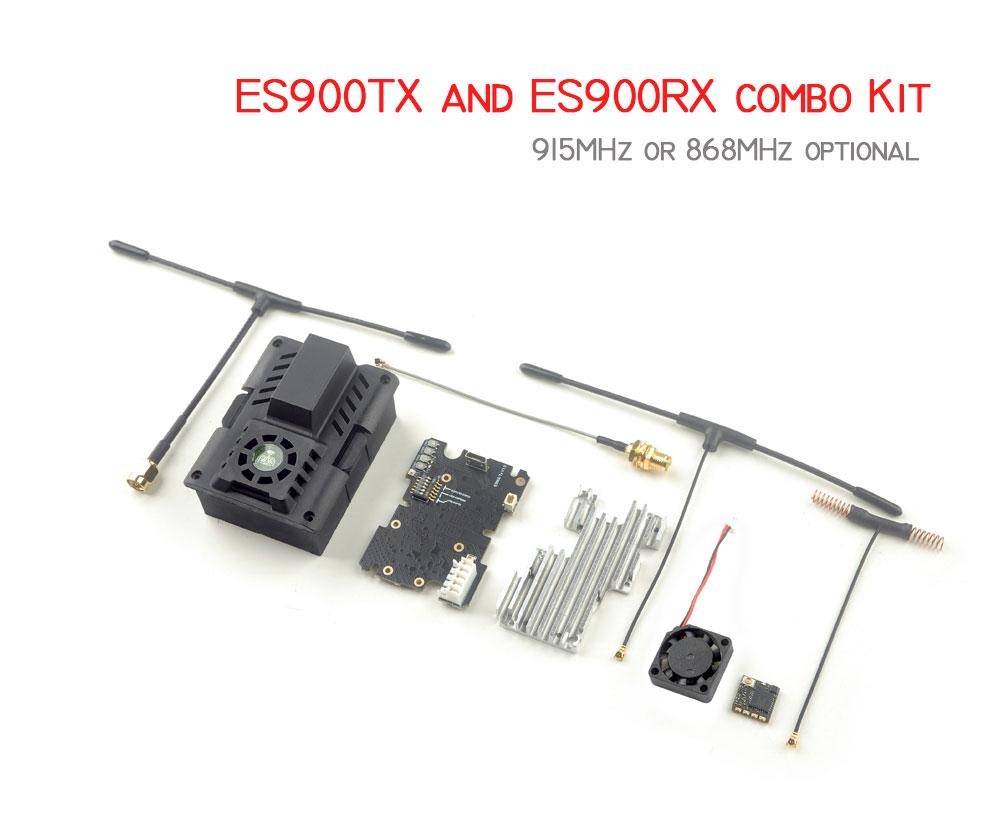
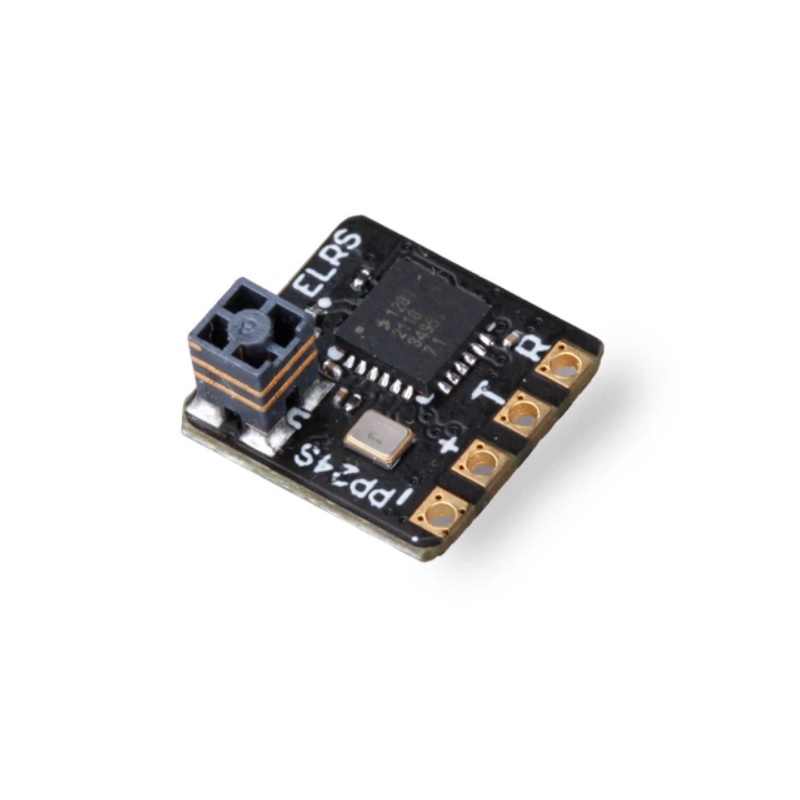
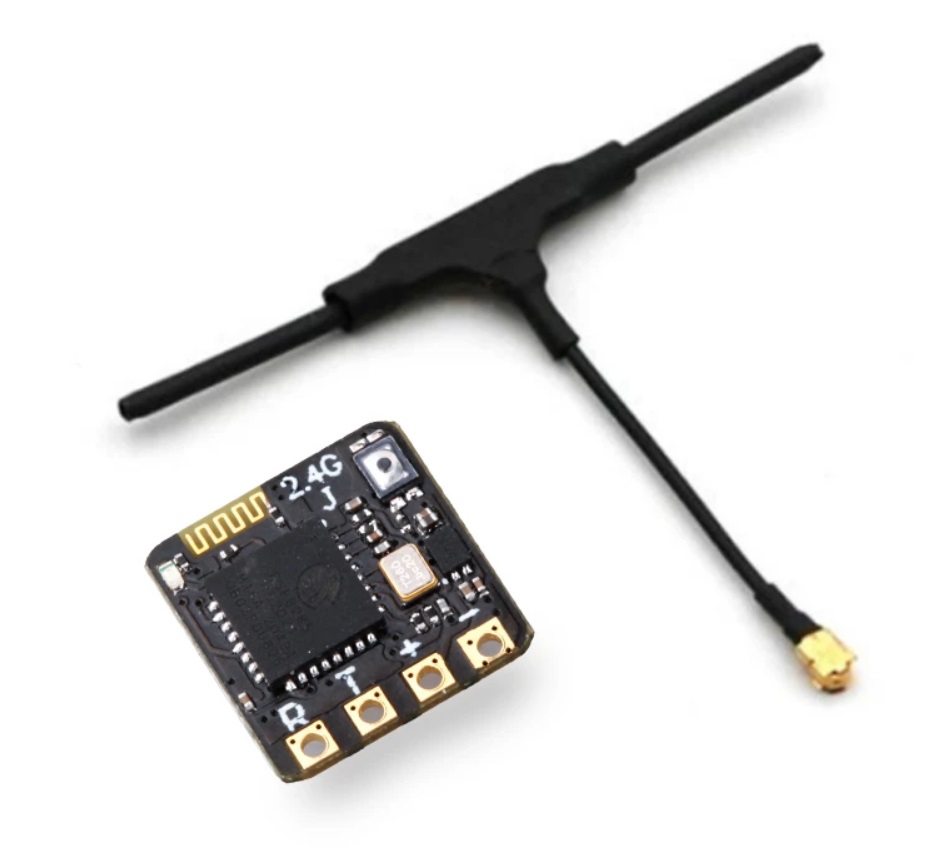
Happymodel ES900RX (900MHz) and PP, EP1, EP2 (2.4GHz) receivers
 |
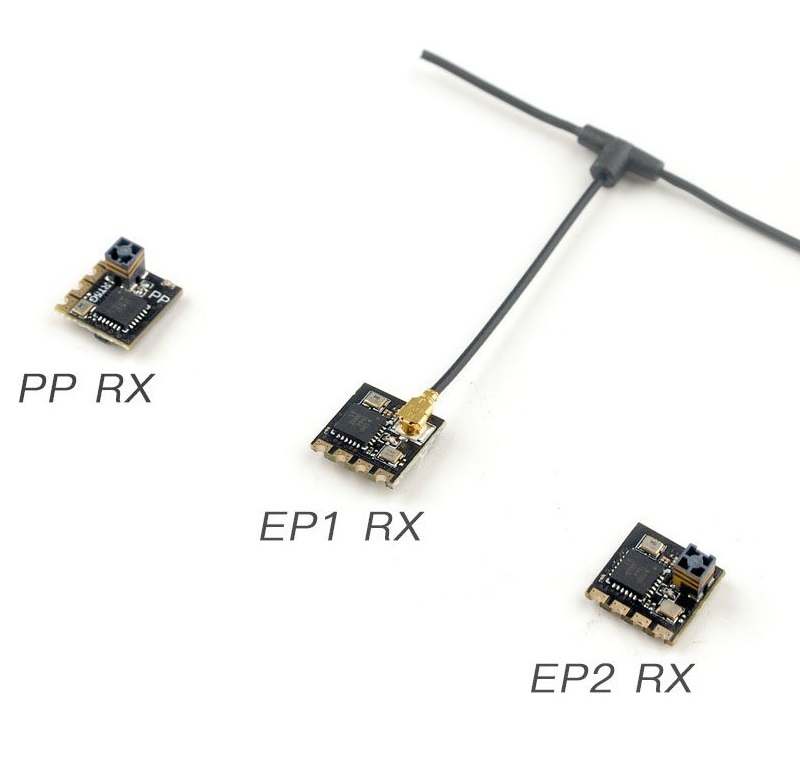 |
Banggood: 2.4 GHz – https://www.banggood.com/0_42g-Happymodel-2_4G-ExpressLRS-EP1-Nano-High-Refresh-Rate-Ultra-small-Long-Range-RC-Receiver
The pinout of the Happymodel ExpressLRS PP, EP1 and EP2 receivers:

BetaFPV 900MHz and 2.4GHz TX radio transmitter modules
 |
 |
BetaFPV: https://betafpv.com/collections/expresslrs-series/products/elrs-nano-tx-module
Banggood: 2.4GHz – https://www.banggood.com/BETAFPV-ExpressLRS-2_4GHz-Nano-Long-Range-Micro-TX-Module
900MHz – https://www.banggood.com/BETAFPV-ExpressLRS-868-or-915MHz-Nano-Long-Range-Micro-TX-Module
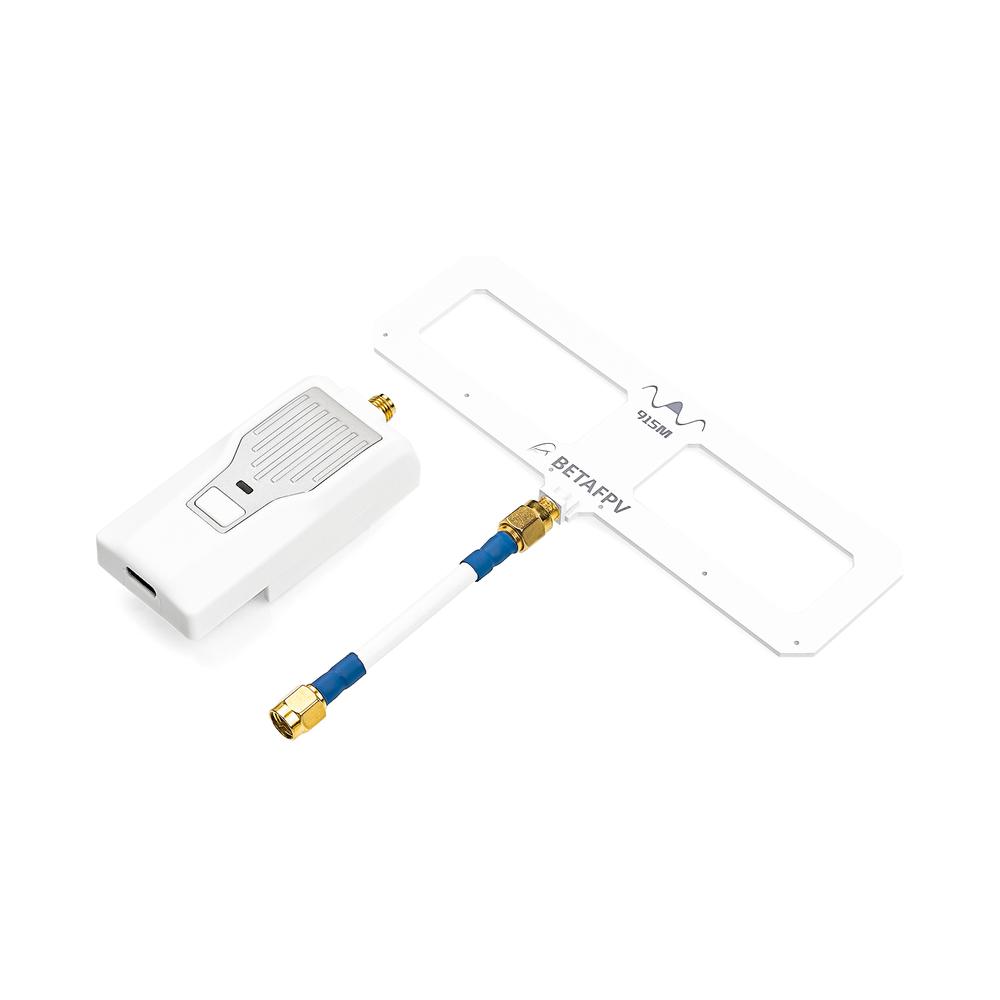
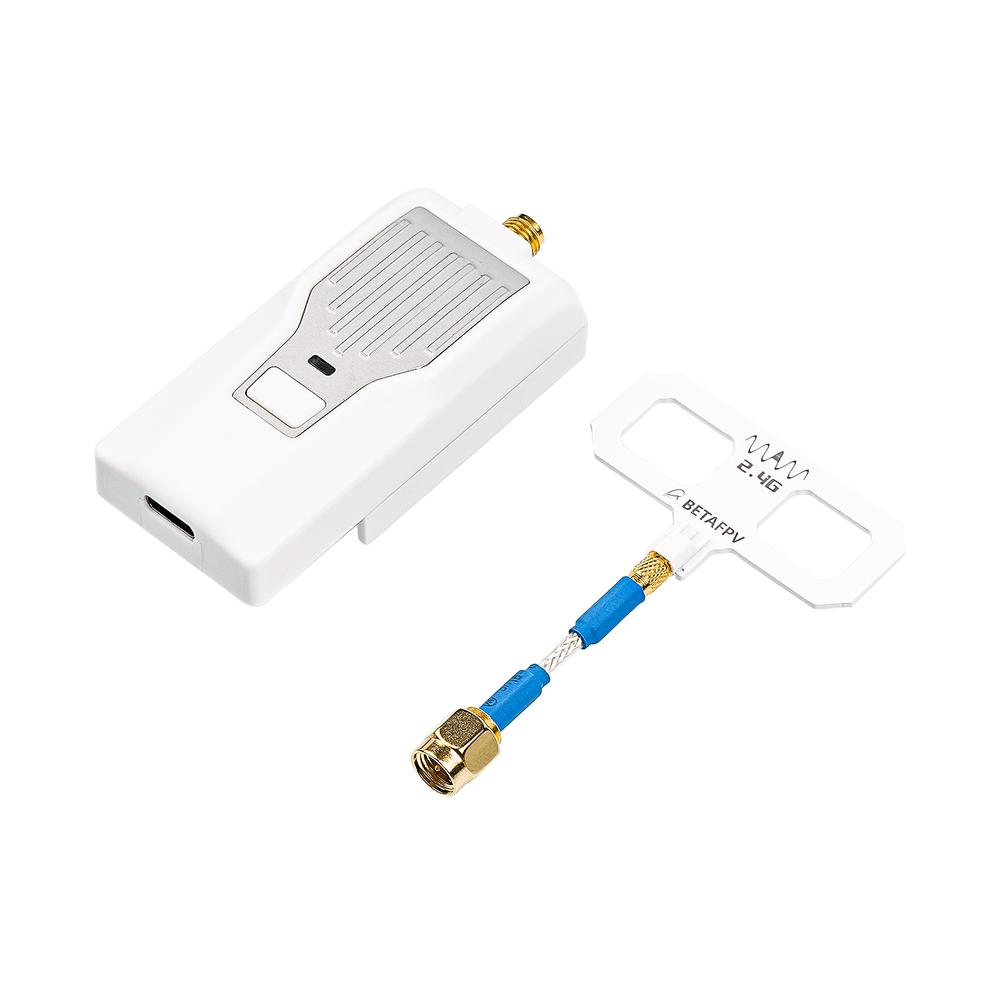
BetaFPV 900MHz and 2.4GHz receivers
 |
 |
BetaFPV: https://betafpv.com/collections/expresslrs-series/products/elrs-nano-receiver
Banggood: 2.4GHz – https://www.banggood.com/0_7g-BETAFPV-ExpressLRS-2_4GHz-Nano-Ultra-small-Long-Range-RC-Receiver
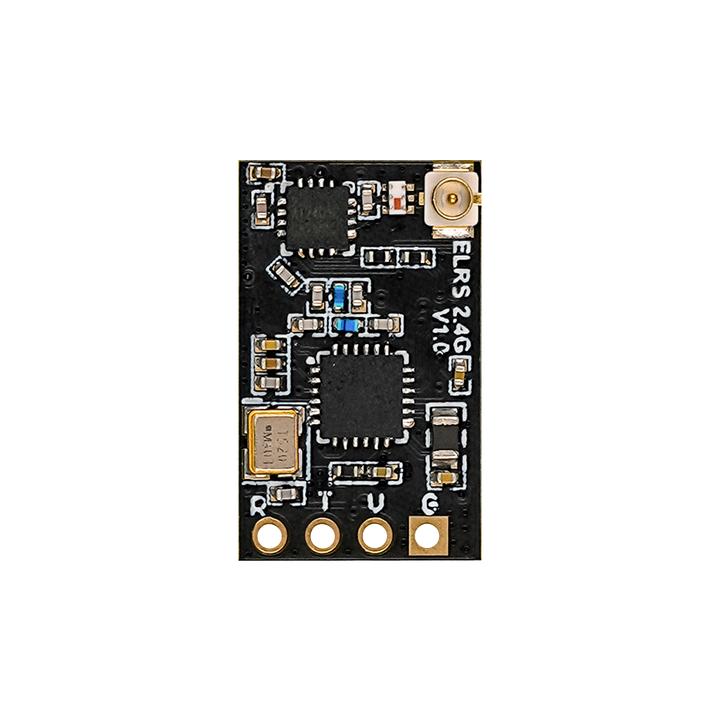
Flywoo EL24E and EL24P receivers
 |
 |
Flywoo: https://flywoo.net/collections/new/products/0-4g-flywoo-2-4g-expresslrs-elrs-el24e-el24p
Banggood: https://www.banggood.com/0_4g-Flywoo-Universal-ExpressLRS-ELRS-EL24E-or-EL24P-…-1887378.html
ExpressLRS can also be flashed to ImmersionRC Ghost TX and Atto / Zepto receivers.
 |
 |
The complete list of the available ExpressLRS hardware can be found here: List of ExpressLRS hardware – Transmitters and Receivers
ExpressLRS 900MHz vs 2.4GHz
Which ExpressLRS system is better? 900MHz or 2.4GHz band? It depends on what is your target use. If you fly quadcopters and not worried about reaching the tens of the kilometers of the long range, then 2.4GHz is recommended. Advantages of the 2.4GHz:
- 2.4GHz has ultra fast 500Hz update rate. 900MHz fastest rate is 250Hz;
- 2.4GHz – one band – one hardware, no need to worry about 868MHZ/915MHz sub bands. 900MHz actually is 868MHz (EU region, CE regulations) and 915MHz for (US region, FCC regulations). Antennas should be optimized for the particular frequency and manufacturers usually make „universal“ „900MHz“ antennas to fit the both frequencies, that are not optimal for the particular frequency;
- 2.4GHz is free band where 915MHz can interfere with GSM mobile phone towers if you are on the wrong band;
- 2.4GHz has more bandwidth and that means less chance of the interference with the other pilots when flying;
- 2.4GHz has more hardware options. More manufacturers are into 2.4GHz so you’ll have more choices;
- 2.4GHz antennas are smaller. Both TX and RX antennas are substantially smaller and lighter;
- 2.4GHz has receivers with on board SMD ceramic antenna.
However 900MHz band ExpressLRS can penetrate more obstacles and can get your aircraft father than 2.4GHz.
There is a leaderboard of the max distances traveled with ExpressLRS hardware here:
https://github.com/ExpressLRS/ExpressLRS/wiki/Range-Competition
ExpressLRS configuration in OpenTX
ExpressLRS protocol setup
ExpressLRS uses the CRSF serial protocol to communicate between the radio transmitter and the ELRS TX module. In order to set CRSF protocol, go to your selected model settings, in the “Model Setup” tab, enable your “External RF” and select “CRSF” as the protocol:
Internal RF module should be turned OFF.
ADC filter setting
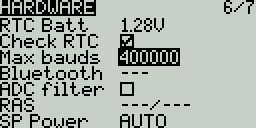
OpenTX has ADC filtering turned on by default. This means that sticks position values are averaged or so called “smoothed” on the radio, but as the result you could get the rough values that are “jagged”. So if you are flying the quads and not the fixed wings with servos, then it is recommended to turn the ADC filter OFF. You can find this setting on hardware setup page in the SYS settings by long pressing the SYS button.
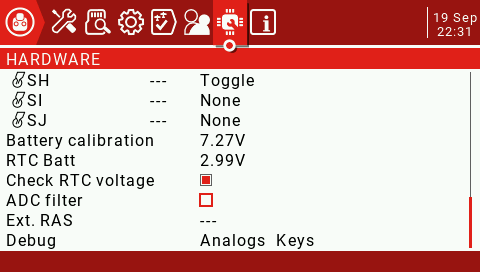
On monochrome LCD radios:
ELRS TX module configuration with LUA script
All the TX module parameters and configuration changes can be made with the help of the LUA script.
Download LUA file from this link: ExpressLRS Lua Script (right click on the link and select “Save file as…”). Alternatively you can download the latest LUA script from the ExpressLRS Configurator.
Copy LUA Script file ELRS.lua to the folder \SCRIPTS\TOOLS\ on the radio SD card.
You can run the ExpressLRS LUA configurator by long pressing the SYS button and selecting the ELRS Lua script from the list.
Once the ERLS LUA script is working you’ll see the configuration options.
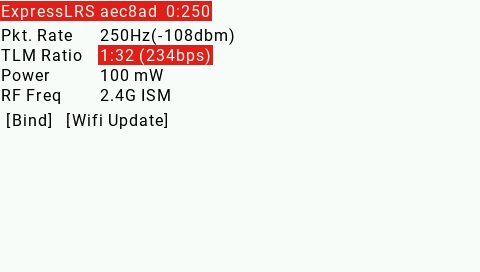 |
The ERLS.Lua script top bar shows the bad packet count and the current working packet rate. It should always show a stable 0:[user selected packet rate]. For example: 0:50, 0:150, 0:250, 0:500. If the packet rate shows 0:250 no matter what Pkt. Rate setting is, then your crsfshot is not working properly.
Possible issues and solutions
If the LUA script shows only the “Connecting…” message on the screen, it means the LUA is not communicating with the ExpressLRS TX module.
 |
Possible reasons and solutions to this issue:
- Your module is not making proper connection in the external JR module bay. Try reseating the TX module inside the JR bay/case. The working ExpressLRS module should have (red) LED on.
- You are running OpenTX version older than 2.3.12. You need 2.3.12 version or newer for ExpressLRS to work properly.
- You have not set the External RF to CRSF in the Model setup. Go to the Model setup on your radio and double check the settings. Internal RF should be turned OFF.
- ExpressLRS TX module is in WiFi update mode. You need to power off-on your radio in order to start the ExpressLRS module in normal mode.
If the LUA script shows !!! VERSION MISMATCH !!! error warning, this means you need to update the TX module firmware.
Do you need to update the ExpressLRS?
As of writing this article the ExpressLRS was still in the beta phase. The stable version 1.0 was just released, so you are advised to update to it. Also every new version has some bugs or features fixed. It is strongly recommended to update the freshly purchased ExpressLRS hardware (just to mention a few – Happymodel ES24TX, ES915TX, Namimno Flash & Voyager, BetaFPV ELRS Nano TX and RX transmitter modules and receivers). Usually the purchased TX modules and receivers does not contain the latest firmware.
Unfortunately there is no way how to find out what firmware version is on your TX/RX currently. You have to update all the modules to the latest known firmware to be sure you have the same and the latest firmware on TX/RX. This will be improved in the ExpressLRS version 1.1 in the nearest future.
How to Flash/Update ExpressLRS
There are several methods to flash the ExpressLRS firmware into TX or RX modules. These depend on the hardware you use ant its capabilities (does it have USB socket, does it have WiFi ESP32 chip, etc).
For TX module available methods are TX update, WiFi update, UART update.
For RX modules available methods are BF serial passthrough, WiFi update, UART update.
In general: if your TX or RX has ESP chip on board then WiFi update is available. If your TX module has USB socket, then UART update method is available. Any RX can be updated by BF serial passthrough or UART update method.
The list of possible firmware flashing methods for each of the hardware item can be found here: https://github.com/ExpressLRS/ExpressLRS/wiki/Flashing-ExpressLRS
In order to flash TX or RX module you need to prepare (compile) the firmware.
Preparing (compiling) the ExpressLRS firmware for flashing/updating
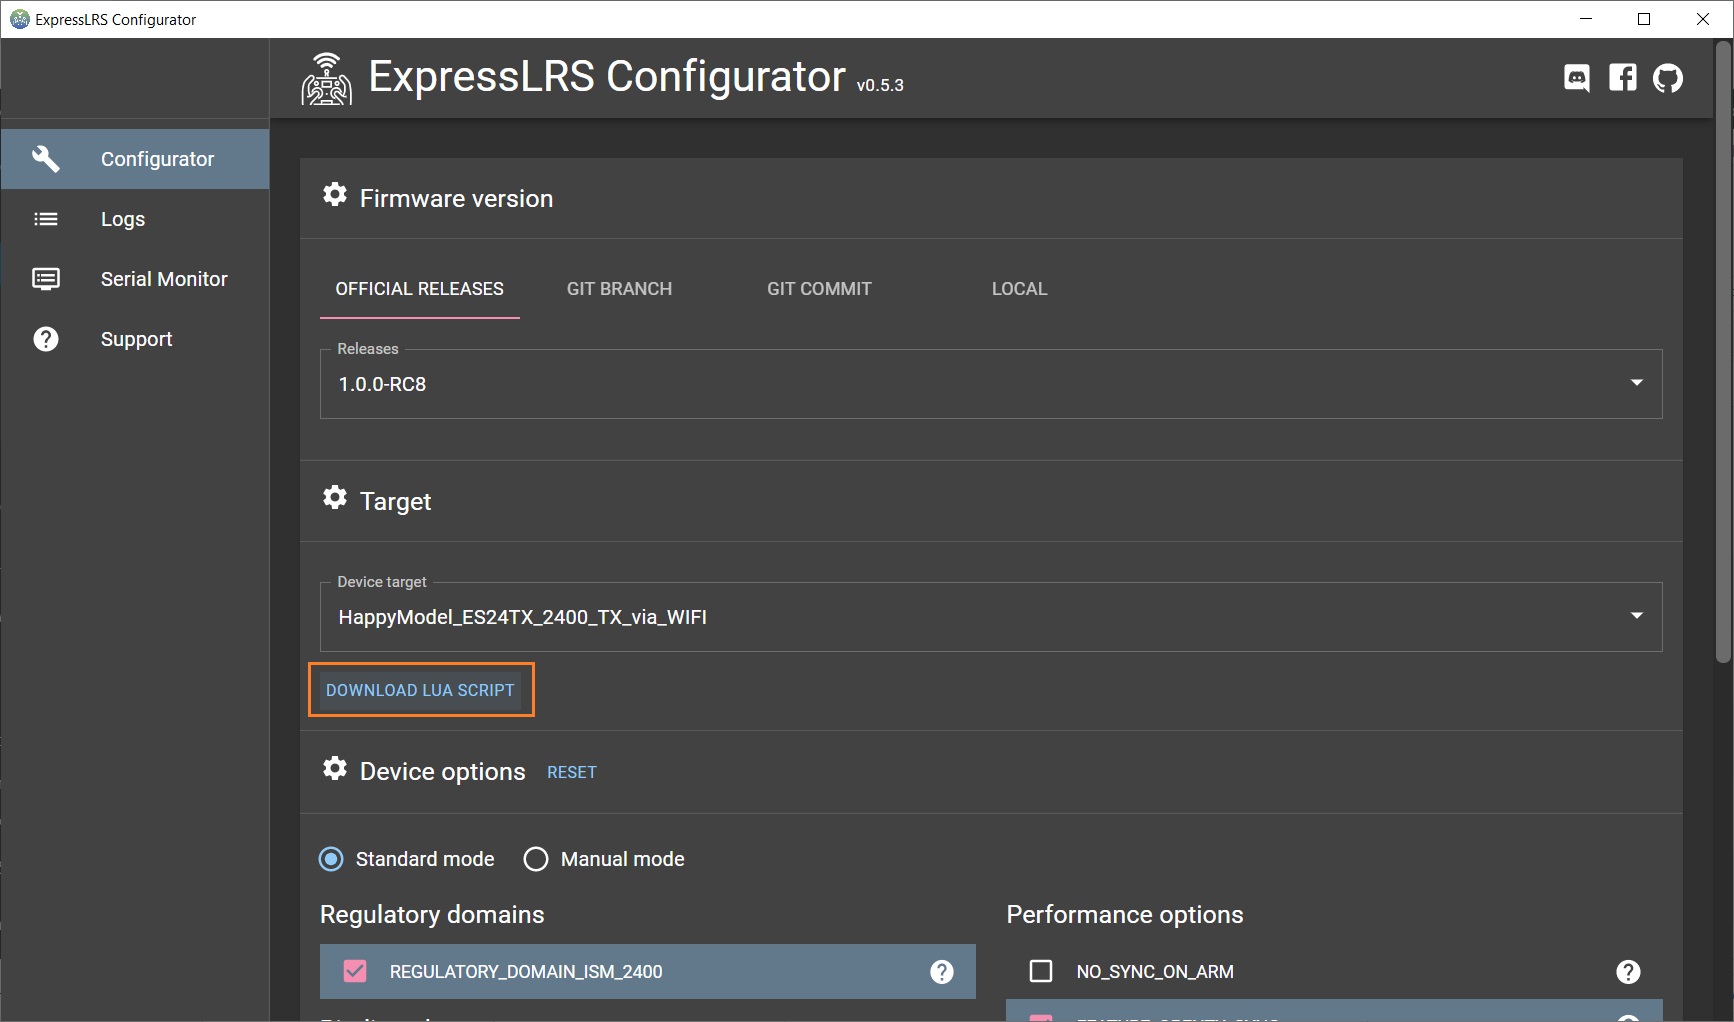
Download and install ExpressLRS Configurator. You can download the ExpressLRS Configurator from here: https://github.com/ExpressLRS/ExpressLRS-Configurator/releases
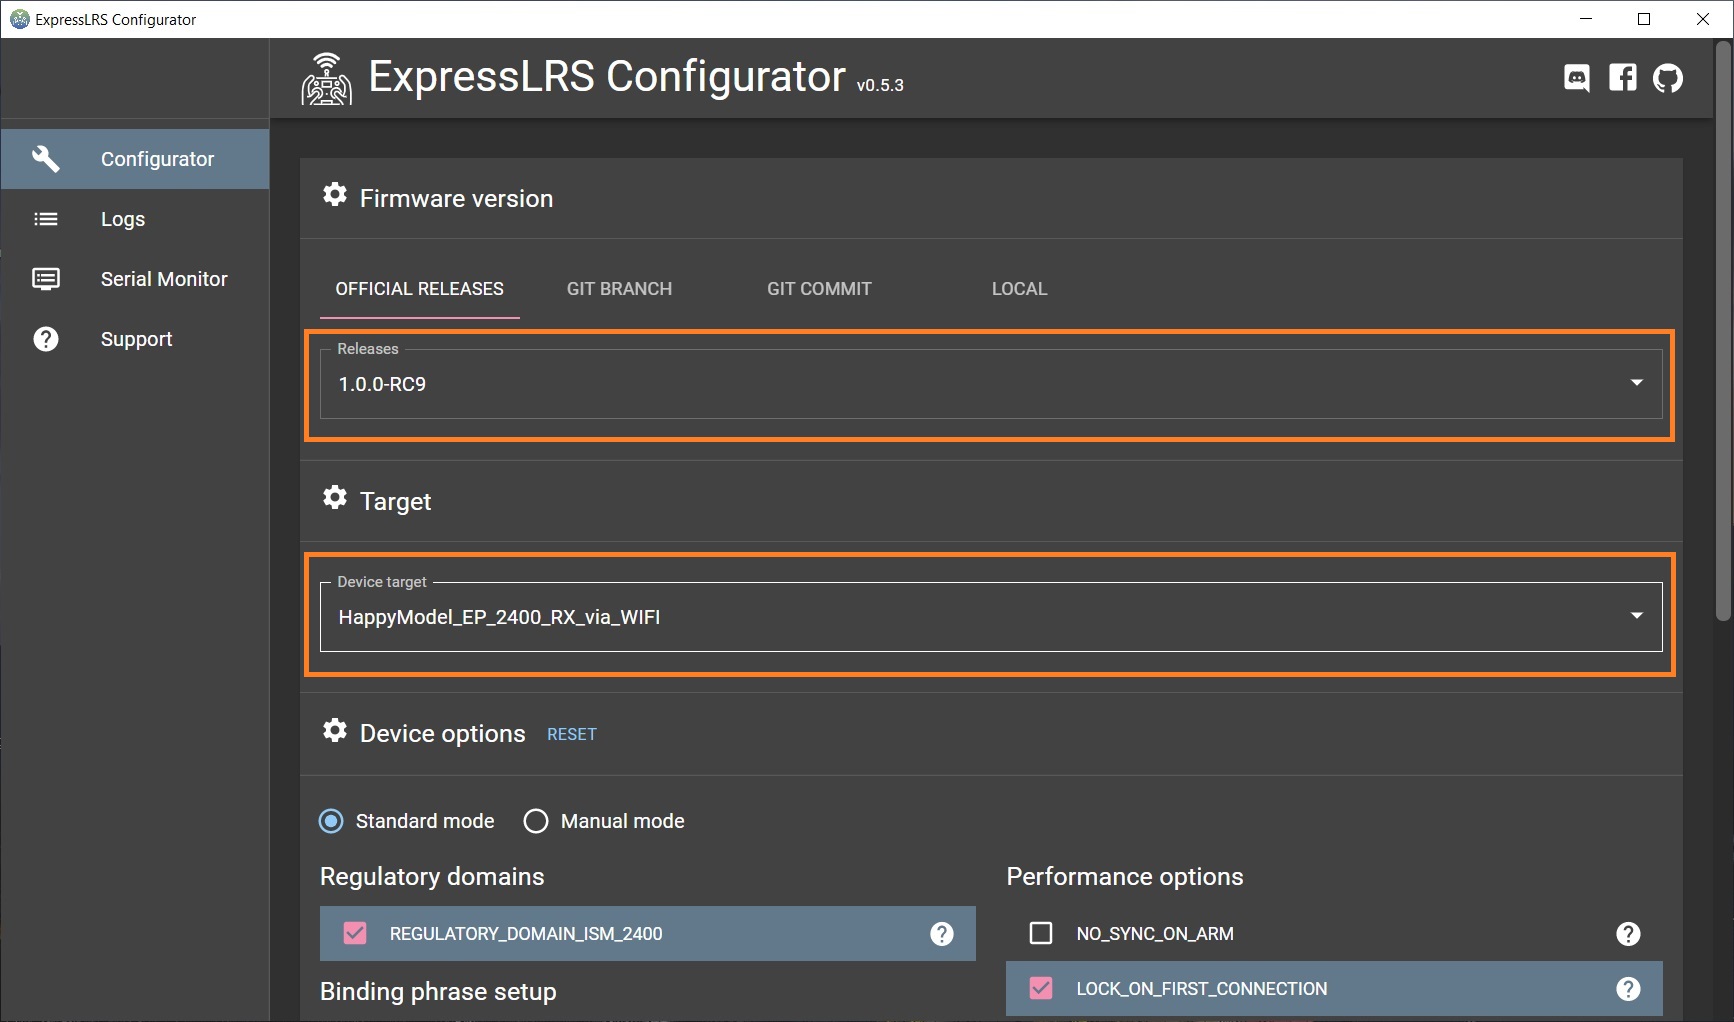
Start ExpressLRS Configurator and choose the firmware release. “RC-x” addon to release number means this is Release Candidate version. You should use RC versions if you really need to. If you are not sure, then choose the stable versions like “1.0.1” and up.
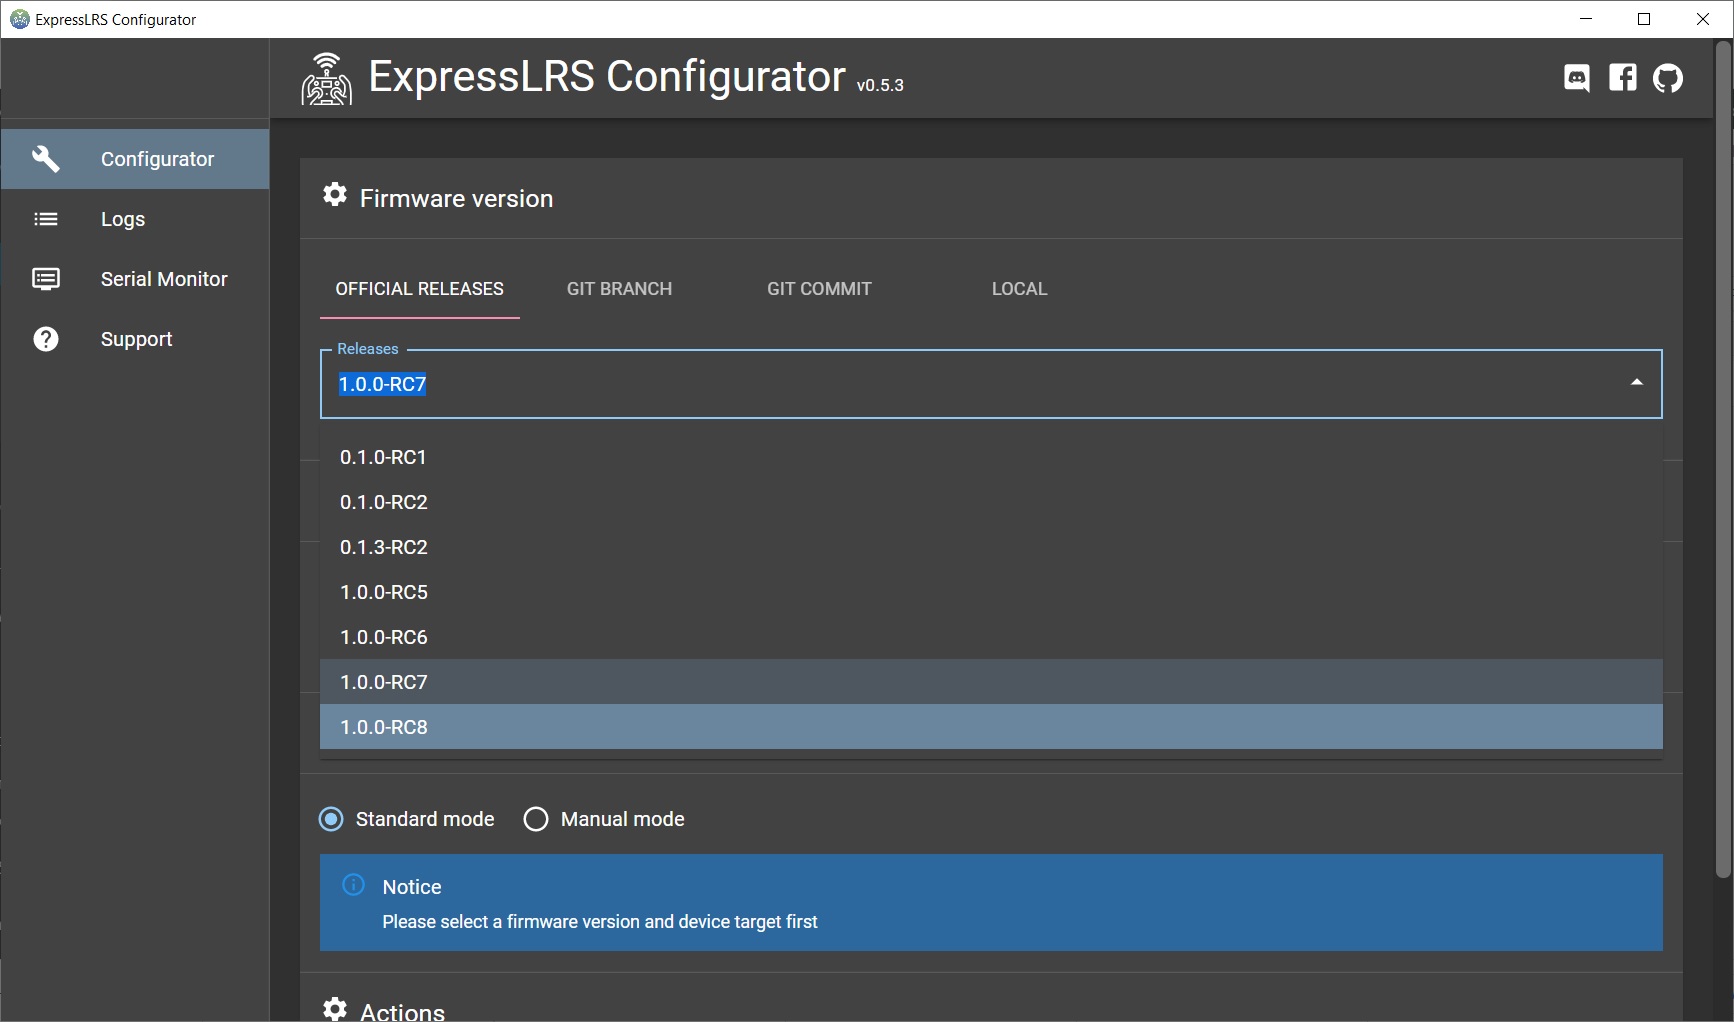
The following instructions are made for updating the Happymodel ES24TX radio transmitter modules and the EP1/EP2 receivers. Instructions are similar for the other ExpressLRS TX and RX modules on the market.
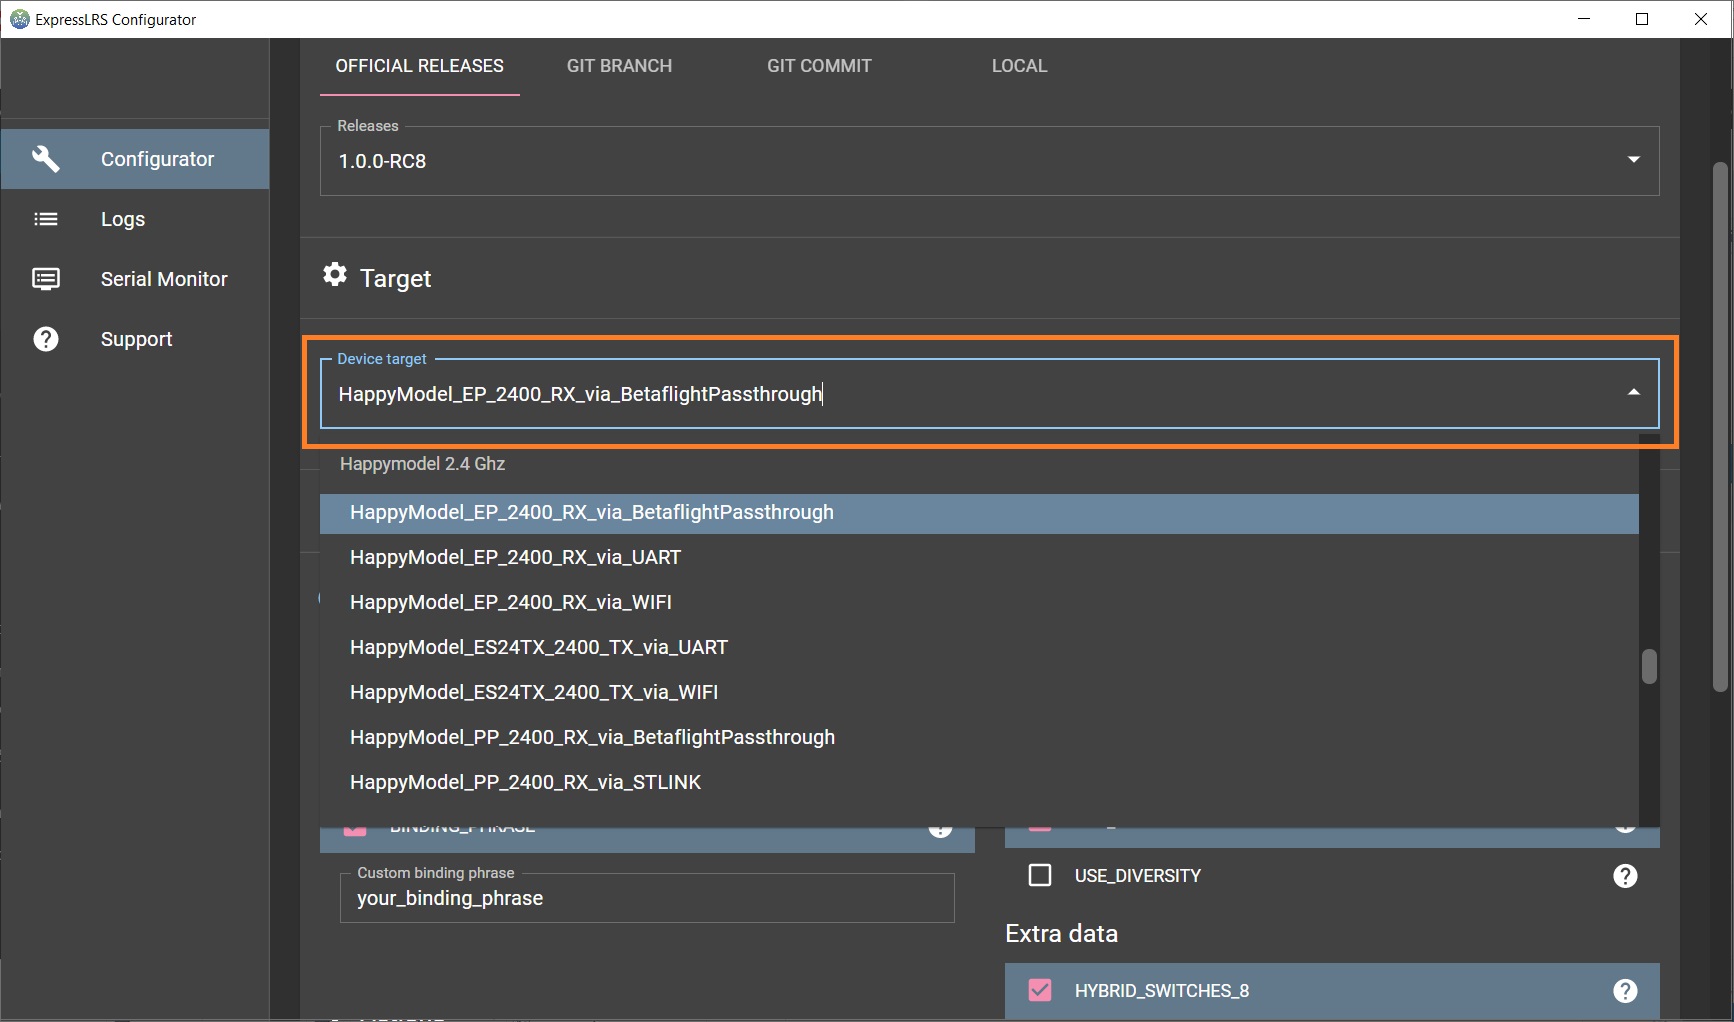
Compiling Transmitter module (TX) firmware
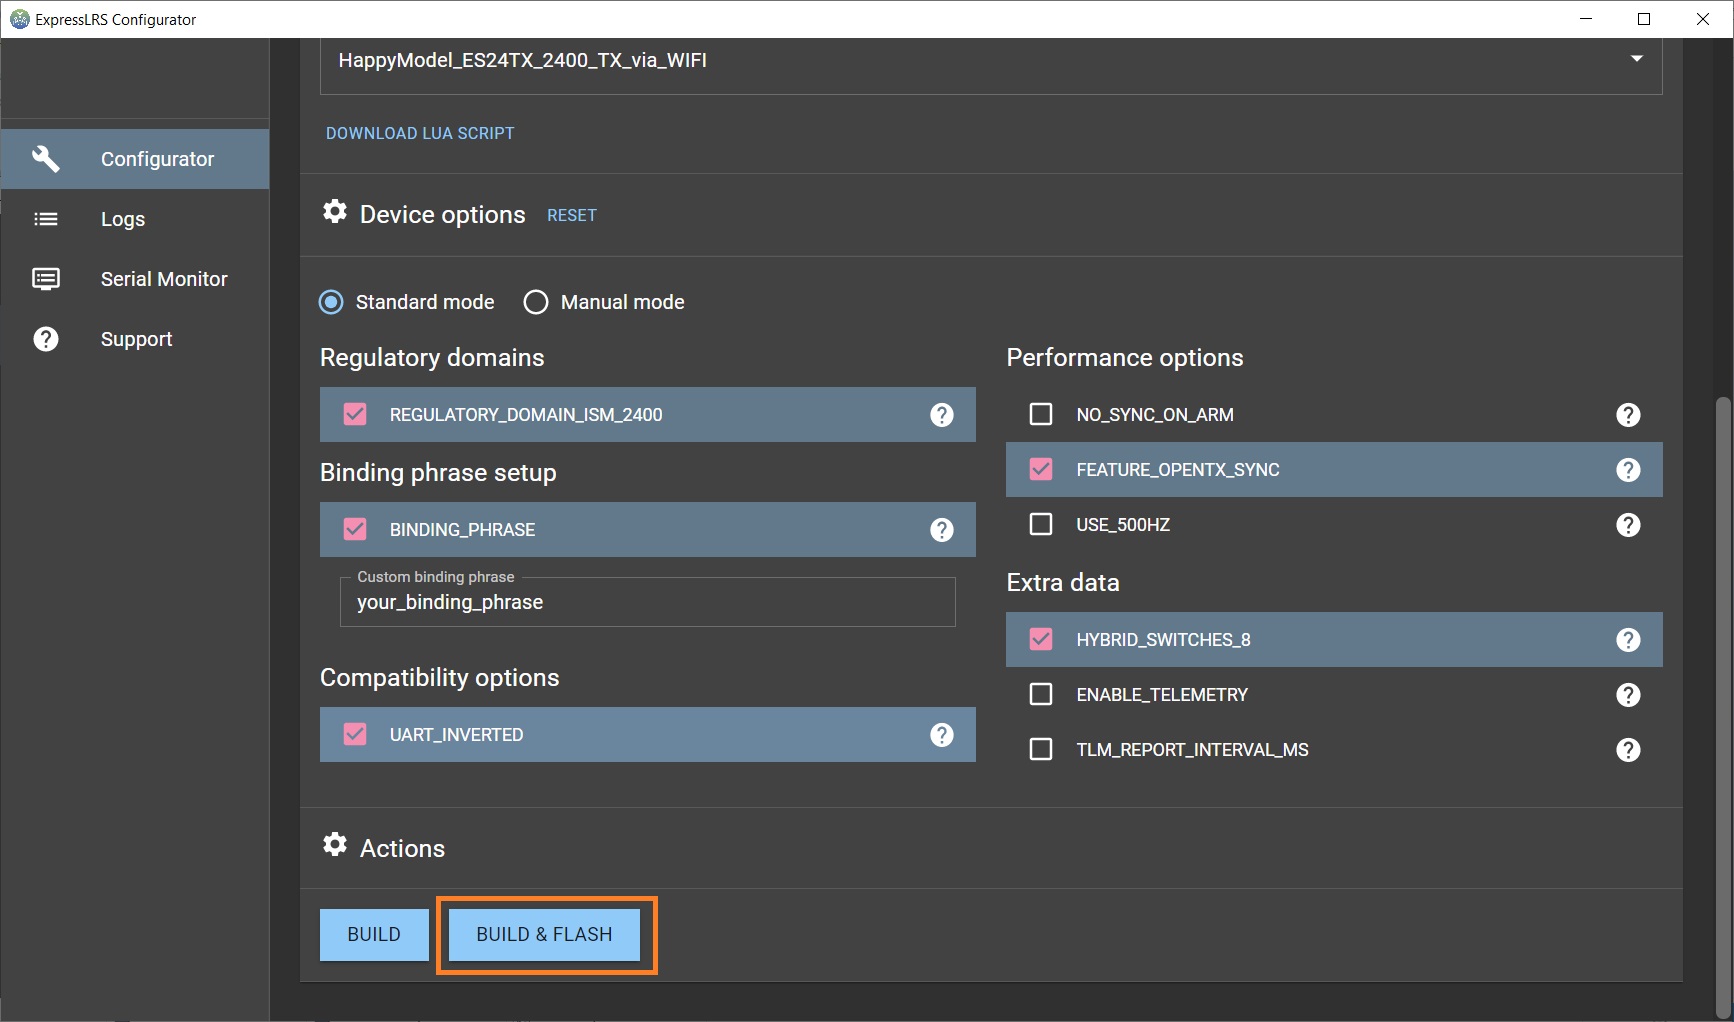
Select your hardware and update type you are building the firmware for. Usually firmware target name ending ( “_WiFi“, _UART“, _BetaflightPassthrough) mean the corresponding different methods of firmware update. You should choose the firmware option with the update method you are going to use UART, Wifi or BetaflightPassthrough.
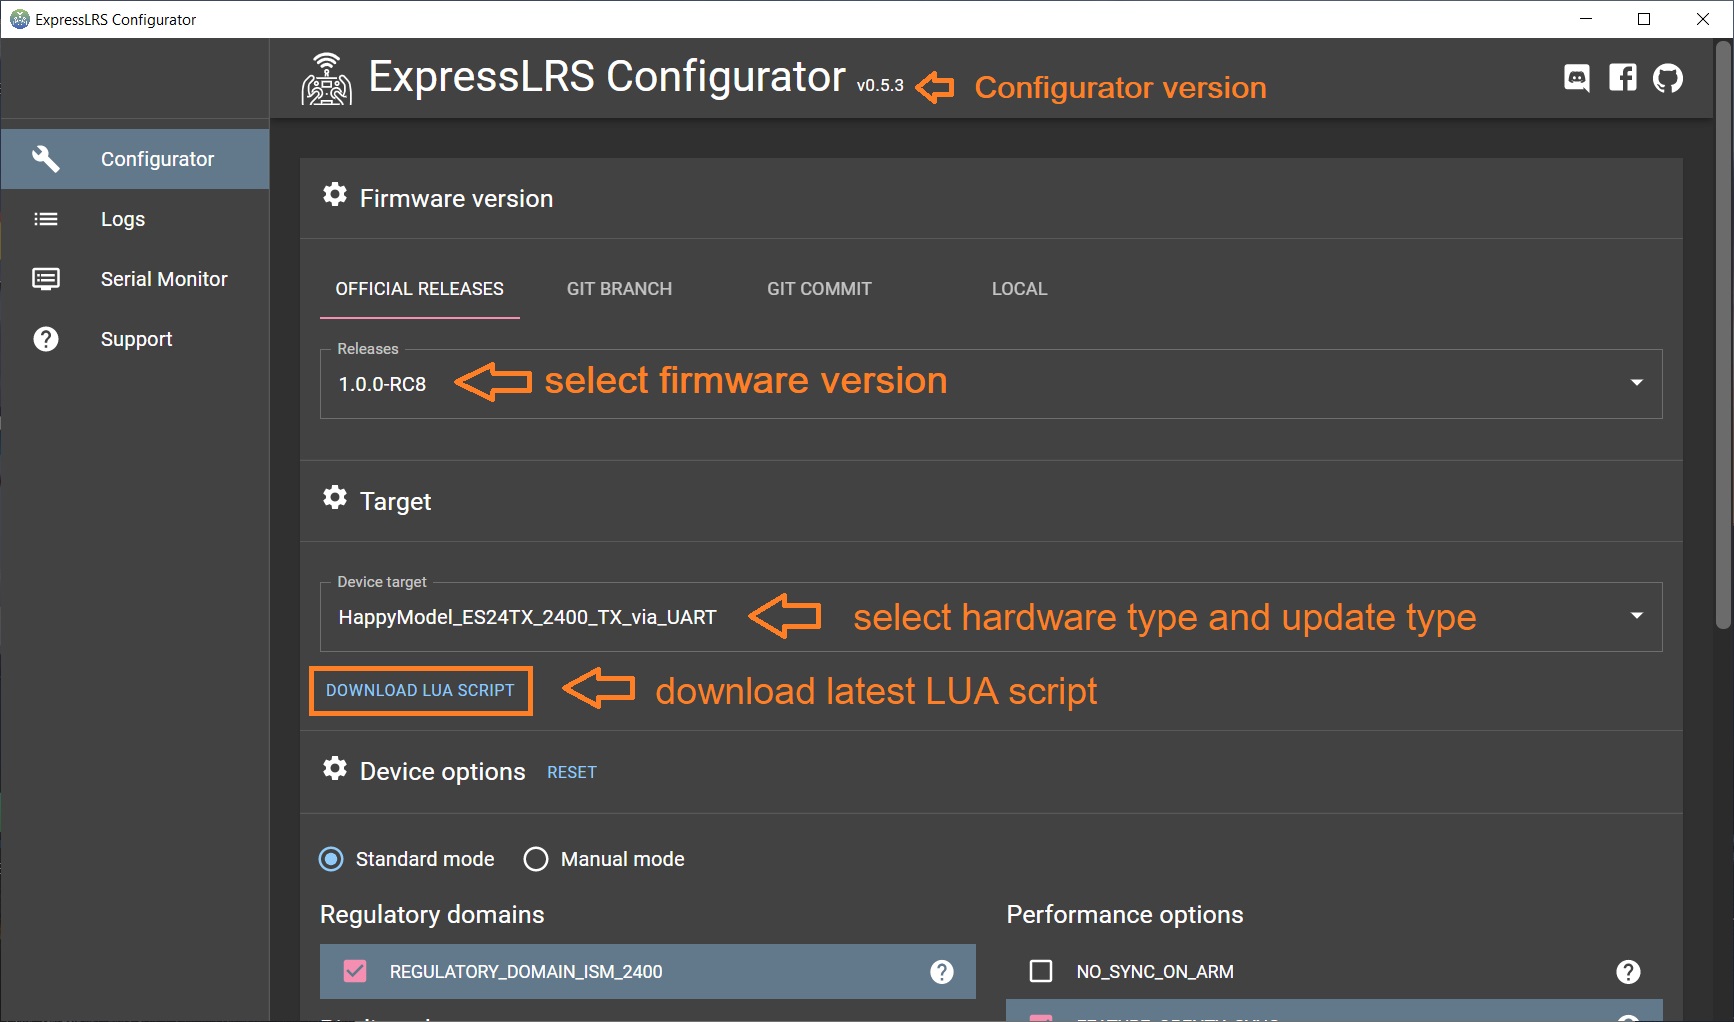
After the device is selected you will have to set the Device options specific to the selected hardware.

Device options
USE_500HZ – Enables the 500Hz update speed (this option is removed in the later versions)
HYBRID_SWITCHES_8 – Enables the use of the three-way and 6-way switches (by default the ExpressLRS transmits only two-way (On-Off) switches in the channel data).
ENABLE_TELEMETRY – Enables additional telemetry like Battery voltage, Current, GPS data, Flight mode (the basic telemetry like RSSI, Link Quality is transmitted always)
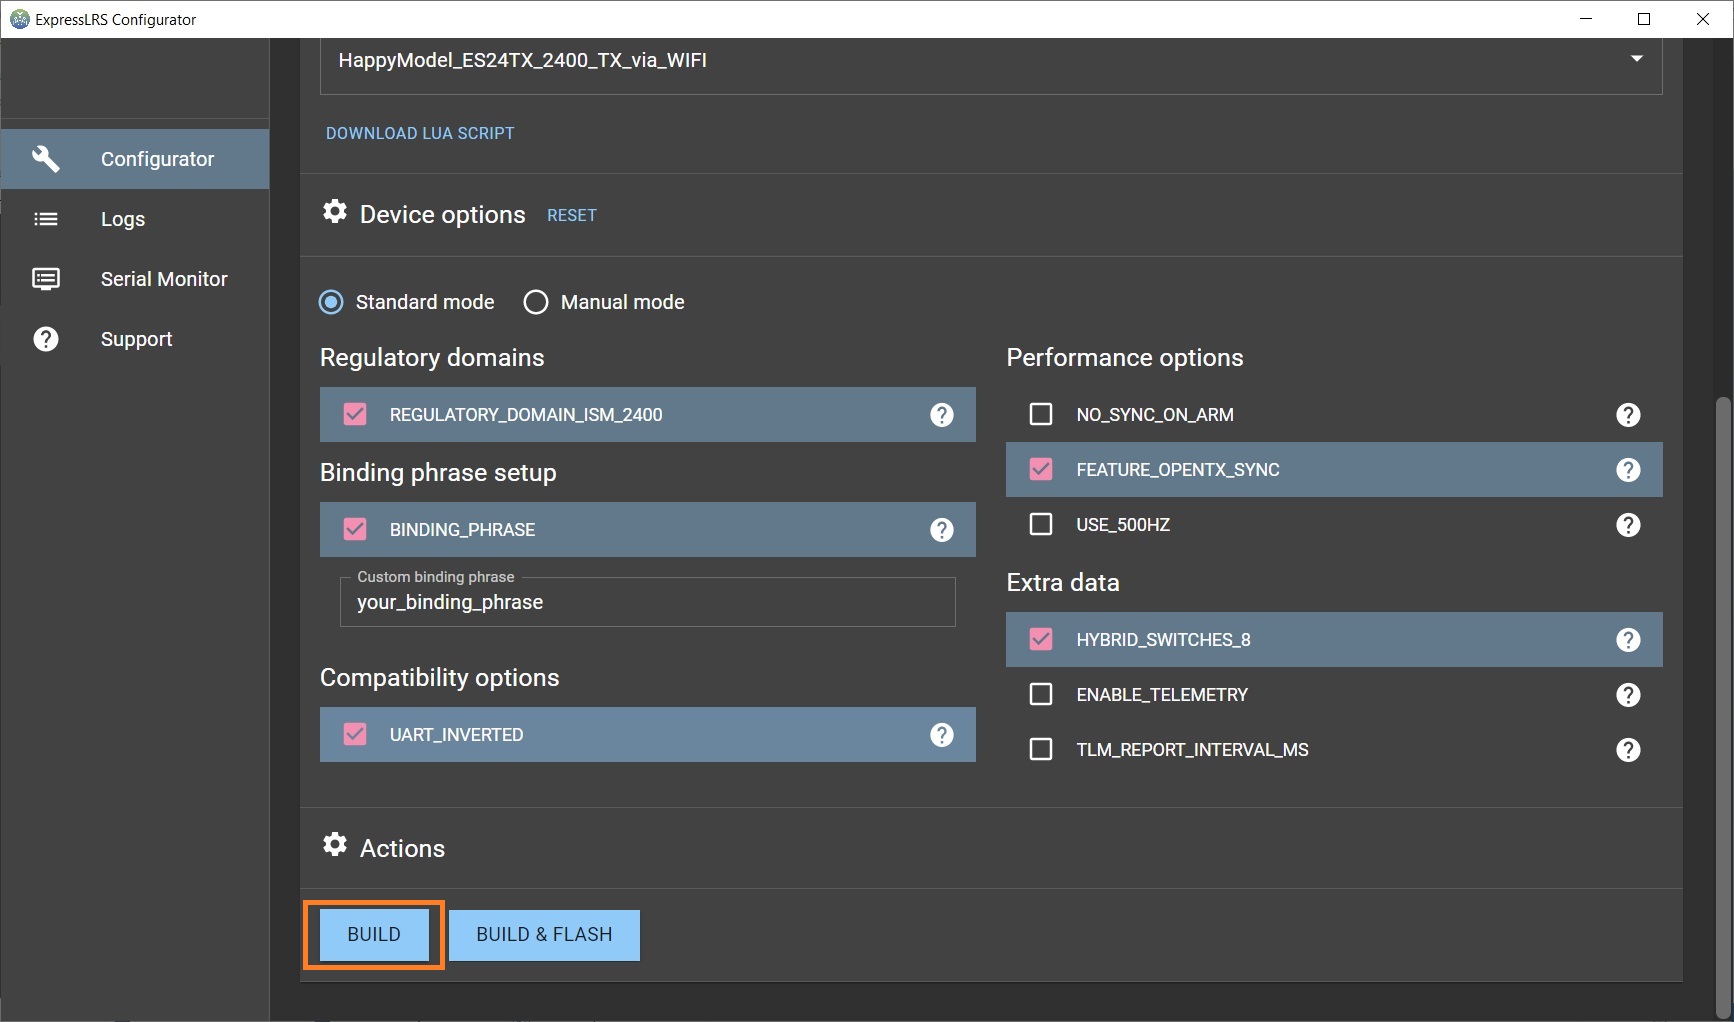
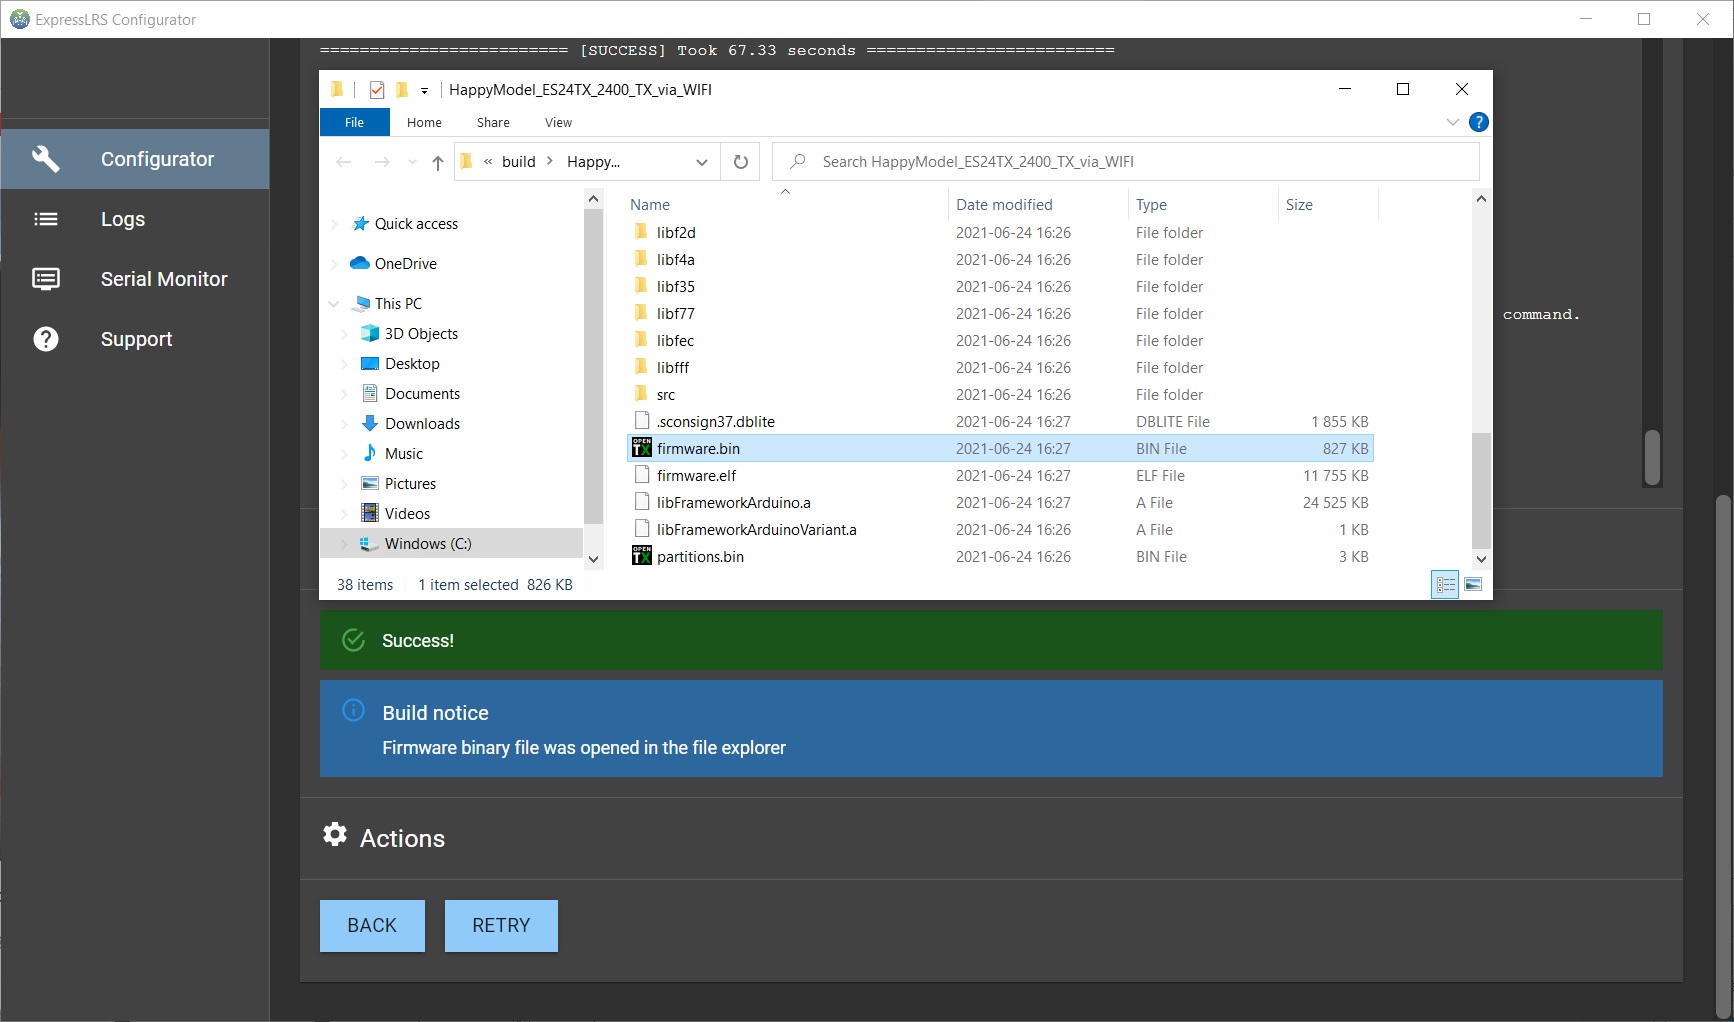
After everything is set up, press the BUILD button. Once compiling is finished, the Configurator will open the fomder with the compiled firmware.bin file.
Flashing/updating ExpressLRS TX via WiFi
Updating via WiFi is probably the most convenient way of firmware flashing/updating.
First you have to put the TX into WiFi update mode. Go to the ELRS Lua script on your transmitter by long pressing the
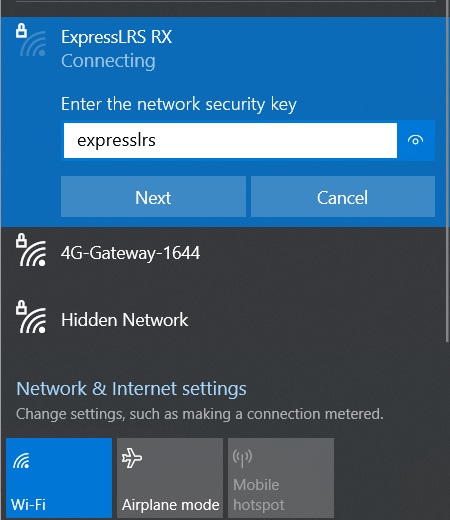
Then connect to the WiFi network called “ExpressLRS TX Module“. The WiFi network password is “expresslrs” Don’t get confused with the “ESP WiFiManager” WiFi network – this is the backpack ESP chip making its hotspot network and currently (as of firmware version 1.0) is not used. Read more about this backpack network below in the notes.

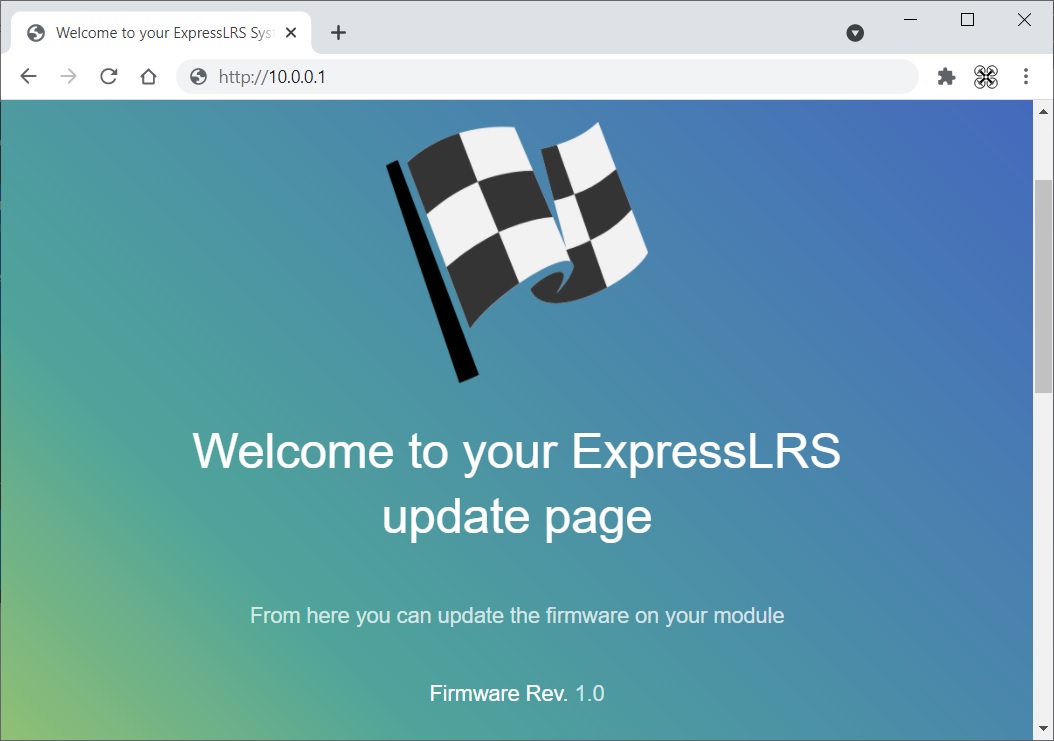
Once you have connected to the ExpressLRS TX Module WiFi network, start your internet browser and open this address: http://10.0.0.1
You’ll see the ExpressLRS WiFi update page welcome screen.
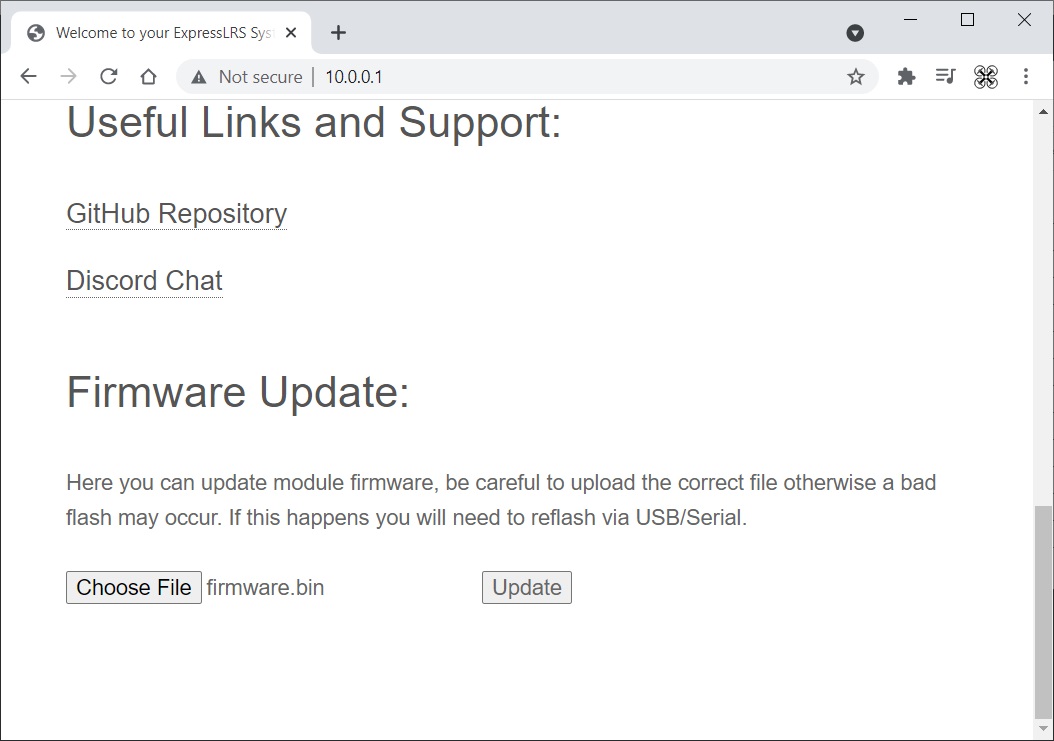
Scroll down the page, select the the compiled firmware file firmware.bin (read about preparing and compiling the firmware up in the article) by pressing the “Choose file” button. Hit the “Update” button to start the update process.
Wait until the webpage refreshes and the address changes to http://10.0.0.1/update. The page might look like that:
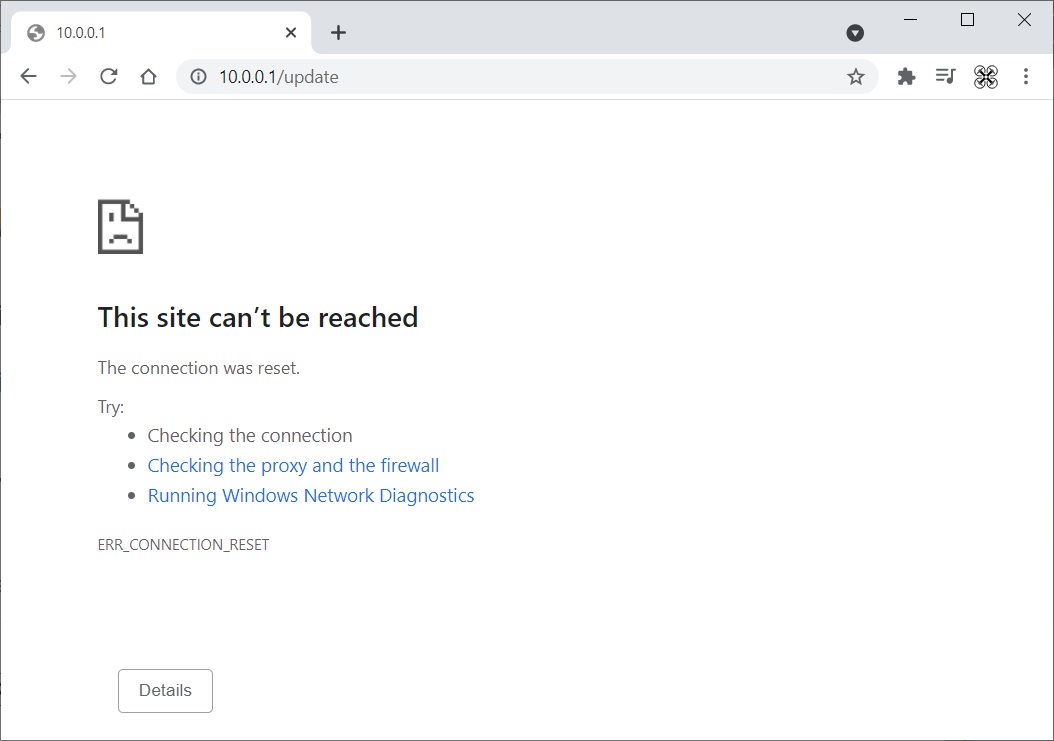
Important! Don’t hurry, wait at least another 10 seconds for the update to finalize.
Flashing /updating ExpressLRS TX via UART
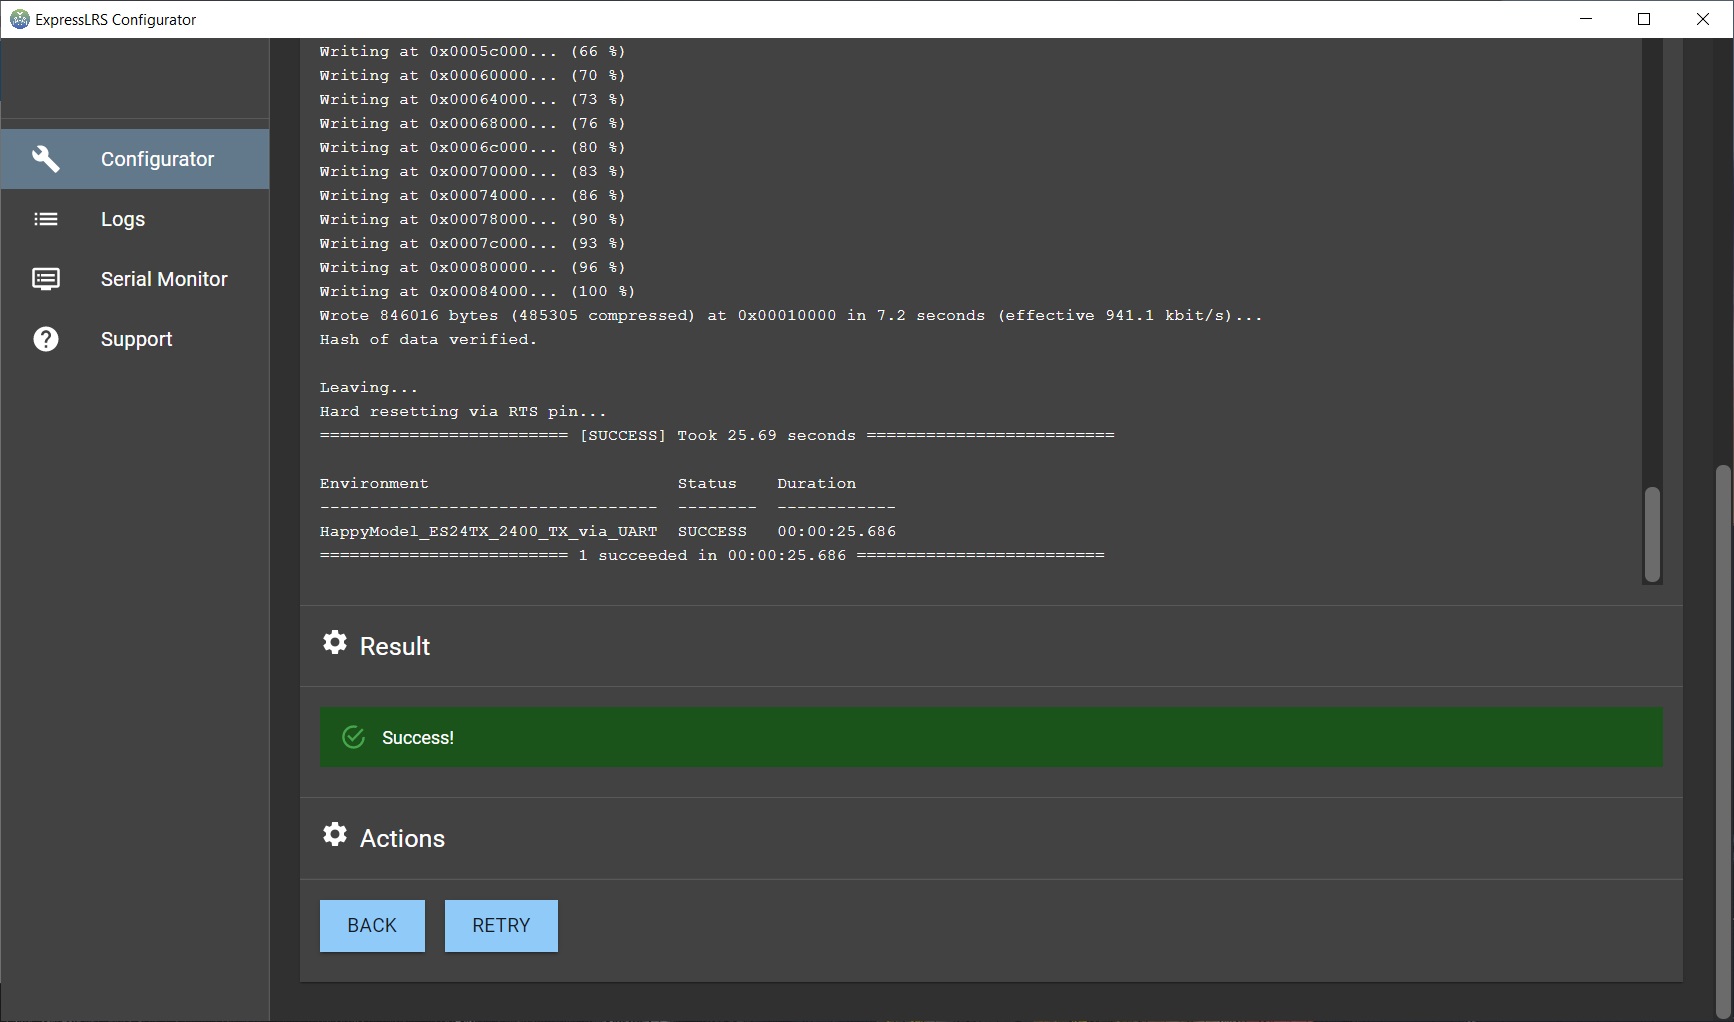
If you have select the firmware target version with “_via_UART“, then you can press the [BUILD & FLASH] button to build and flash the ExpressLRS module in one step. Your transmitter module should be connected to the PC via USB cable before this step.
ExpressLRS configurator will compile first, then automatically will detect the serial port where the ExpressLRS TX module is connected and will try to flash the compiled firmware into it.
If building and flashing is successful then you should see following result.
If the ExpressLRS Configurator fails to detect the TX module then you’ll see this kind of error.
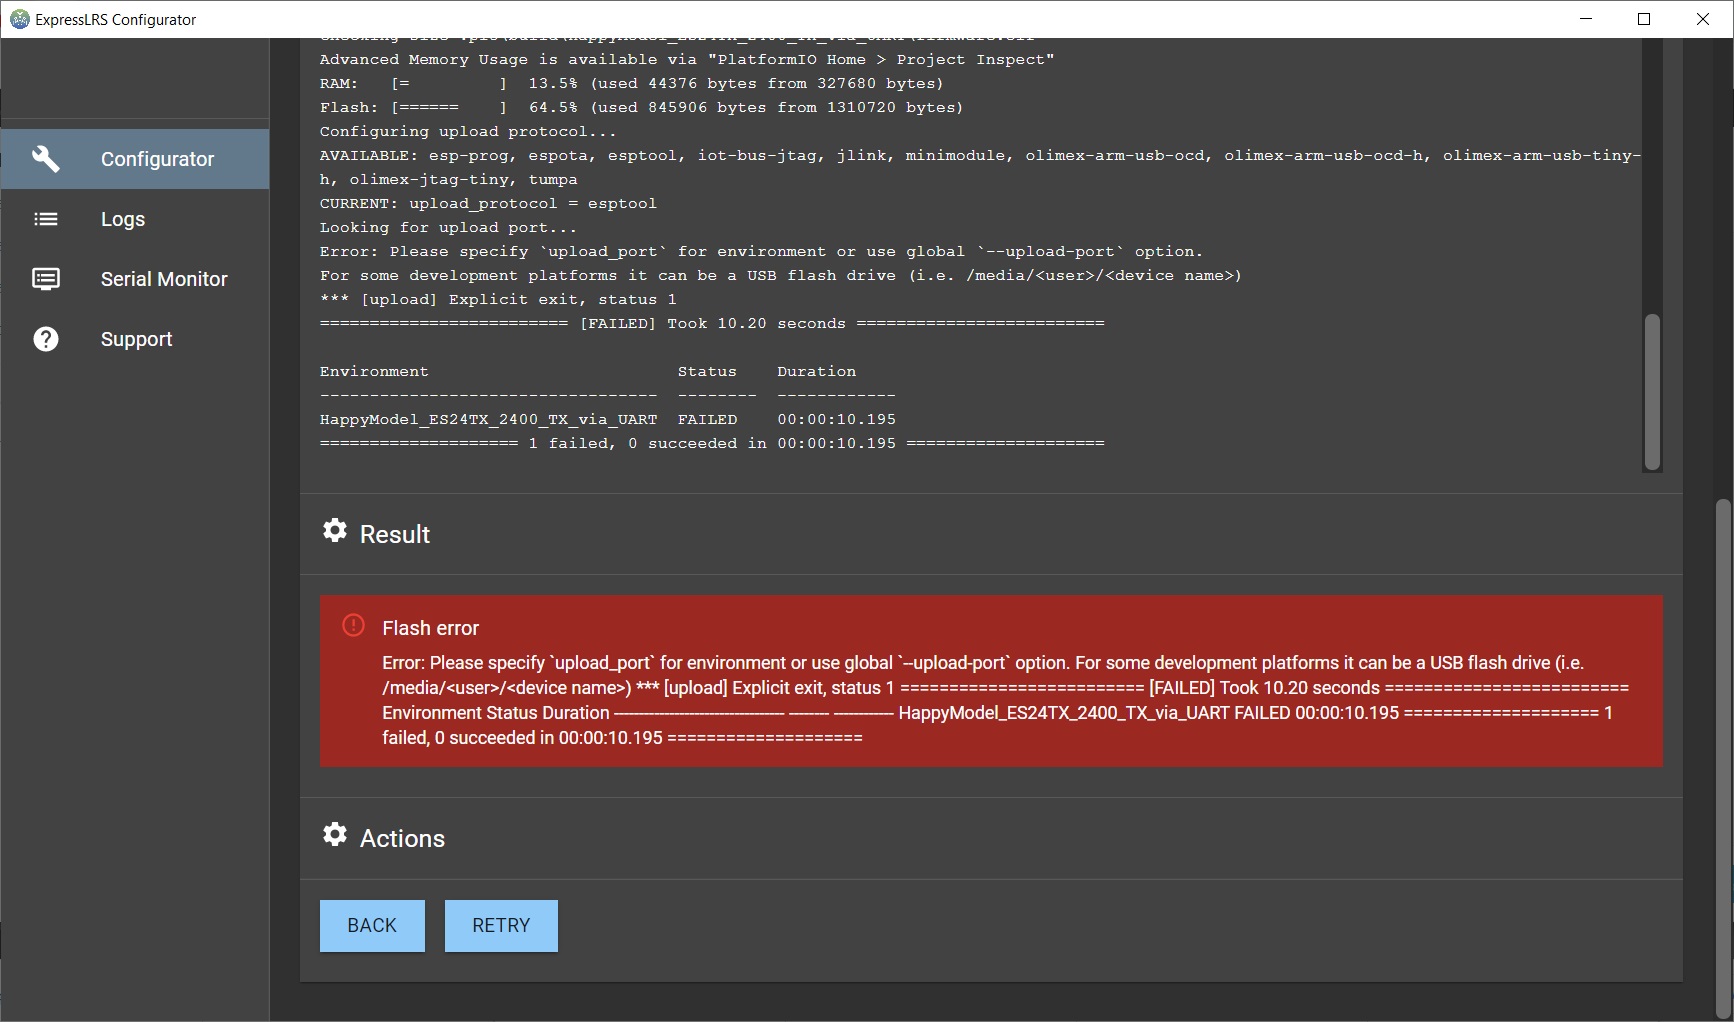
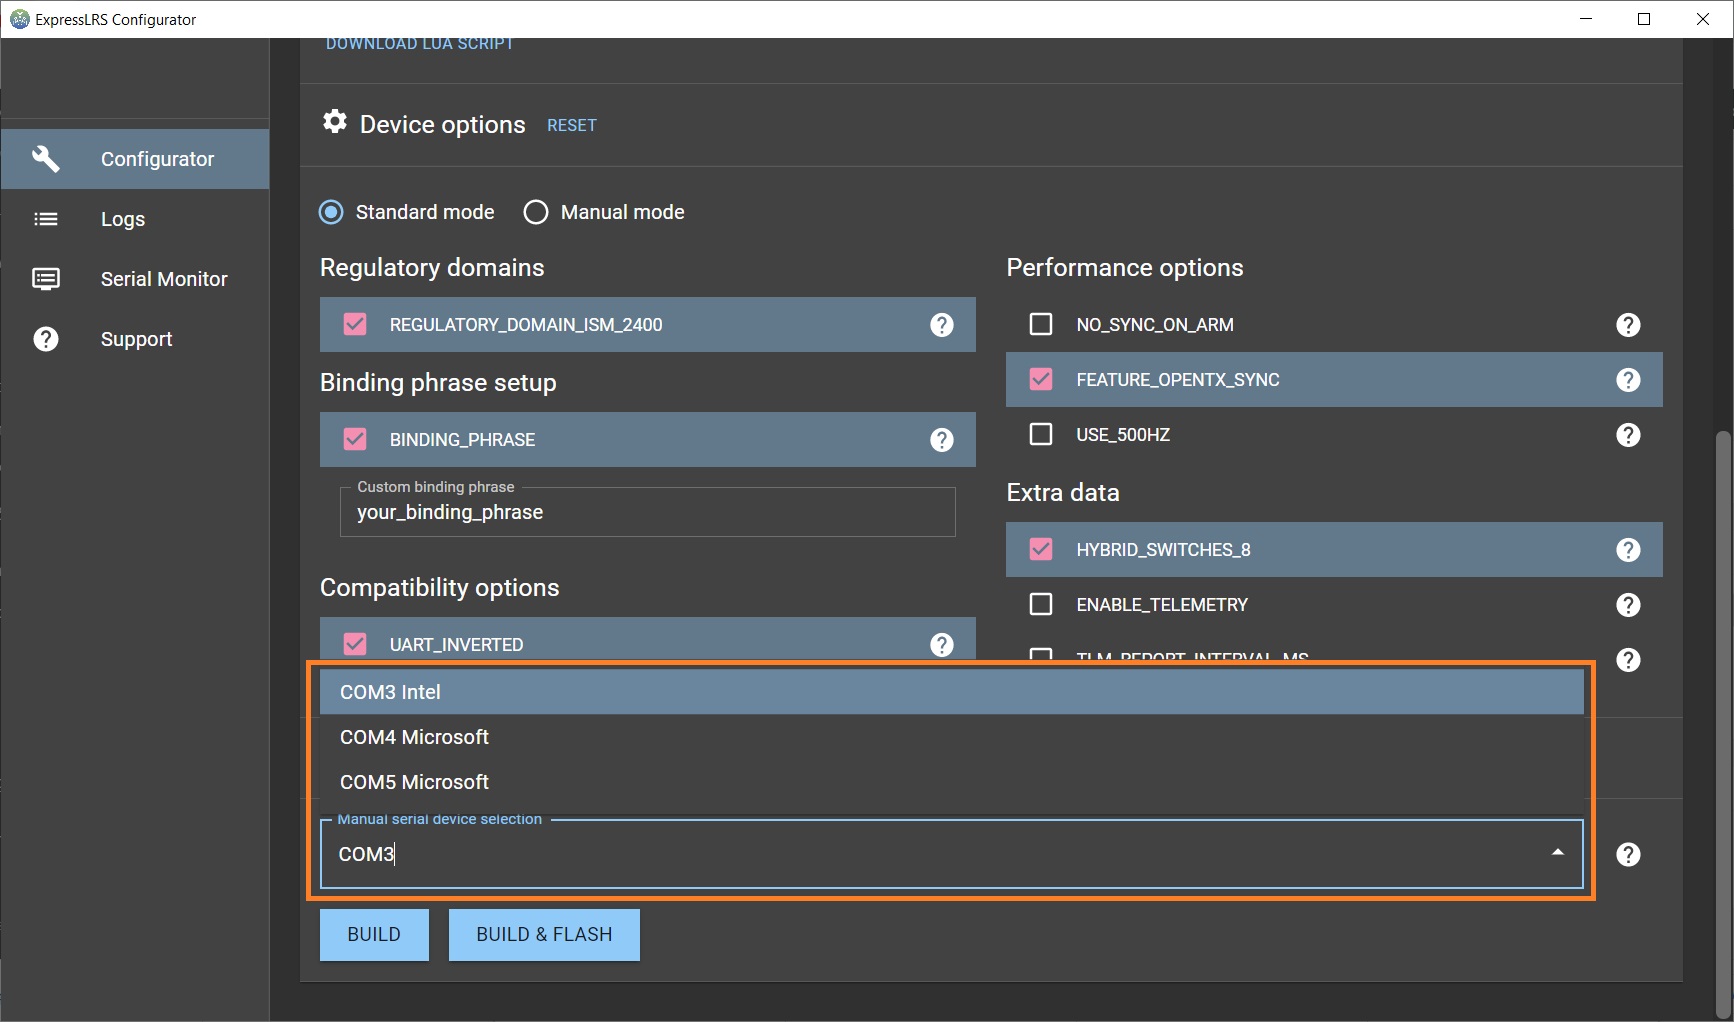
In this case you will have to select the serial port of your manually.
Compiling receiver (RX) firmware
Select your receiver hardware and update type you are building the firmware for. Usually firmware target name ending ( “_WiFi“, _UART“, _BetaflightPassthrough) mean the corresponding different methods of firmware update.
After the device is selected you will have to set the Device options specific to the selected hardware.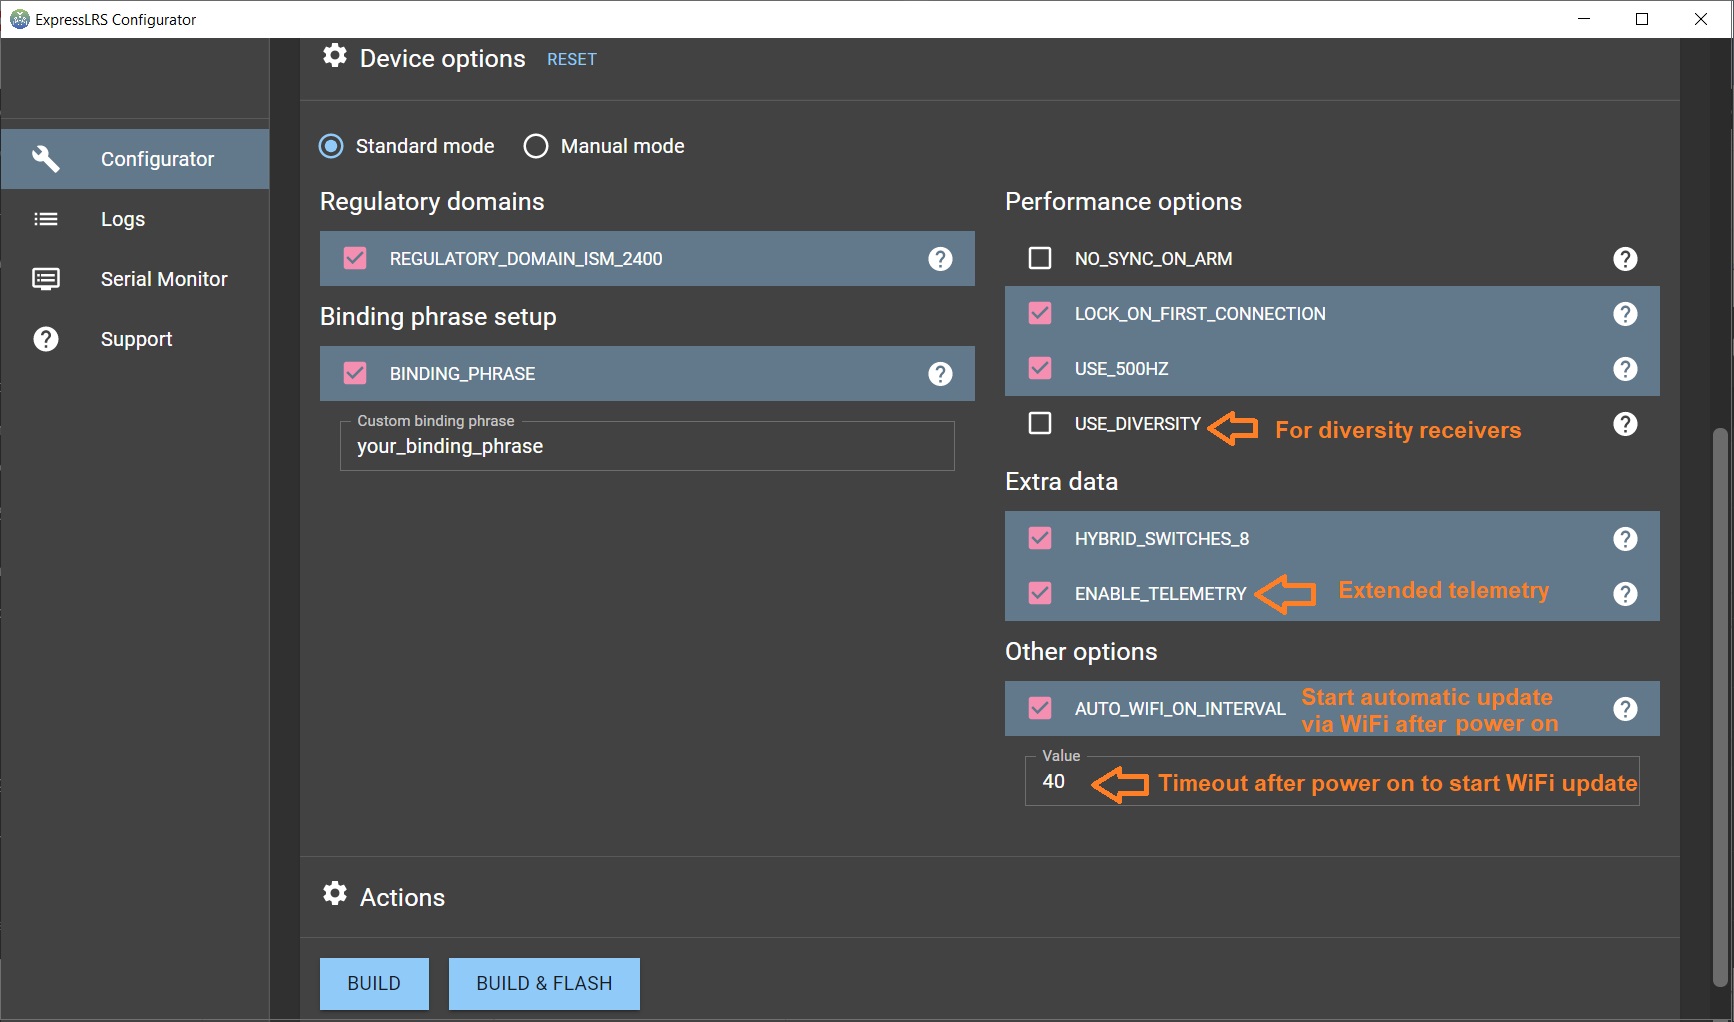
Device options
USE_500HZ – Enables the 500Hz update speed (this option is removed in the later versions)
HYBRID_SWITCHES_8 – Enables the use of the three-way and 6-way switches (by default the ExpressLRS transmits only two-way (On-Off) switches in the channel data).
ENABLE_TELEMETRY – Enables additional telemetry like Battery voltage, Current, GPS data, Flight mode (the basic telemetry like RSSI, Link Quality is transmitted always)
AUTO_WIFI_ON_INTERVAL – Enables automatic start of WiFi update on the startup. Timeout value can be customized (by default it is 40 seconds).
Flashing/updating ExpressLRS RX via WiFi
Updating the ExpressLRS receiver via WiFi is definitely the most convenient way of firmware flashing/updating.
First you have to put the RX into WiFi update mode. For this you need to power on the receiver without your radio. Receiver will enter into atomatic WiFi upade mode after the AUTO_WIFI_ON_INTERVAL timout
Then connect to the WiFi network called “ExpressLRS RX Module“. The WiFi network password is “expresslrs“.
Once you have connected to the ExpressLRS RX Module WiFi network, start your internet browser and open this address: http://10.0.0.1
You’ll see the ExpressLRS WiFi update page welcome screen.
Scroll down the page, select the the compiled firmware file firmware.bin (read about preparing and compiling the firmware up in the article) by pressing the “Choose file” button. Hit the “Update” button to start the update process.
Wait until the webpage refreshes and the address changes to http://10.0.0.1/update. The page might look like that:

Important! Don’t hurry, wait at least another 10 seconds for the update to finalize.
Flashing /updating ExpressLRS RX via Betaflight Passthrought
If you have select the firmware target version with “_via_BetaflightPassthrought“, then you can press the [BUILD & FLASH] button to build and flash the ExpressLRS receiver in one step. Your receiver should be connected to the flight controller and your flight controller should be connected to the PC via USB cable before this step.
ExpressLRS configurator will compile first, then automatically will detect the serial port where your flight controller is connected, will try set the controller into the Betaflight Passthrough mode and flash the compiled firmware into it.
If building and flashing is successful then you should see following result.
Problems while flashing/updating ExpressLRS
“Not Enough Space”
You might get the “Not Enough Space” error while updating your ELRS receiver to 3.x version. This happens because the new firmware gets bigger and now the developers
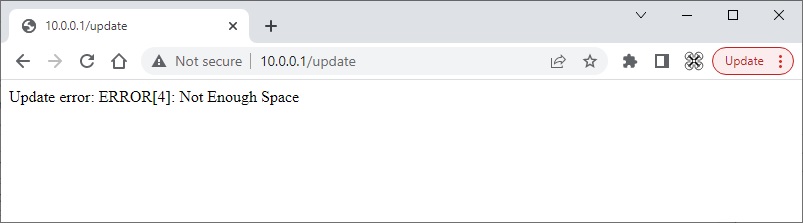
One possible solution using WiFi update method is to to flash the version 2.5.1 of ExpressLRS firmware first and only then the 3.x version to your receiver
Second possible solution is to flash the version 3.x firmware with Betaflight SerialPassthrough or by using FTDI UART adapter.
“Target mismatch” while updating to version 3.1
The “Target mismatch” error message when updating to 3.1.x version happens because the new ELRS firmware is slightly larger with all the new features added and is now bigger than the free space in the flash. Luckily the ESP8285 MCU, used in the most of the receivers, allows uploading a gzipped firmware, so the developers will use this feature of flashing compressed firmware from the version 3.2 to solve this issue.
Update via WiFi stores the new firmware in the left-over space and on reboot it is installed (updated) in the device’s main flash memory.
Update via UART/Betaflight Passthrough overwrites the old firmware directly.
Binding ExpressLRS
ExpressLRS receivers can be bound in two ways – automatically when using the same bind phrase or in conventional way by putting both TX and RX into binding mode.
ExpressLRS receiver automatically binds to the transmitter module if both TX and RX modules have the firmware with the same bind phrase. You can set your custom binding phrase in the ExpressLRS Configurator.
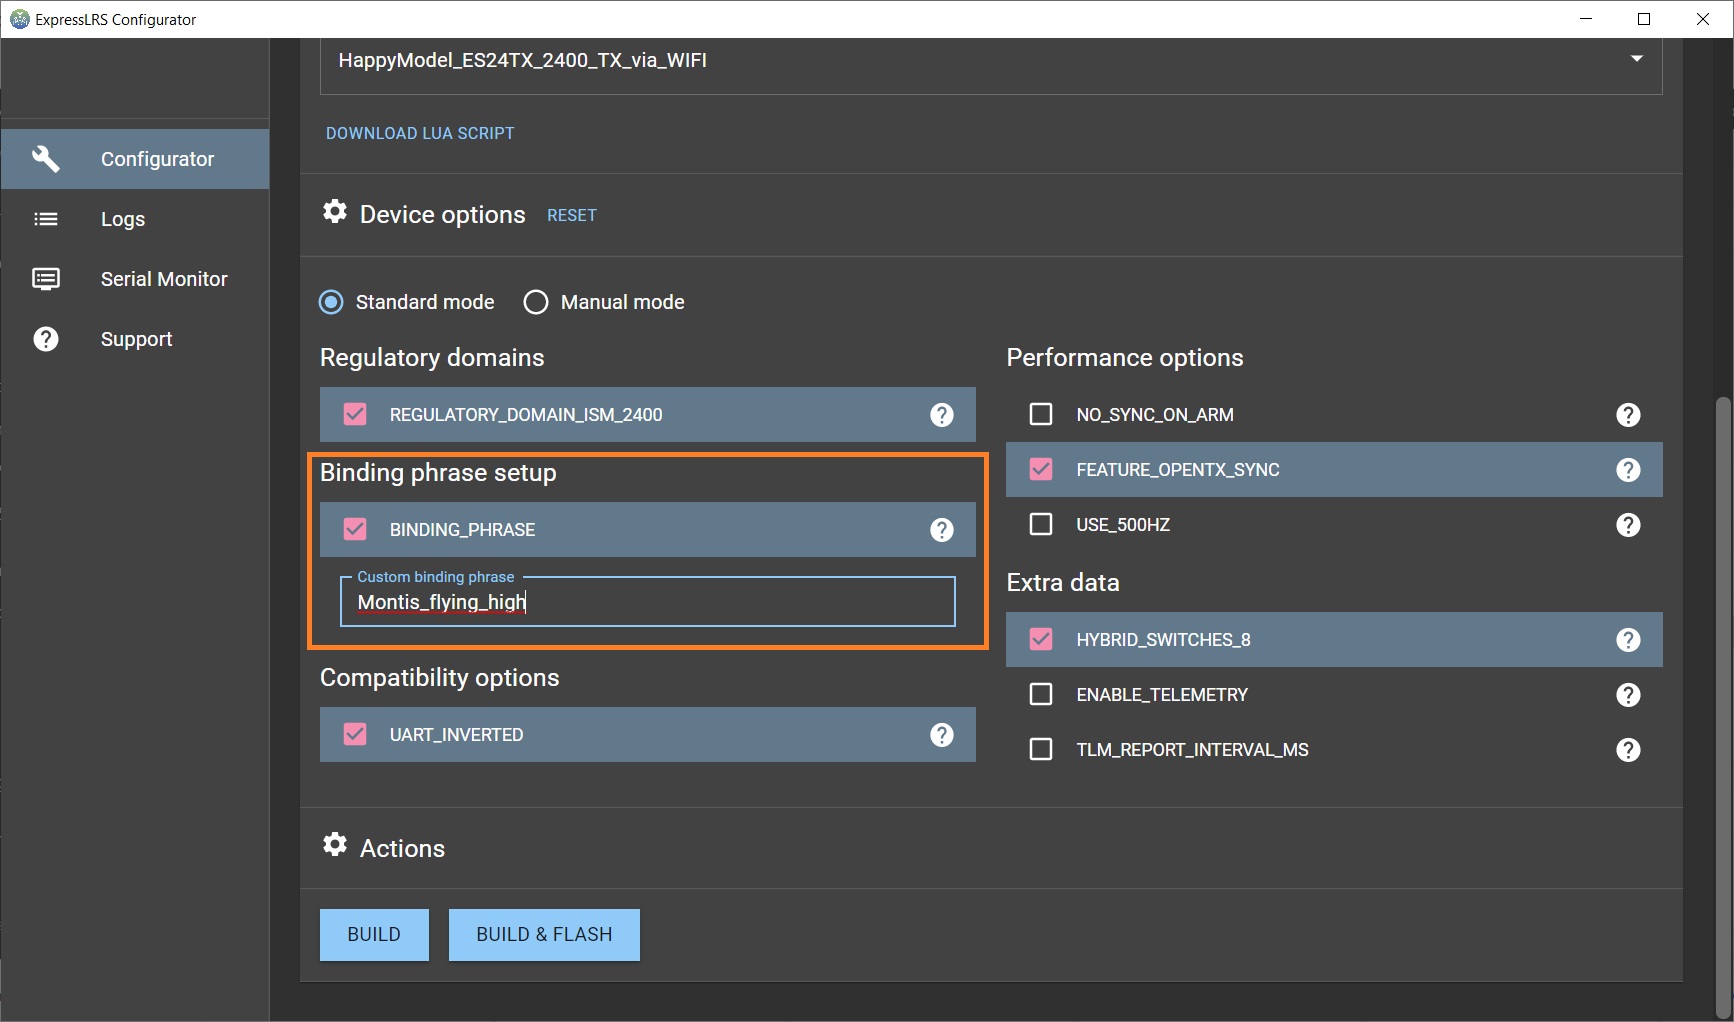
You need to compile and update the firmware for both TX and RX with the same binding phrase. In this case you wouldn’t need to use the bind option on the the ELRS Lua script, the TX and RX should auto-bind.
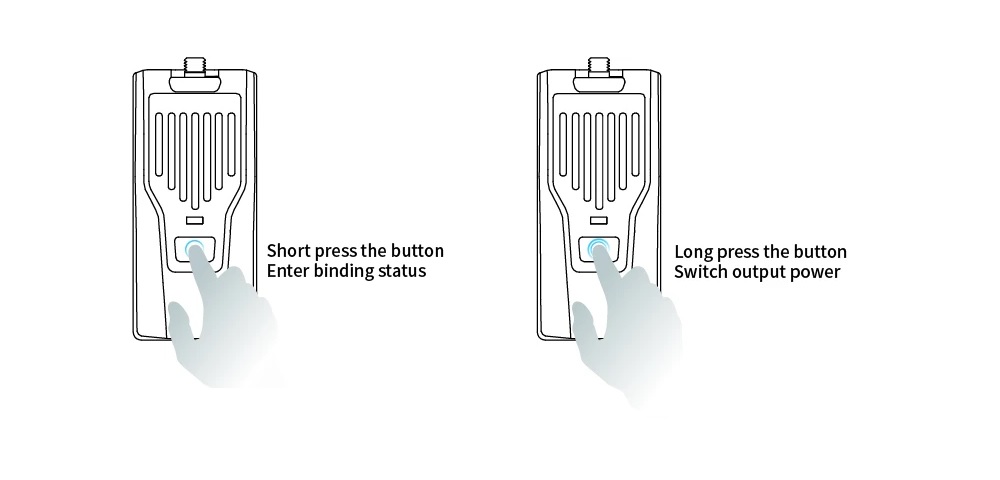
Alternatively you can bind any ExpressLRS receiver to any ExpressLRS transmitter by setting both to bind mode. In order to set receiver into bind mode you have to power on and off cycle the receiver 3 times and it will enter into bind mode. Transmitter module can be set into the bind mode by selecting [Bind] option in the ERLS Lua script.
Some ExpressLRS transmitter modules have Bind button on the module and you can enter the bind mode by pressing that button.
How to connect the ExpressLRS receiver to Flight Controller
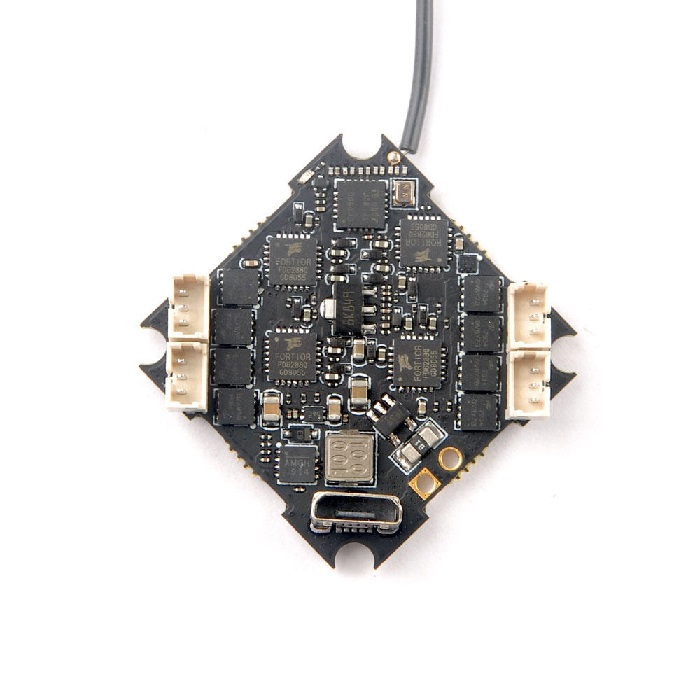
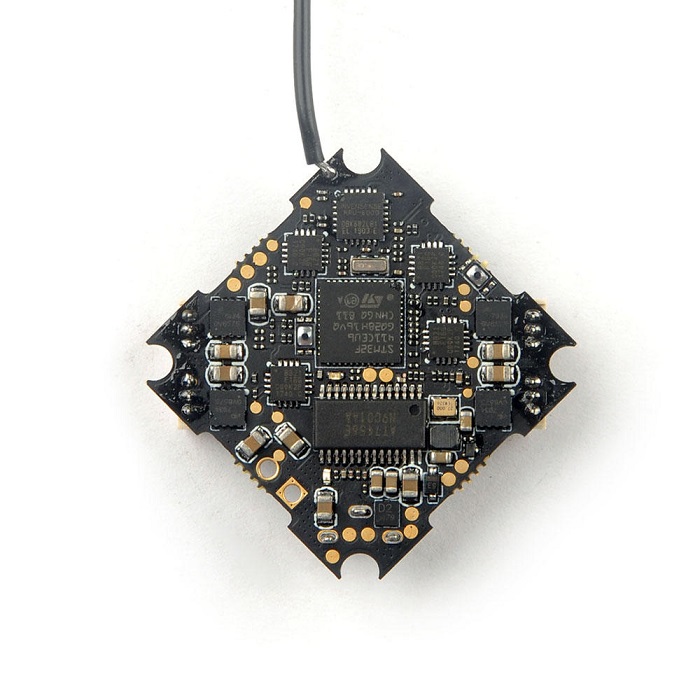
ExpressLRS receivers use CRSF protocol to communicate with the flight controller. So the ExpressLRS receivers should be connected the same way as TBS Crossfire receivers. Any Crossfire receiver connection diagram is also valid for the ExpressLRS receiver. Moreover the ExpressLRS receivers have the same pinout as TBS Crossfire Nano receivers so they can be direct mounted (soldered) on the FC board or adapter boards as the TBS Crossfire Nano RX.
The general rule is to connect the ExpressLRS receiver TX pad to the Flight controller RX pad and RX pad to the TX pad. Also GND to GND and usually the ExpressLRS receivers are powered from 5V.

How to setup the ExpressLRS receiver in Betaflight
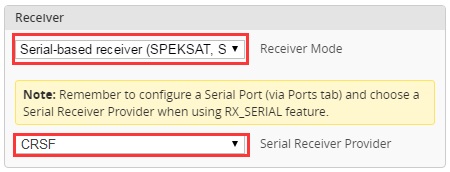
Open Betaflight Configurator, select the “Serial based receiver” and “CRSF” as protocol in Configuration tab.
Notes
Always turn the transmitter first…
Always turn transmitter first then switch to your ExpressLRS model on the radio, only then power up the quad otherwise you’ll probably get your ExpressLRS into the WiFi update mode, especially if Wifi Interval is set to 20s as default setting is (in the latest versions it was changed to 40s).
You can keep the your radio on between changing to different quads. You can also increase the WiFi interval to 40s or more in case you want to power the quad first and have a plenty of the time to power the radio transmitter afterwards.
Why does using AUX1 for ARM is so important?
When the option HYBRID_SWITCHES_8 is switched on, then only the AUX1 channel is sent with every packet. . Other channels (AUX2–AUX8) are sent one channel per one packet and can take up to 7 packets for the channel value to be sent to the receiver. Using the AUX1 for arm ensures the disarm command to be sent to the model as quickly as possible. AUX1 is simply the lowest latency AUX channel in ExpressLRS.
Note: if you don’t use HYBRID_SWITCHES_8 , then you can use any channel for ARM/DISARM as all the channel AUX1-AUX8 values are sent with every packet. All the channels are only the 2-pos (ON-OFF).
Why does the ES24TX have a wifi AP, is there any way to turn it off?
Happymodel ES24TX module has backpack ESP32 chip on the board. HappyModel should not have put any firmware on it before shipping, as there is no special firmware for it (at least for the FW version 1.0)
There is no way to turn it off easily, but you can wipe it with esptool. Actually the influence of the additional WiFi network created by ESP backpack is not significant, so no need to worry about it.
“CRSFShot” or “Sync Pulses”?
CRSFShot is what ExpressLRS uses to be fast. CRSFShot reduces the latency up to 25% and also reduces the variable latency by 95%.
Actually you may find CRSFShot called differently, mostly depending on “who you talk to or which “release notes” you read”. OpenTX calles it “Sync Pulses” and it is supported from the OpenTX version 2.3.12. CRSFShot is also known as “Mixersync”.
Does ELRS support Betaflight lua script?
Enabling ENABLE_TELEMETRY option in the ExpressLRS Configurator adds support for the Betaflight lua script.
Will my receiver work with the different manufacturers transmitter?
Any ExpressLRS receiver will work with any ExpressLRS transmitter. You just need to make sure they are on the same frequency range (900MHz or 2.4GHz) and have the same firmware version.
Why cant I set the the higher power output in Lua script?
If you set the higher power output than (500mW, 1W or 2W) and the script reverts it to the 250mW it means the transmitter module is not capable of the higher power levels.
How do I fix occasional “Telemetry lost” warnings?
If you get “Telemetry lost” warnings, while your dBm/Link quality is still good it means your telemetry rate is too low. Try increasing it until “Telemetry lost” warnings disappear.
Receiver gets very hot while not connected to the radio
If the receiver does not connect to the radio and the AUTO_WIFI_ON_INTERVAL is set on then the receiver enters into WiFi mode and starts to heat up. It is recommended to power the receiver AFTER the radio is powered on even if you are starting it on the bench. In this case the receiver starts in normal mode and stays in it until power cycled again.
Receiver sometimes does not start properly – solid LED
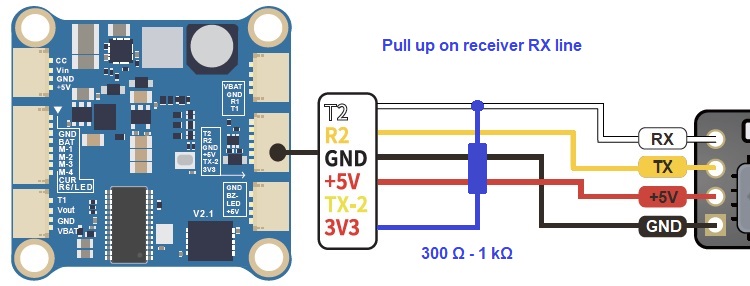
If you have to plug in the battery several times for the receiver to start properly and you get solid led light on the receiver it might be that flight controller pulls receivers RX line to the ground while powering on. Receiver then enters the bootloader mode and does not start. This issue is present on some flight controllers and can be fixed by adding the 1kOm pullup resistor from RX line on receiver (TX pin on the FC) to the 3.3V on the FC.
On some flight controllers this issue is present only on some of the UARTs, so its recommended to try another UART if you experience this issue.
List of FC’s that are known to have this issue: GEPRC GEP-F4-35A-AIO, GEP-20A-F4, GEP-12A-F4, iFlight Succex-D AIO f4, Mamba F405, …
Receiver sometimes does not start properly – dimmed LED
It seems that some Happymodel EP1 and EP2 have issue of not booting and getting extremely hot, even overheating. The symptoms are – receiver lights solid LED for a moment upon startup and then LED stays in the dimmed state. Receiver gets locked up, consumes a lot of current and heats up. Cause is unknown, there is a presumption that voltage regulator is the culprit. In the most cases the voltage regulator has markings SDG on the chip.
Parts of the the article are used from: ExpressLRS GitHub, Discord and etc.
-
 ESC Firmware Guide
In this concise overview, we’ll explore the evolution of ESC (Electronic Speed Controller) firmware,
ESC Firmware Guide
In this concise overview, we’ll explore the evolution of ESC (Electronic Speed Controller) firmware, -
 List of brushless whoop/toothpick flight controllers
This is the list of brushless tiny whoop/toothpick style flight controllers with brief description
List of brushless whoop/toothpick flight controllers
This is the list of brushless tiny whoop/toothpick style flight controllers with brief description
Thanks a lot, as always an excellent guide !!
Thank you very much for your comment! Guide is not perfect, a lot is missing and it took way more time than I thought to write it.
Nice guide. Oner question, I have the Happymodel ES900RX with 868 MHz. I have set everything like you wrote. But if I put the RX module in WIFI Update mode I can’t find the wifi on my MacBook or iPhone. Could ik be that the 868MHz can’t setup a wifi network in the 2,4 GHz band? And if so, is there still an option for flashing with a SD card? Because new ExpressConfigurator does not make SD-card update scripts.
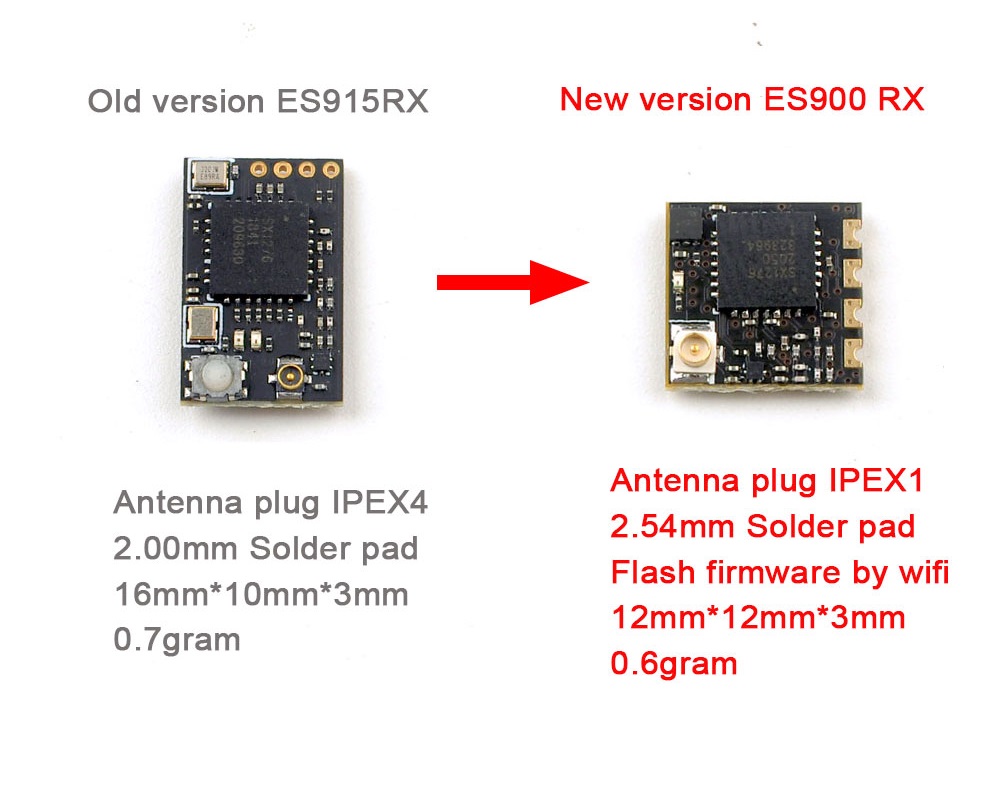
Hi, are you sure you have got the ES900RX and not the older ES915RX? ES915RX didn’t have the WiFi update possibility, but ES900RX has. Bot versions 2.4GHz and 900MHz have WiFi. RX has ESP32 chip (ESP8285), which does have WiFi connectivity.
If you fail to make WiFi update, then you can try to connect the receiver to the FC and try Serial Passthrough method.
I am sure I bought the ES900RX :-). After some settings hassle I got it flashed with the USB cable.
I just got it working. I flashed the ES900RX with the USB cable. And after it got flashed with the new version 1.2.0 the wifi update also works.
In the case of the Iflight SucceX f405 v2.1, i had to change the uart to 4 (or 6) to solve the solid light problem
Changing the UART ports is a good solution. Thanks for sharing your experience.