Review: Eachine ATX03S VTX
Introduction
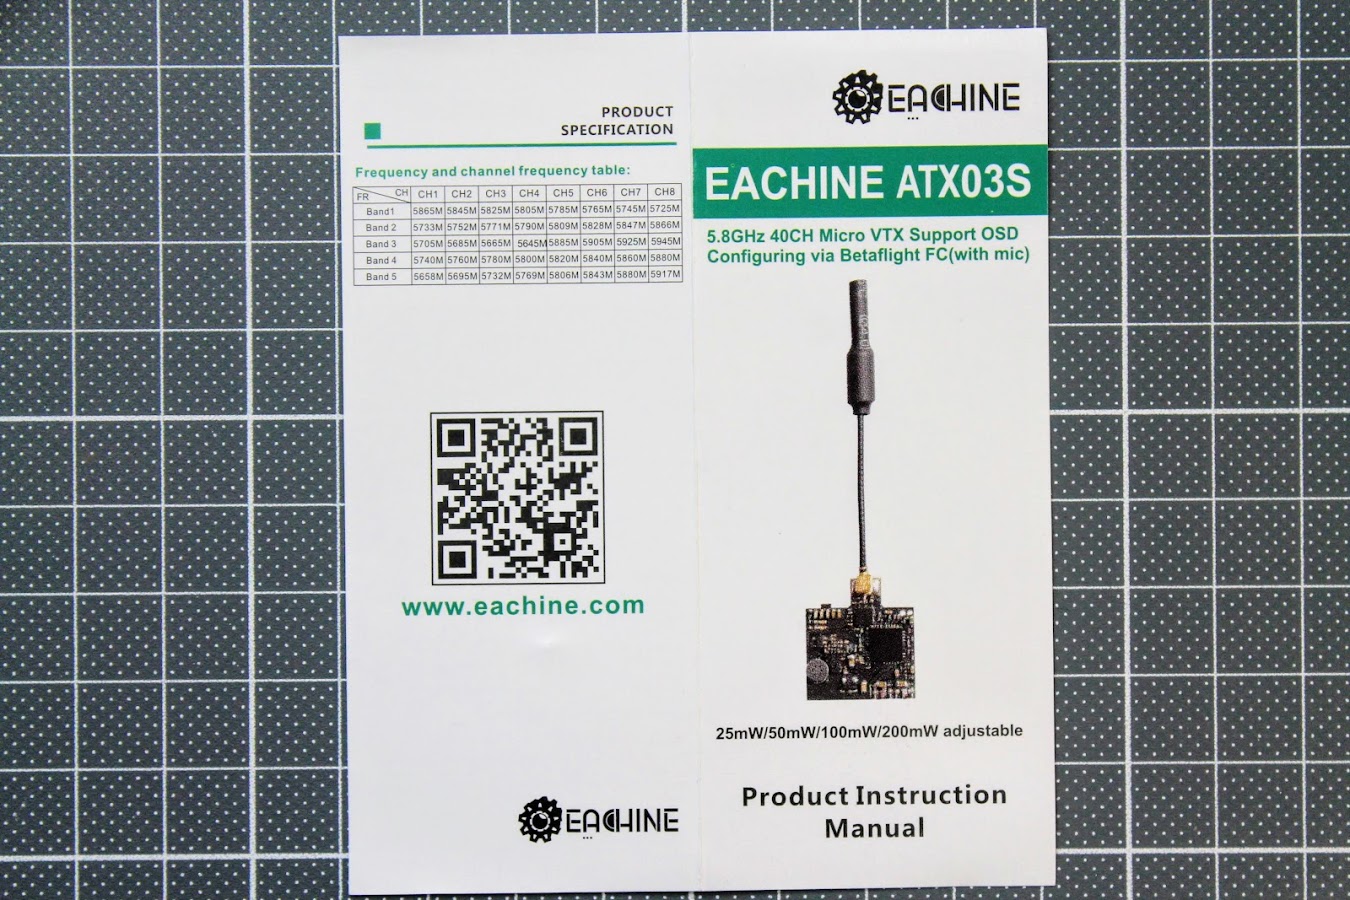
Eachine has a large range of micro video transmitters. First one was VTX01, then VTX02 followed by VTX03. VTX01 has fixed output level at 25mW, VTX02 – fixed at 200mW while VTX03 has switchable power levels 0/25/50 and 200mW. Eachine has even released a version of VTX03 with audio-in feature for transmitting audio together with video feed – ATX03 (read ATX03 review here). These micro tramsmitters were lightweight, small, have decent performance and are reasonably priced, however they were lacking the feature that all modern video transmitters should have – remote control via Smart Audio. Eachine then released VTX03S video transmitter with Smart Audio support but without any audio in or microphone feature. Finally the VTX that ticks all the boxes was released – Eachine ATX03S.
Eachine ATX03S
Specifications:
Item name: Eachine ATX03S Mini FPV Transmitter
Output power: 25mW/50mW/100mW/200mW adjustable
Input voltage: 3.3V-5V
5V camera supply, 245mA(MAX)—–25mW@4.2V (Typical)
5V camera supply, 310mA(MAX)—–50mW@4.2V (Typical)
5V camera supply, 390mA(MAX)—–100mW@4.2V (Typical)
5V camera supply, 517mA(MAX)—–200mW@4.2V(Typical)
Video format: NTSC/PAL
Antenna dimensions: 55mm X 2mm diameter
Antenna: IPEX
Frequency: 5 bands 40 channels
Size: 19x16mm(LW)
Weight: 2.9 g
Features:
* Support 0.01mw Parameter-adjusting Mode.
* 25mW, 50mW, 100mW and 200mW power switchable.
* One button frequency and power setup.
* OSD configuration using smart audio.
* Onboard mic.
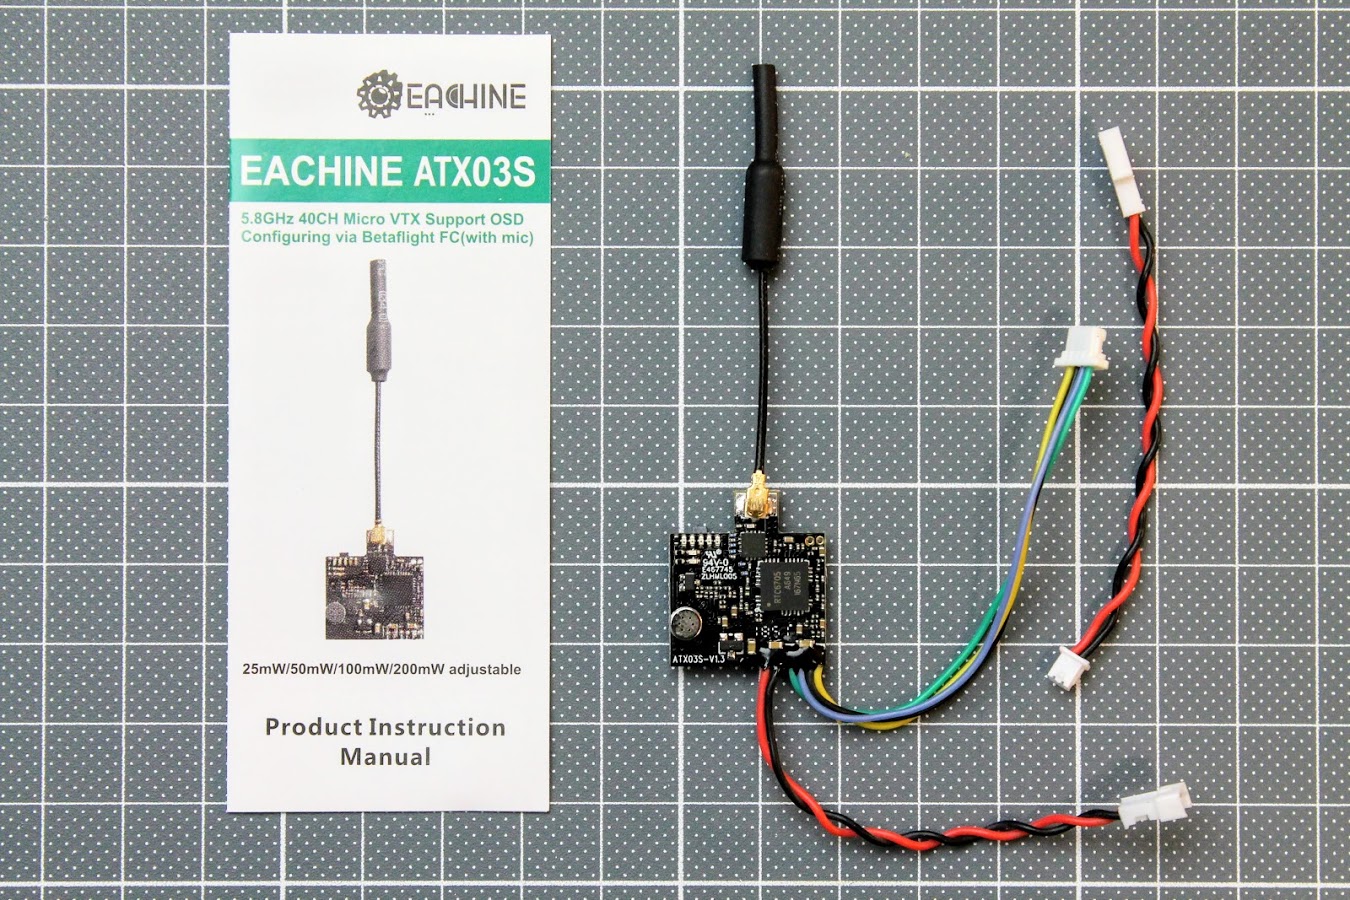
Inside the box there is only the ATX03S itself and the instructions leaflet.
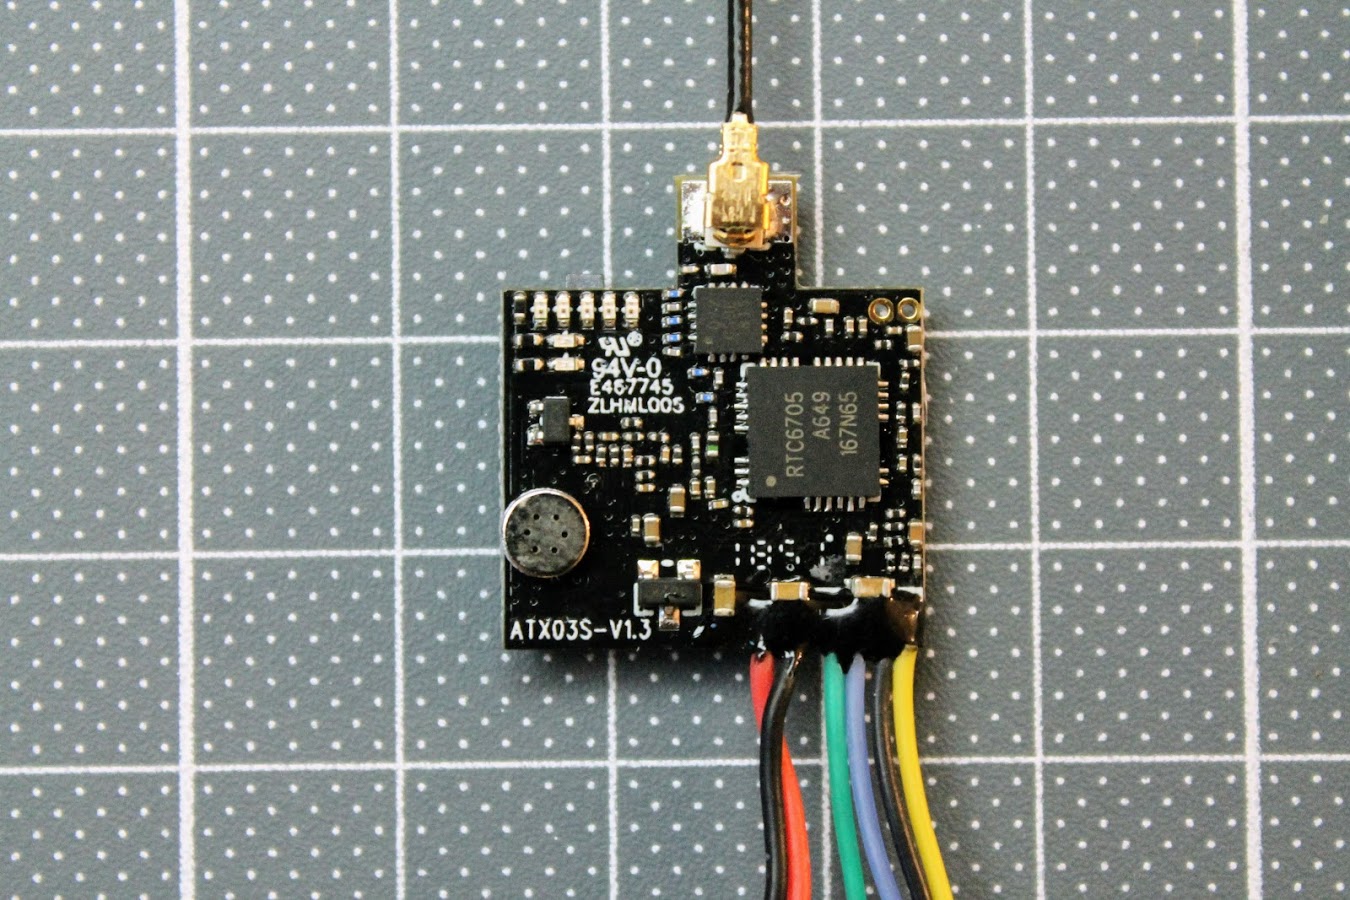
Closer view of the front PCB side.
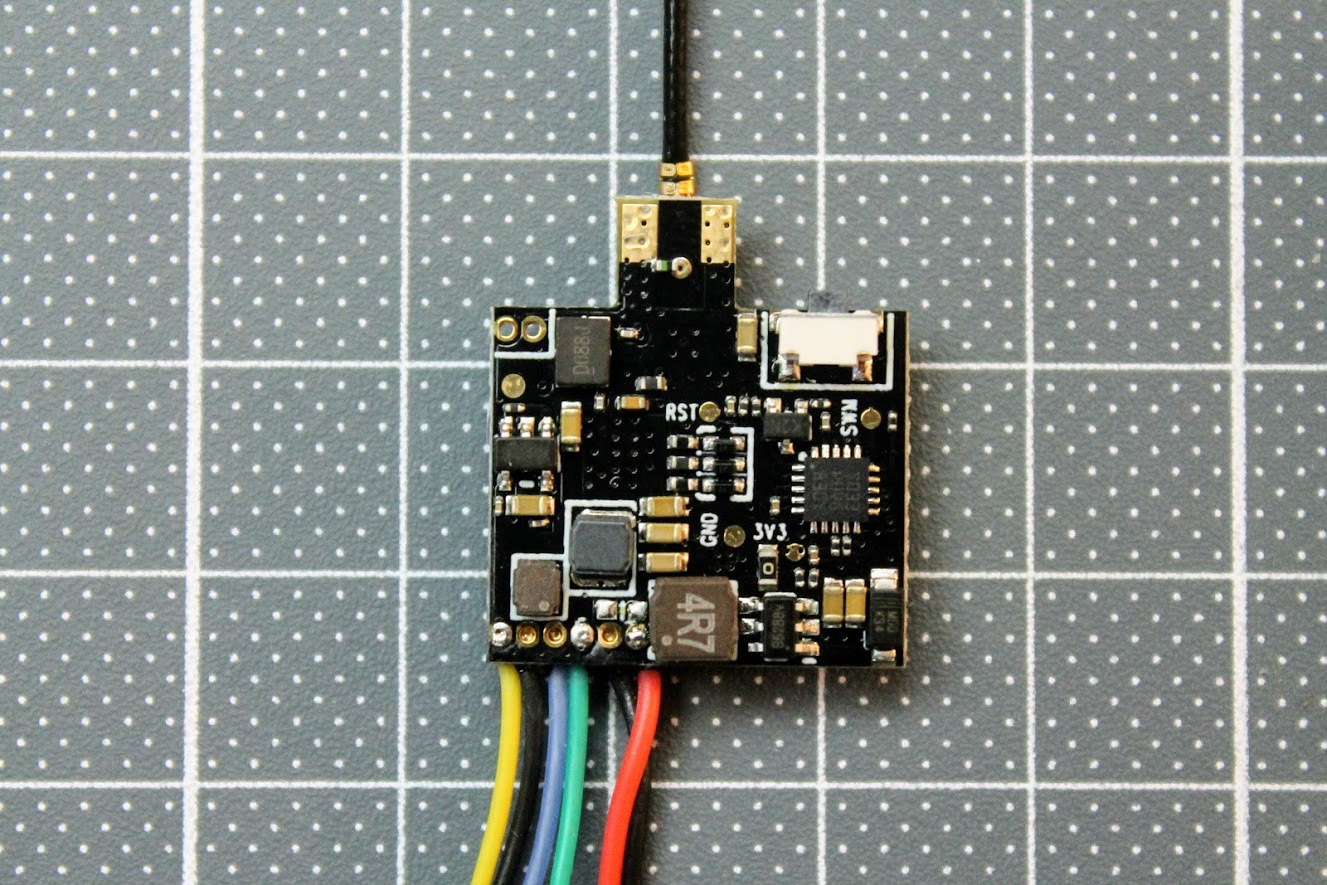
Closer view of the back PCB side.
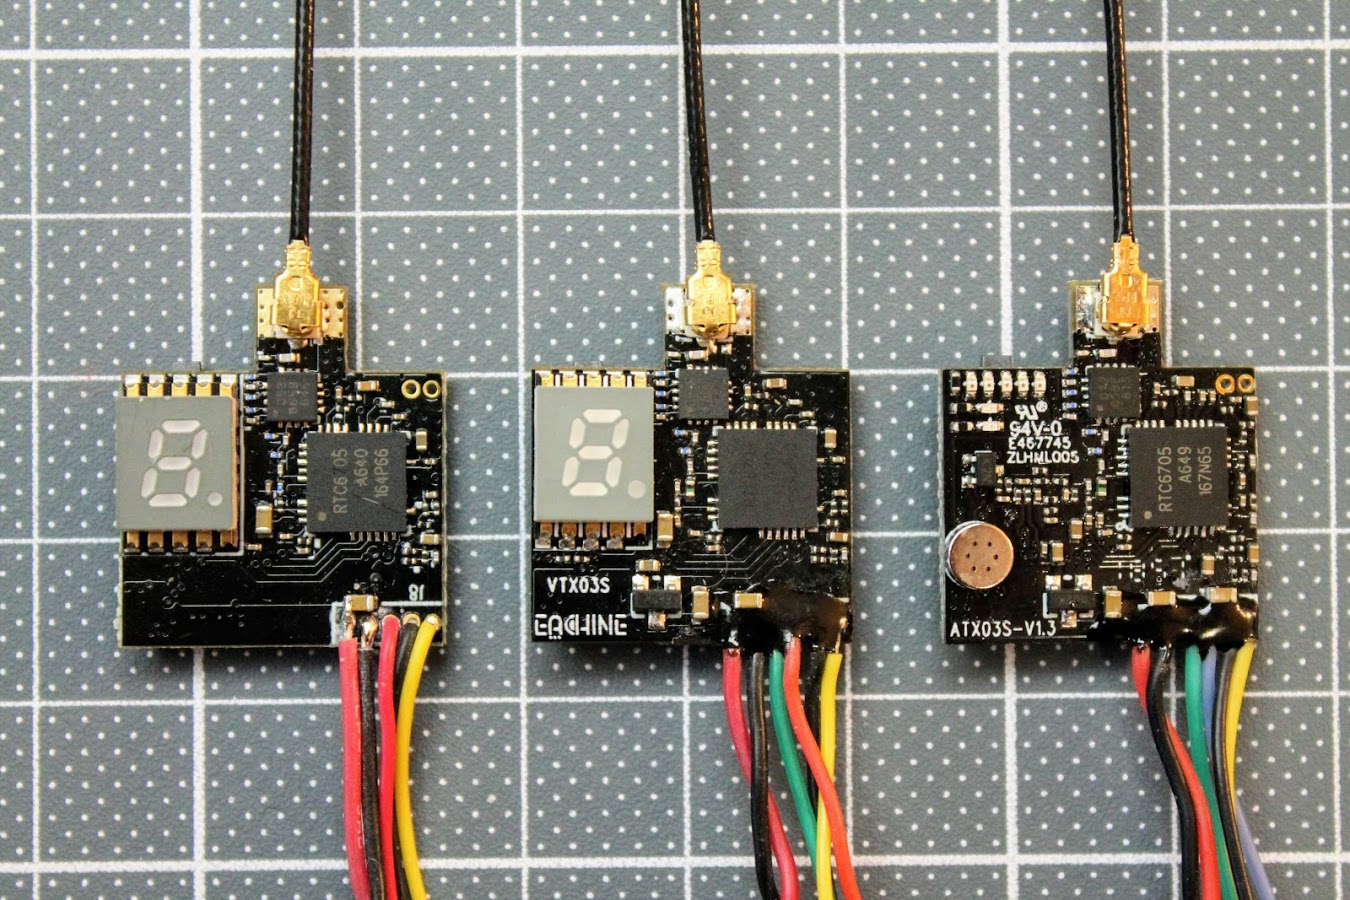
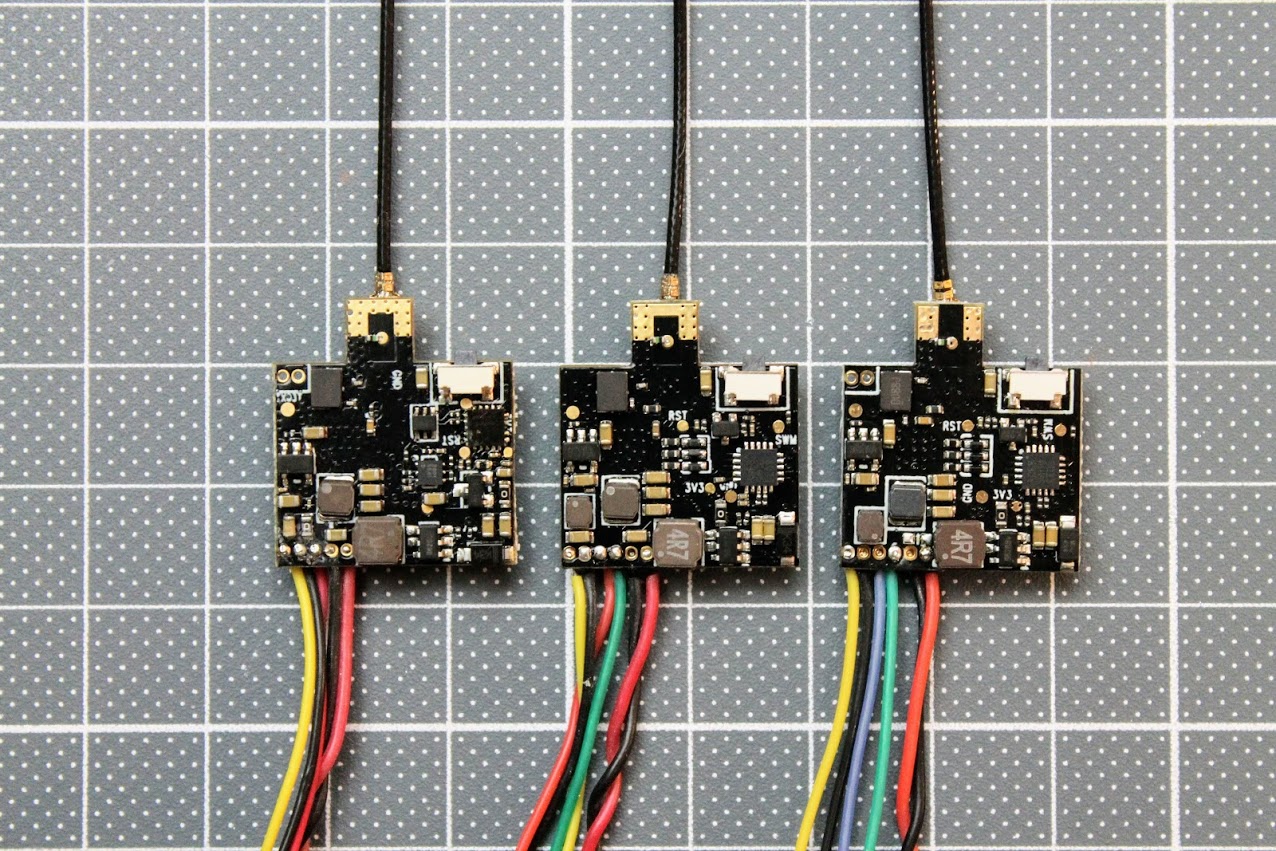
The PCB size and layout comparison with the VTX03, VTX03S and ATX03S.
The back side of the PCB is almost identical to the VTX03S.
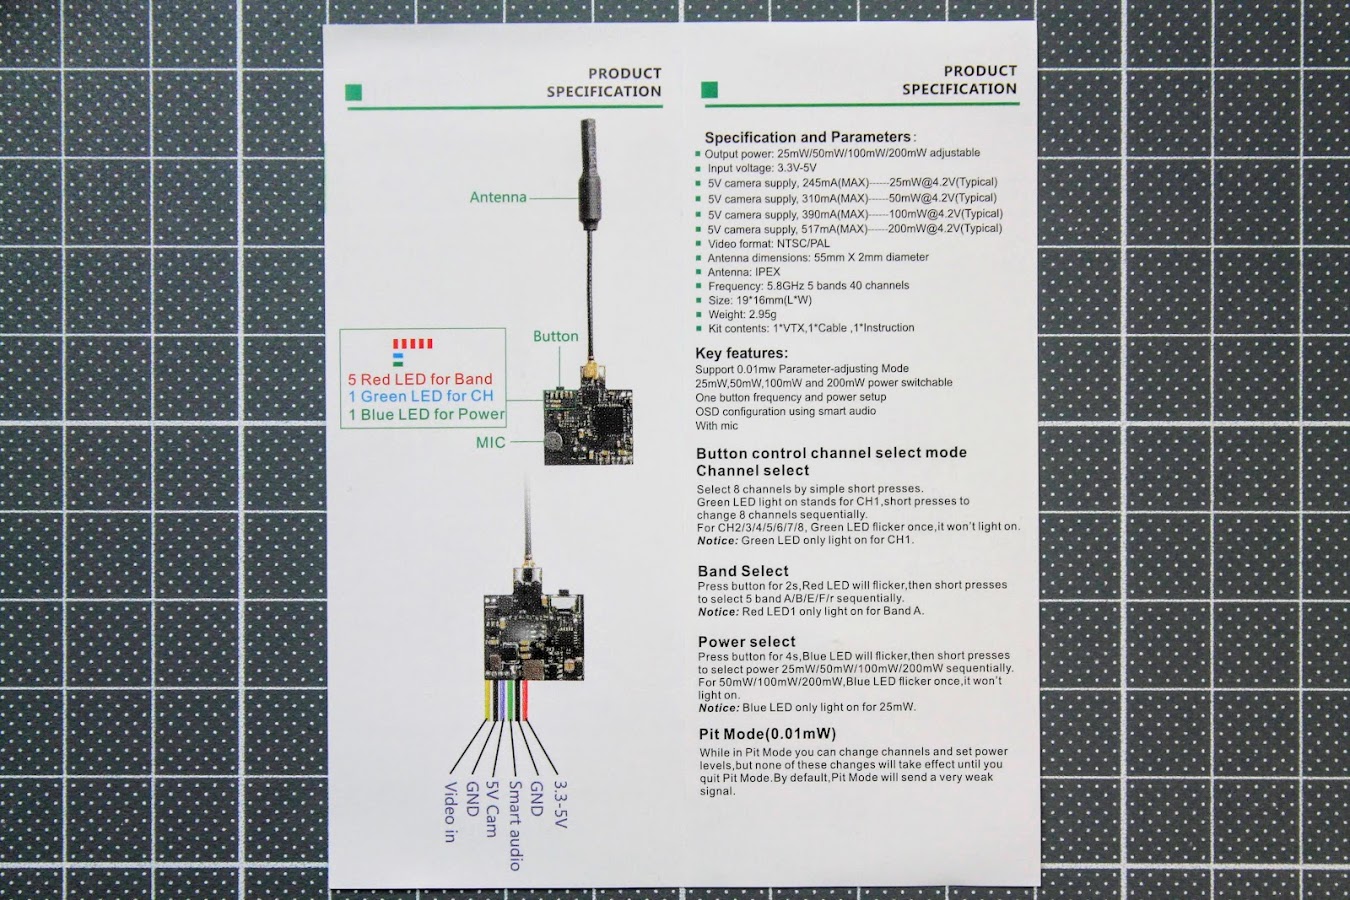
Leaflet provides basic info and the basic operation instructions for manual channel/band/power selection.
Interesting, that channels 4, 7 and 8 on the band E were disabled in the previous VTX03S due to the FCC regulations, but enabled in ATX03S. Bands U, o, L and H are removed comparing to VTX03.
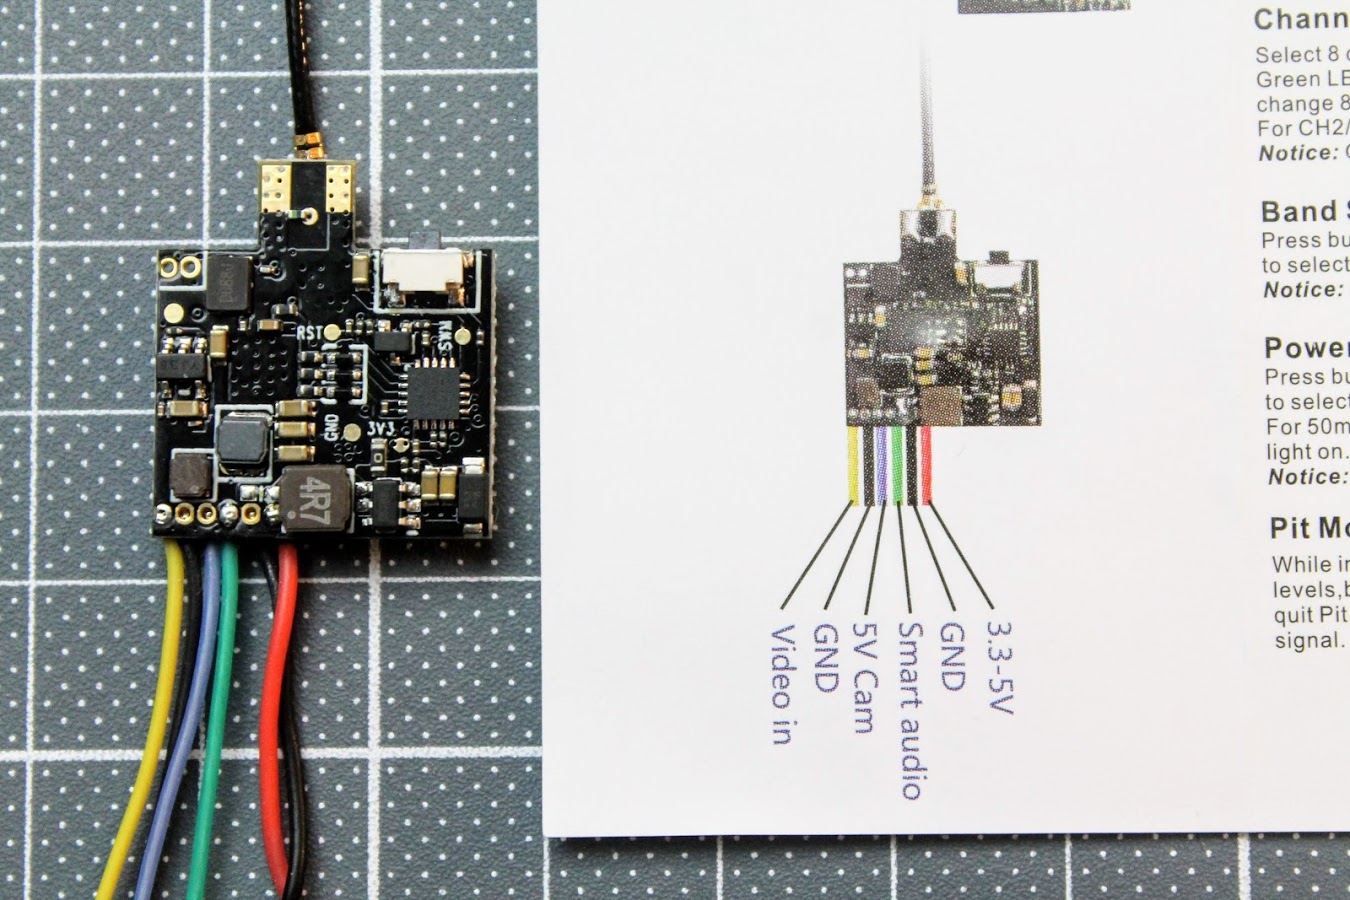
Eachine ATX03S pinout diagram. It was really confusing in the case of ATX03 (read about confusion here). Just have in mind that blue wire 5V Cam means it is 5V power output to the camera. Don’t connect it to the battery.
Weight of the VTX03S is 3.0 grams with wires. You can shave about 0.5 gram if you will strip the connectors and shorten the wires.
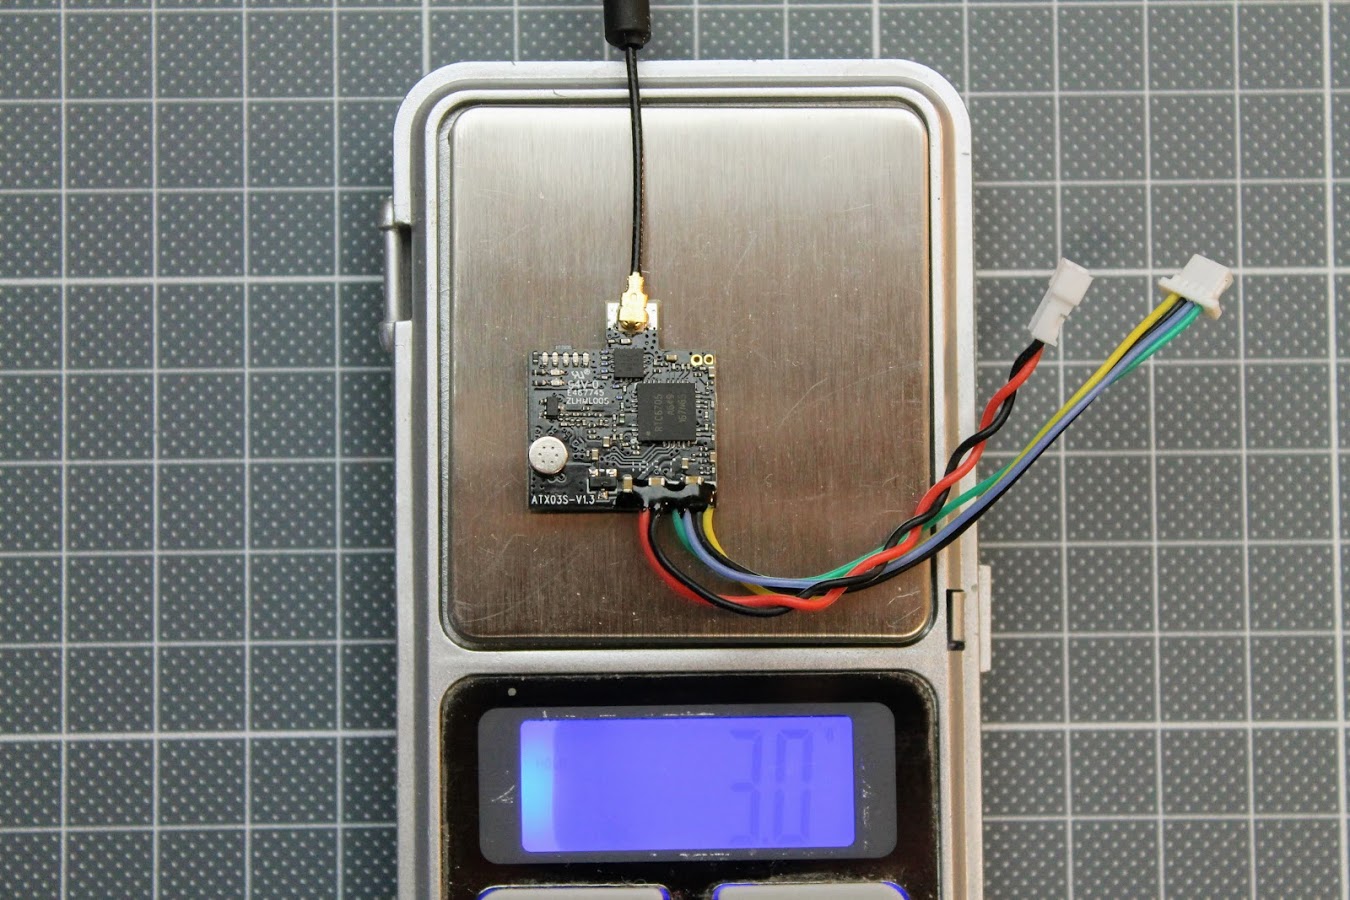
Weight of the VTX03 for comparison.

And weight of the VTX03S for comparison.
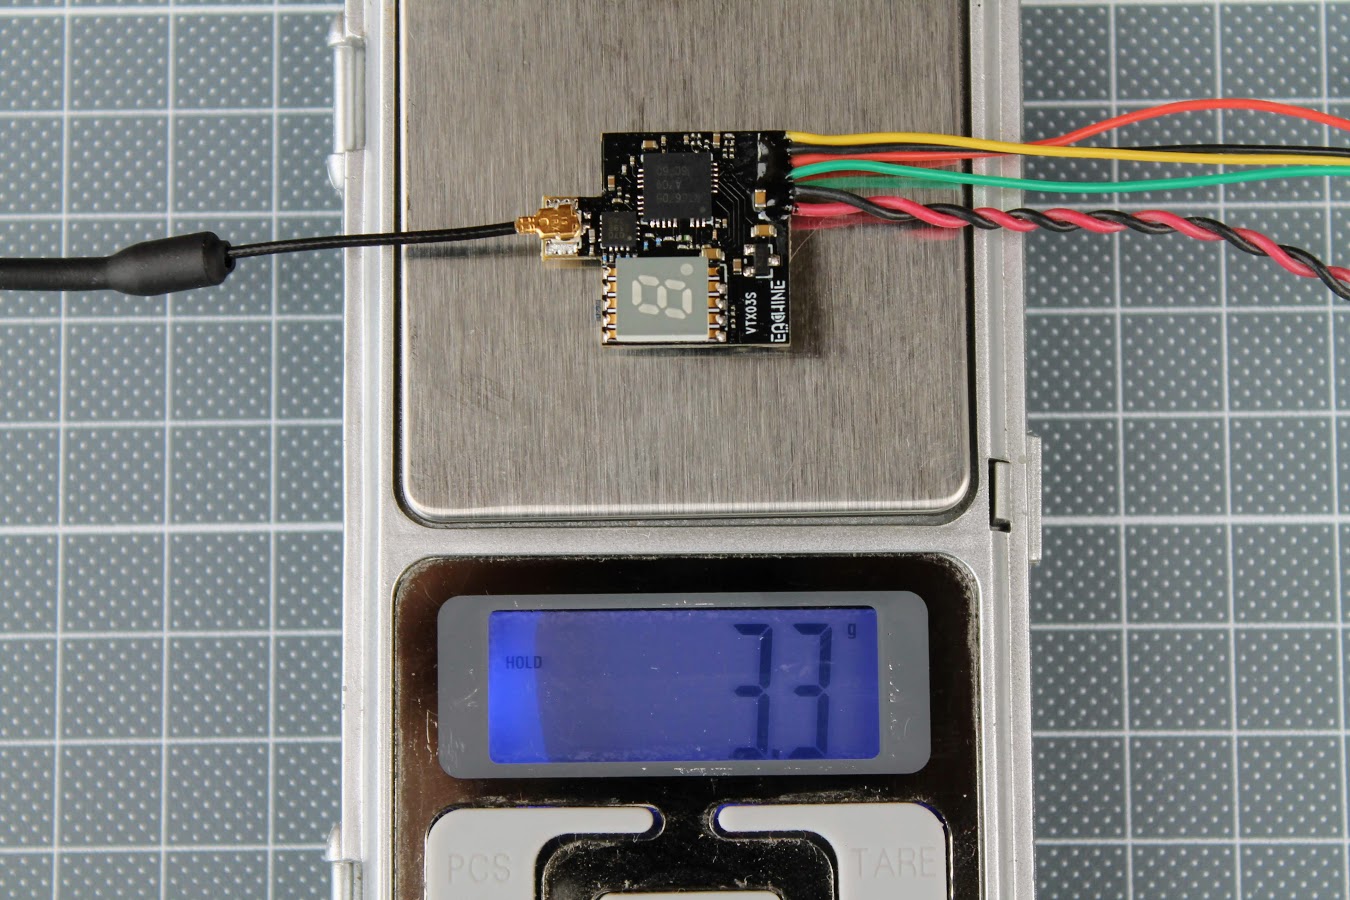
So the new design with on board LEDs instead of the 7-segment LED module helps to save 0.3 grams even with the added onboard microphone.
Funny how user manual has LED colors mixed up, but you can easily find out that Green is Green and Blue is Blue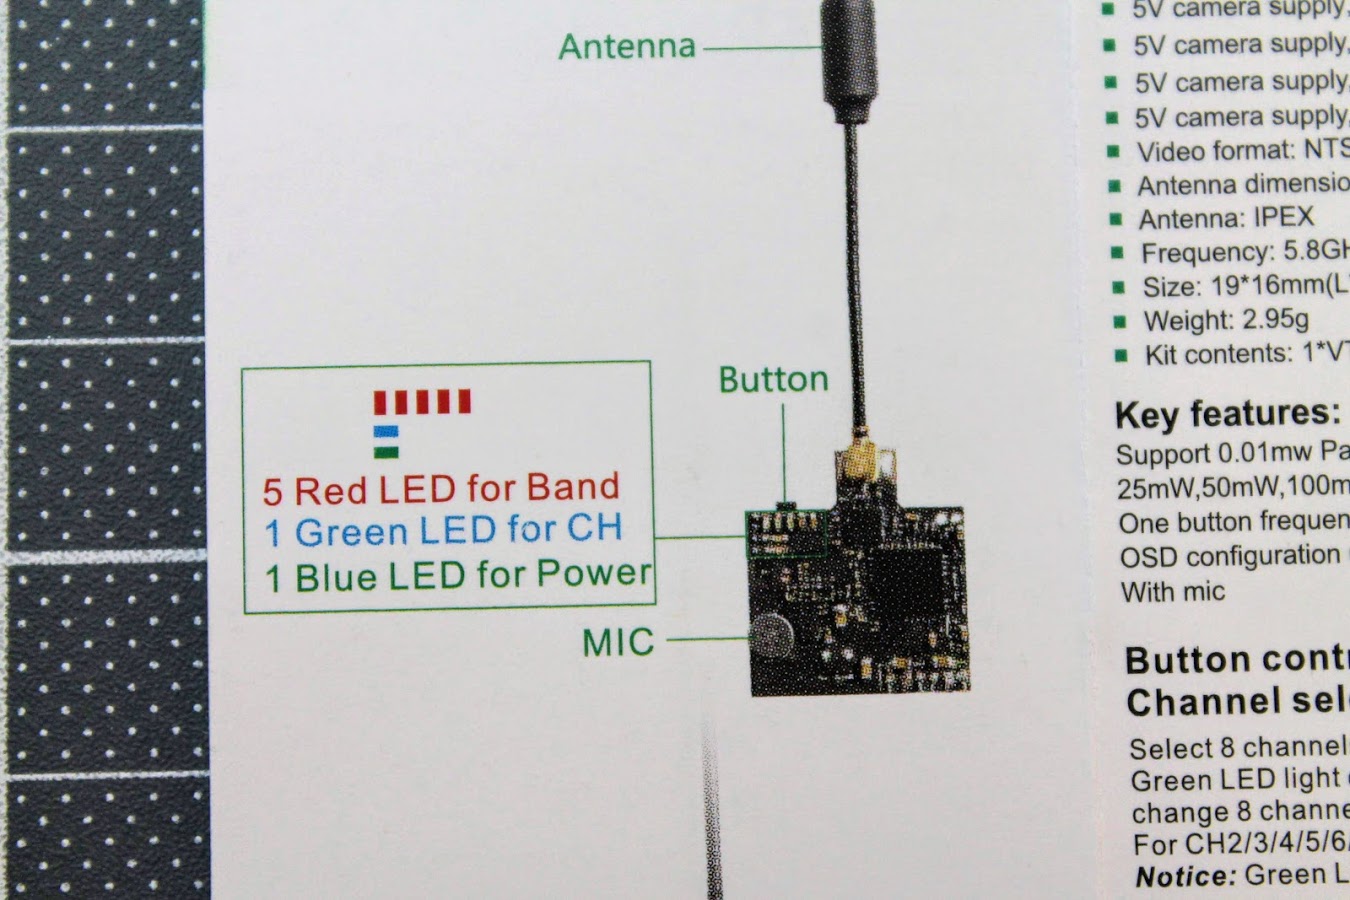
Button control channel, band and power select
Select 8 channels by simple short presses.
Green LED light on stands for CH1,short presses to change 8 channels sequentially.
For CH2/3/4/5/6/7/8, Green LED flicker once it won’t light on
Notice: Green LED only light on for CH1.
Band Select
Press button for 2s,Red LED will flicker,then short presses to select 5 band A/B/E/F/r sequentially.
Notice: Red LED1 only light on for Band A.
Power select
Press button for 4s,Blue LED will flicker,then short presses to select power 25mW/50mW/100mW/200mW sequentially. For 50mW/100mW/200mW, Blue LED flicker once, it won’t light on
Notice: Blue LED only light on for 25mW.
Pit Mode(0.01mW)
While in Pit Mode you can change channels and set power levels, but none of these changes will take effect until you quit Pit Mode. By default, Pit Mode will send a very weak signal
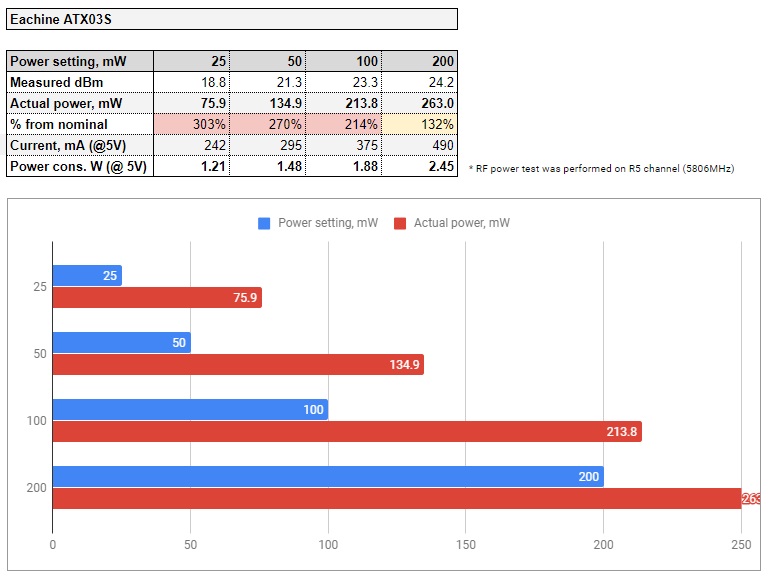
Power output measurements
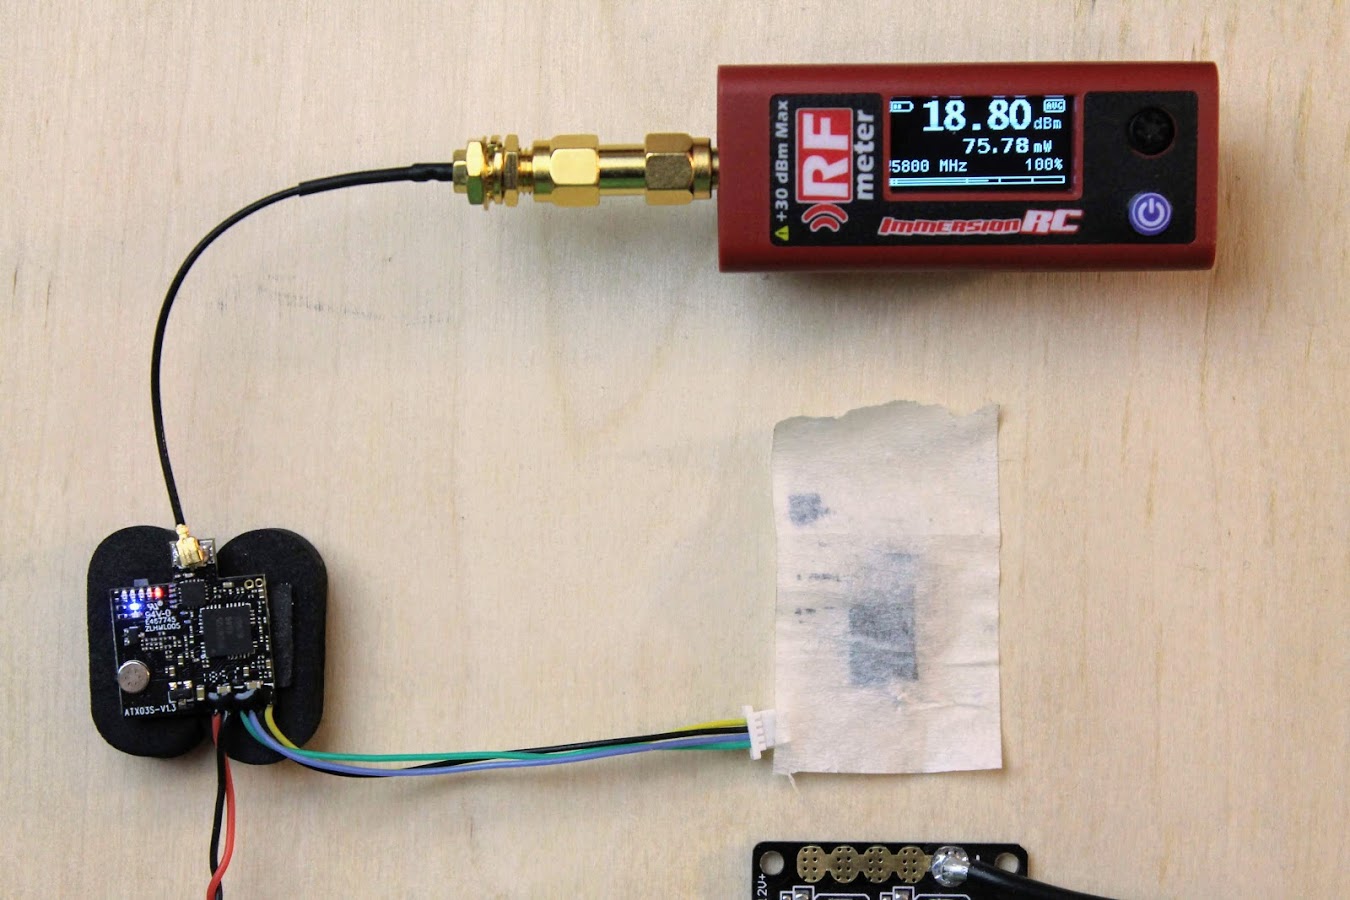
Connected the ATX03S to the immersion RF power meter V2 for test. VTX was cooled with fan while taking the measurements.
First test: 25mW output setting. In the reality it is outputting almost 76mW (18.8dBm).
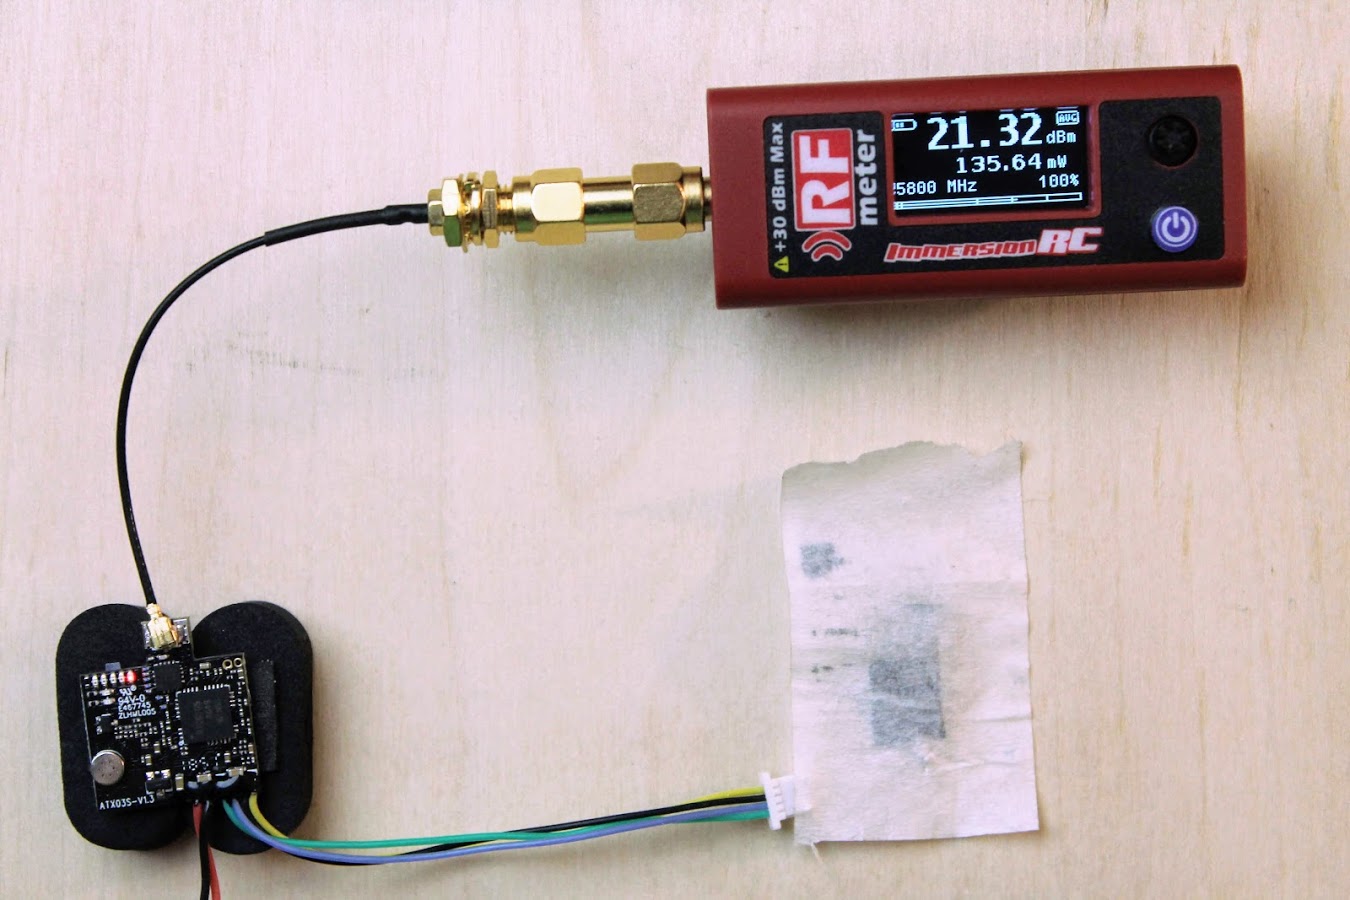
Next step 50mW – outputs nearly 136 mW (21.3dBm).
At 100mW setting it outputs 213 mW (23.3 dBm)

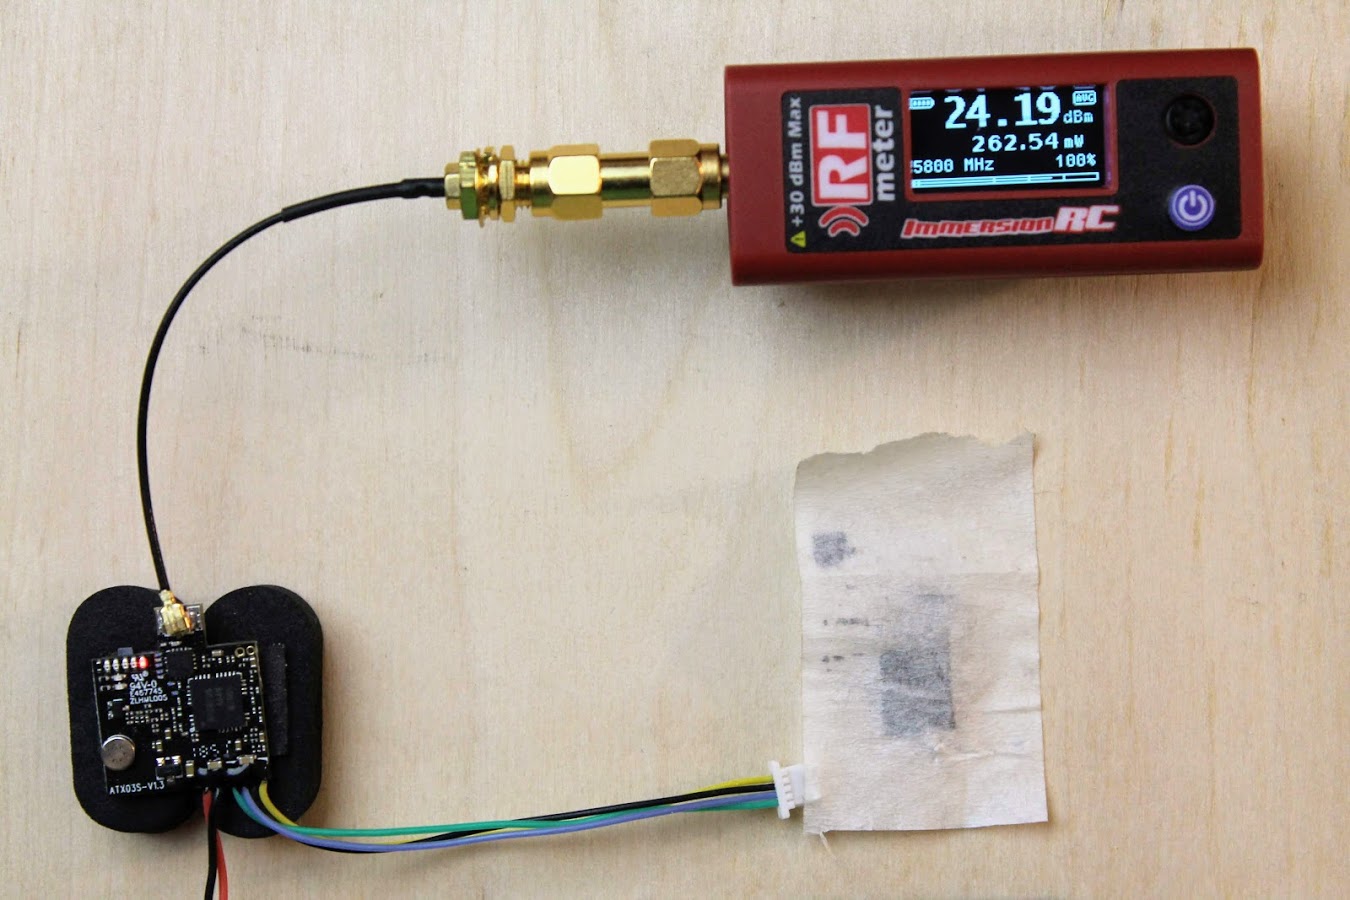
And at max setting of 200mW it outputs 262 mW (24.2d Bm)
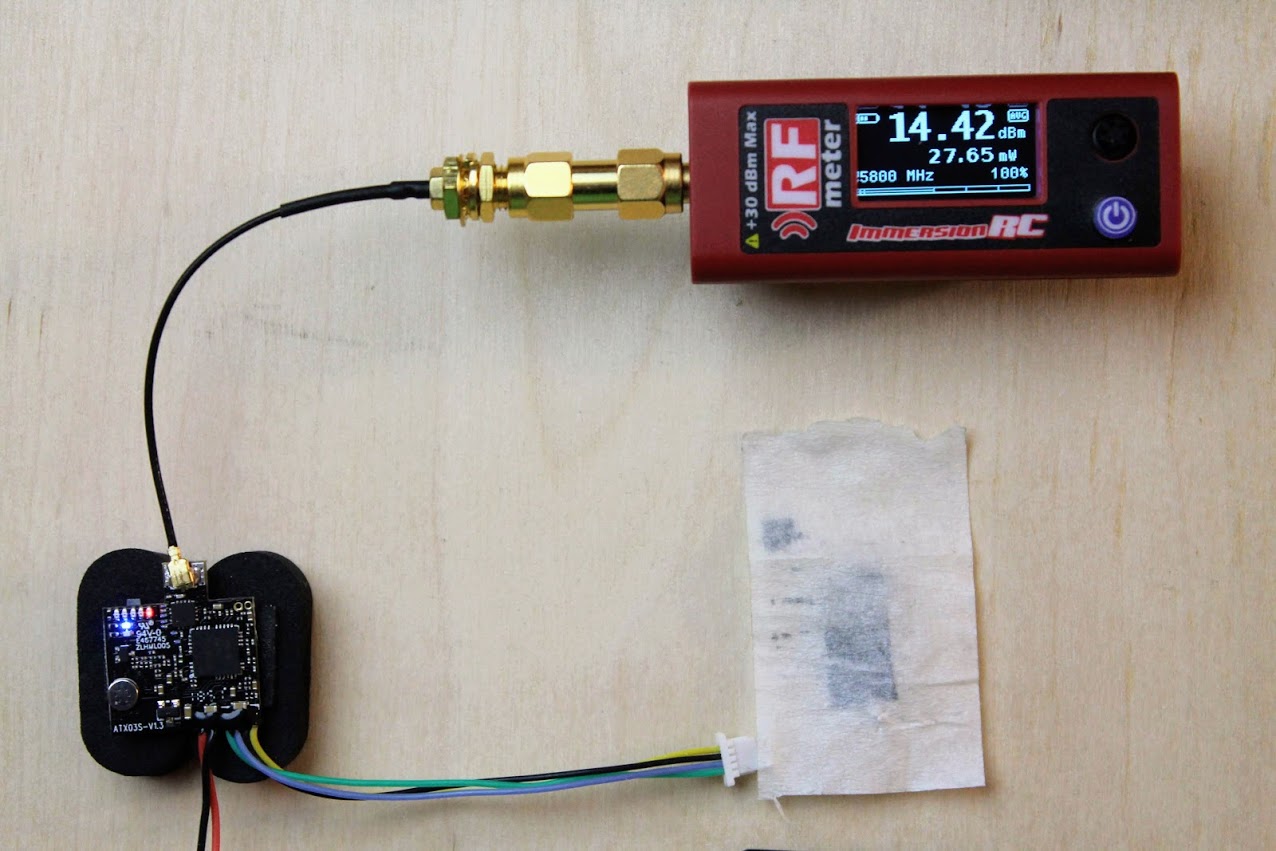
Tested the 25mw setting without cooling and it drops from 76mW down to 28mW (14.4 dBm) after a few minutes.
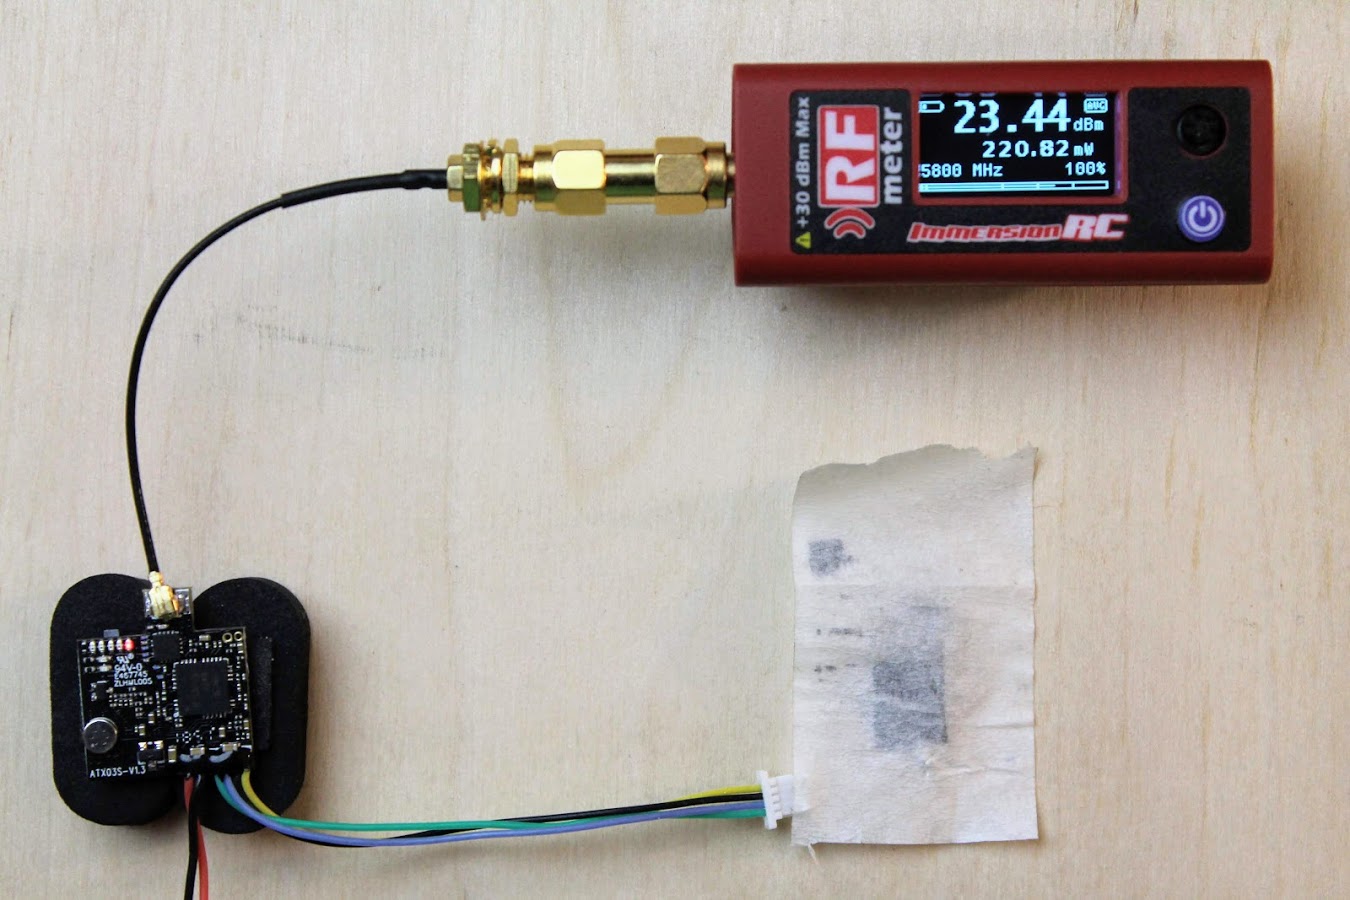
Also the 200mw setting without cooling drops from 262mW down to 220mW (23.4 dBm) after a few minutes.
The power output test results were disappointing at 25mW power setting – powe exceeds the declared output by 3 times, outputting 75mW! Some might like it, but it is not good for racing events.
Here is the RF power output and electrical current consumption for all power levels. Measured at Raceband, CH5.
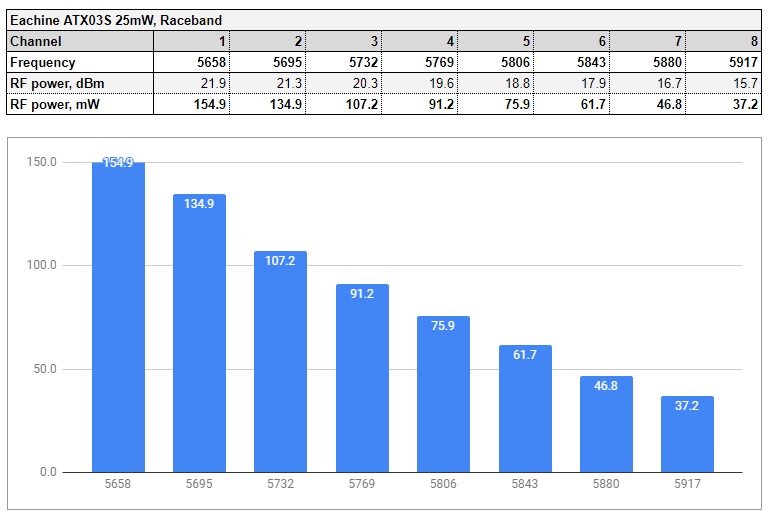
Power output vs frequency for 25mW power level on Raceband.
Power output vs frequency for 50mW power level on Raceband.

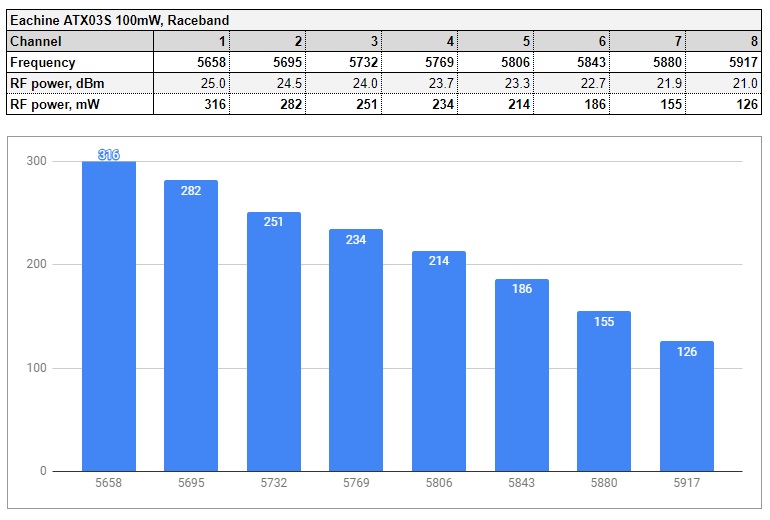
Power output vs frequency for 100mW power level on Raceband.
Power output vs frequency for 200mW power level on Raceband.
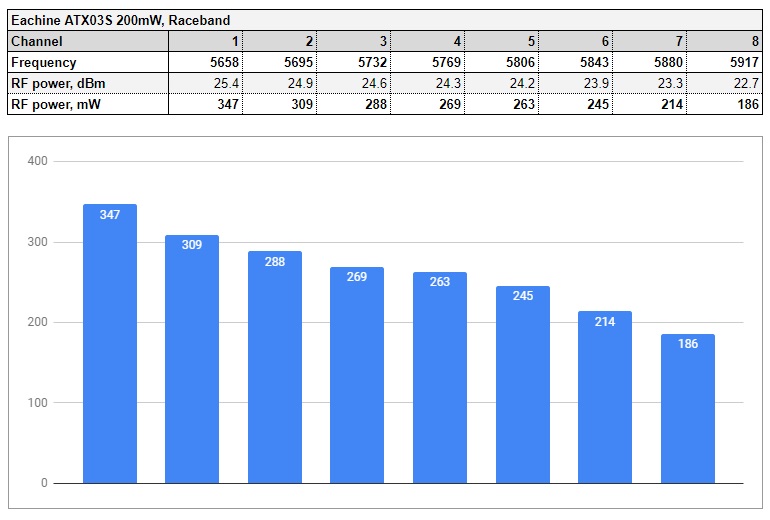
As you can see there are big deviations between the nomimal power and measured power output across the whole Raceband. Varying from 155mW downto 37mW for 25mW setting and from 257mW downto 68mW on the 50mW power output setting. There are similar deviations on the other power output settings. You should have this in mind when selecting the channel/band for FPV feed – it outputs the more power on the lower frequencies and less power on the higher frequencies.
Smart Audio feature
[To be tested]
PROS
- Small and lightweight (3.0 grams)
- Smart Audio control
- Pit mode/25/50/100/200mW switchable power modes
- On board small LEDs instead of bulky LED module
- On board microphone
CONS
- Output RF power is higher than nominal
CONCLUSION
Eachine ATX03S is very lightweight (3.0 grams with wires) and small VTX. It fits into wide range of the aircrafts from the ultralight micro brushless quadcopters up to the high perfomance racing quads, where the weight is crucial. The Smart Audio remote control feature is a must have in the modern video transmitter. ATX03S has 5 switchable output power modes – Pit/25/50/100/200mW. However there are not so good news for racers – output power is enormously boosted over the expected values. 25mW mode outputs 75mW, 50mW – outputs 135 mW (just like its predecessor VTX03S. See Eachine VTX03S review here), but at 200mW it outputs reasonable – 262mW of the RF power . If you are flying alone, more mW probably is welcome – it will increase your flying range and will slightly improve the picture, but it also means that VTX is consumig more current and leads to the less flight time, especially on the smaller quads. On the race events you probably will be asked to turn your quad off after the VTX power measurements – you cannot exceed the 25mW requirements.
Finally the Eachine listened to the user requests and replaced the bulky 7-segment LED module with the small on-board LEDs. It helped to reduce the weight by VTX by 10%. ATX03S also has on board microphone alowing to add the audio feed into the FPV experience.
Eachine ATX03S for sure ticks almost all the requirement checkboxes and if you are looking for the VTX for freestyle rig, then I definitely recommend this VTX for you. If you are a racer, then check if the power output fits into allowed range for your race events.
Available @ Banggood: https://www.banggood.com/Eachine-ATX03S-5_8GHz-40CH-25mW50mw200mW-Switchable-FPV-Transmitter-Smart-Audio-Mic-for-RC-Drone-p-1427187.html
Disclaimer: This item was supplied by Banggood for a fair and unbiased review. Banggood never asked for a positive review and never infuenced my opinion in any way. I’m trying my best to stay uninfluenced and give only my own opinion. All affiliate links if there are any help me purchase items for future reviews.
-
 Review: MEPS Space SZ F7 Mini FC
MEPS (Mepsking) is a new, but emerging manufacturer, making its mark in the RC
Review: MEPS Space SZ F7 Mini FC
MEPS (Mepsking) is a new, but emerging manufacturer, making its mark in the RC -
 HGLRC Thor Pro parallel charging board
HGLRC Thor Pro charger board is battery parallel charging board with protection fuses and
HGLRC Thor Pro parallel charging board
HGLRC Thor Pro charger board is battery parallel charging board with protection fuses and
What cheap VTX and 16:9 camera would you recommend for beginner (Eachine EX2mini drone).
For cheap VTX/FPV Camera options I currently recommend:
VTX
Eachine ATX03S VTX
AKK Race VTX
FPV Cam
Caddx EOS2
Or you could go for AIO camera:
Eachine TX06
Thank you for info and extremely fast response… by the way you have very informative page. Keep it up and have a great day!
Helo.
What OSD settings match with actual power settings?
Thanx