FrSky FPort – the new Protocol
FrSky is innovating again. This time it is the new RC protocol FPort that was developed by FrSky in collaboration with Betaflight. FPort (probably stands for “FrSky Port”) is an interface protocol between receiver and other parts connected to the receiver for data transaction, e.g. receiver and flight controller, receiver and servos or receiver and a sensor. FPort is a one line bus with one master and several slaves. Control channels, downlink data, and uplink data are included on the BUS. It has higher speed (115200bit/s) than S.Port. This new protocol is only for communicating between the receiver and other devices on the aircraft and it does not change the FrSky air transmission protocol between the transmitter and receiver. It is based on SBUS protocol but additional Uplink and Downlink packets were added.
Highlights of this new FPort protocol:
- Only one wire is required for connecting receiver and flight controller including telemetry uplink, MSP tunnelling to the transmitter;
- This is fast protocol;
- The serial communication settings are 115200 baud, 8 bits, no parity, 1 stop bit. This is standart settings, no exotic implementation needed;
- This is uninverted signal (finally FrSky considered compatibility).
While this protocol is uninverted, almost all the FrSky receivers have inverted signal output. So you will need either the hacked FrSky receiver with uninverted output or use an inverted signal input on the flight controller (if inverted output then it nust be inverted input). Connect the SmartPort port on your receiver to the inverted bidirectional port on your flight controller. On F3 / F4 with a ‘uninverted SmartPort’ hacked receiver / F7, the receiver is connected to the TX pin of the serial port, on F4 with a non-hacked receiver the connection will be dependent on how the bidirectional inverter is designed – consult your flight controller manual; (Effectively, this connection uses the same pins on both sides that would be used to connect SmartPort if a non-FPort firmware was used.). We can expect FrSky implementing uninverted signal output in the future receivers.
A new receiver protocol driver for FPort has been added to Betaflight. It is available from Betaflight version 3.3.
How to install and setup FrSky FPort
- Download and install the FPort compatible receiver firmware. Currently only some of the FrSky receivers are supported (see compatible receivers list below); (Instructions for the firmware installation can be found here and here.)
- Install latest Betaflight version onto your flight controller. FPort is supported from Betaflight 3.3.
- Connect the SmartPort port on your receiver to the inverted bidirectional port on your flight controller. On F3 / F4 with a ‘uninverted SmartPort’ hacked receiver / F7, the receiver is connected to the TX pin of the serial port, on F4 with a non-hacked receiver the connection will be dependent on how the bidirectional inverter is designed – consult your flight controller manual; (Effectively, this connection uses the same pins on both sides that would be used to connect SmartPort if a non-FPort firmware was used.)
- Configure your flight controller. Enable ‘serial RX’ for the port the receiver is connected to, choose ‘Serial Rx’ as receiver type, and ‘FPort’ as protocol. For F3 / F4 with a ‘uninverted SmartPort’ hacked receiver / F7, set
serialrx_halfduplex = onin CLI. If not using a receiver with ‘uninverted SmartPort’ hack, setserialrx_inverted = on. After all is done, the relevant bits of adumpshould look like this (assuming we’re using UART3):
F3 / F7:
serial 2 64 115200 57600 0 115200
set serialrx_provider = FPORT
set serialrx_halfduplex = ON
set serialrx_inverted = ON
F4 with non-hacked receiver (needs bi-directional inverter on the flight controller):
serial 2 64 115200 57600 0 115200
set serialrx_provider = FPORT
set serialrx_halfduplex = OFF
set serialrx_inverted = ON
F4 with ‘uninverted SmartPort’ hacked receiver:
serial 2 64 115200 57600 0 115200
set serialrx_provider = FPORT
set serialrx_halfduplex = ON
set serialrx_inverted = OFF
- Bind your receiver to your transmitter;
- Test RC control: With the transmitter on and the flight controller connected to the configurator, make sure the bars in the ‘Receiver’ tab move when you move the sticks on the transmitter;
- Test telemetry: (In OpenTx, a rescan of the sensors is required, since the sensor ids are different between SmartPort and FPort.) Check that the telemetry screen shows the values from your flight controller. (caveat: With FPort it is possible that RC commands work, but telemetry doesn’t. If this happens, it means that the serial connection that you are using is not bidirectional, and the receiver => flight controller data flow works, but flight controller => receiver doesn’t. Id this happens, check your port settings, and (for F4) make sure that the port you are using can support inverted bidirectional.)
- If you want to use the Betaflight lua telemetry scripts on Taranis / Horus, download and install the latest release (1.0 or newer) from here.
- Happy flying. 😉
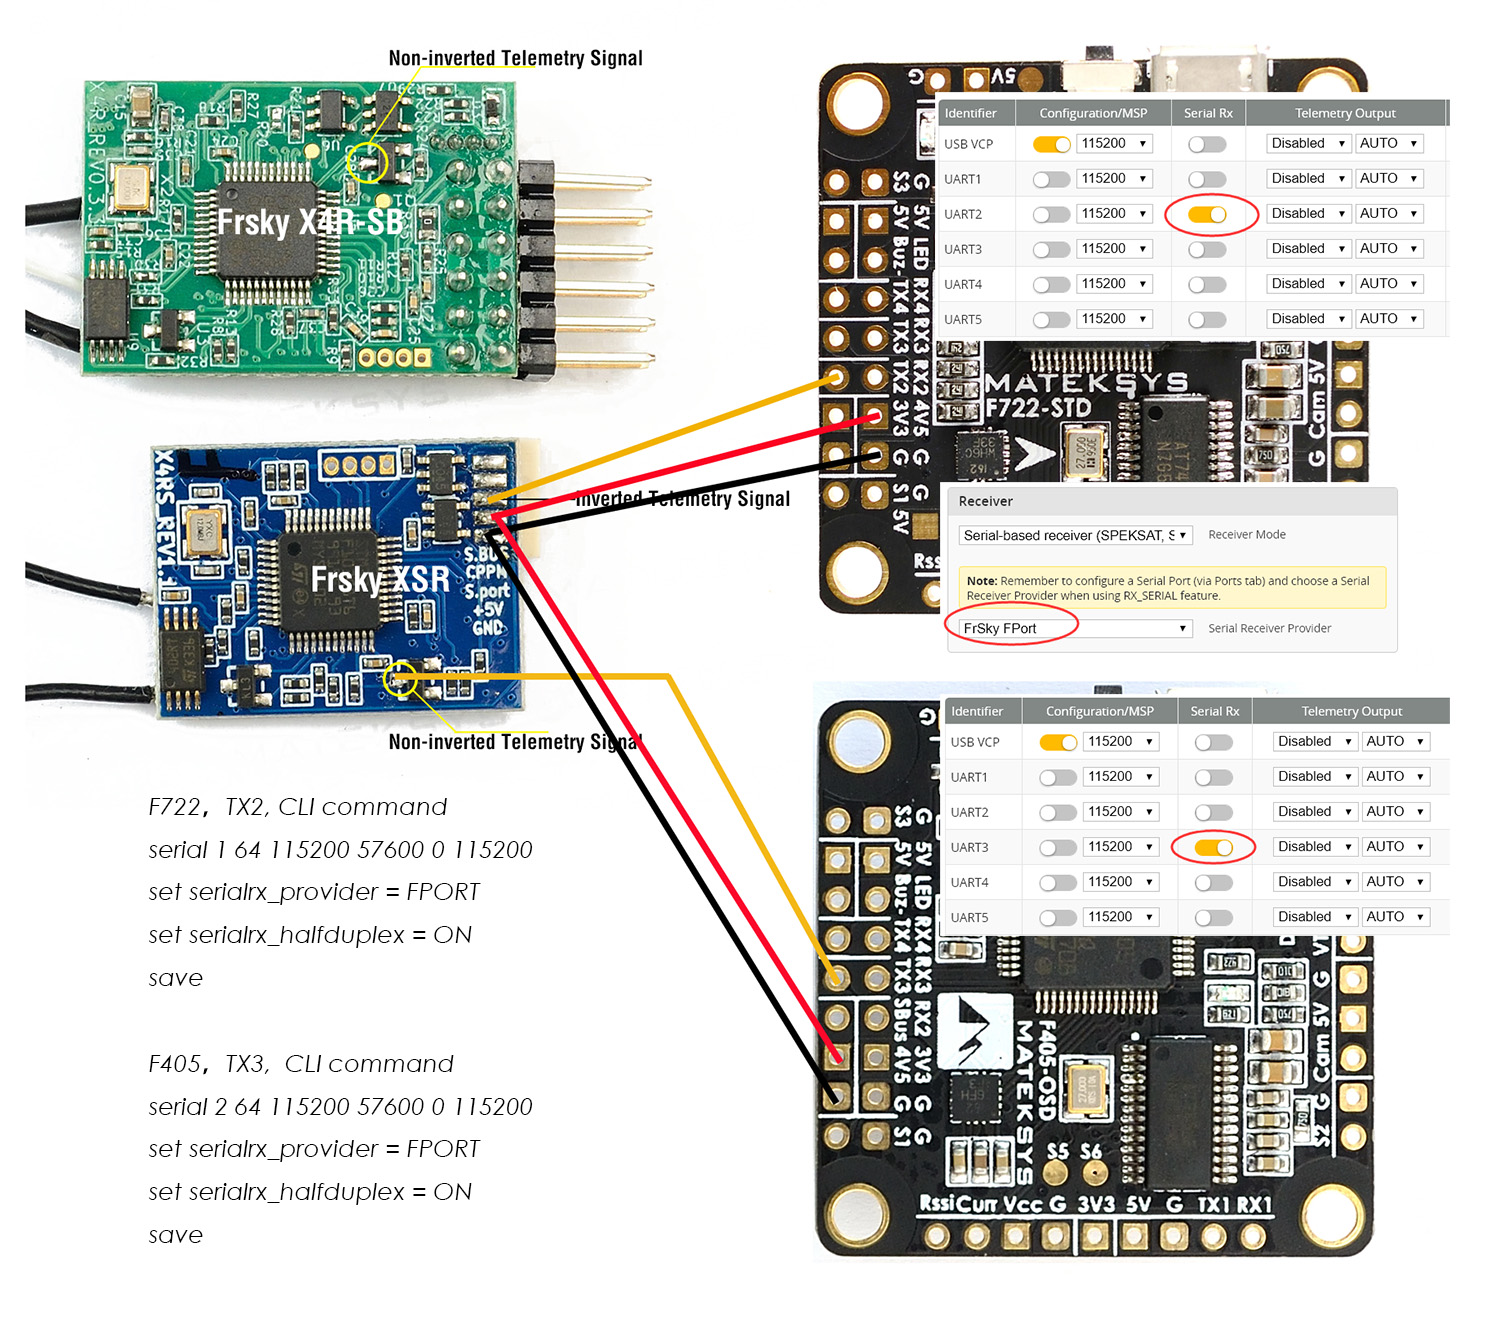
A connection diagram and Betaflight settings for Matek FC:
The detailed protocol specifications are in this document: F.Port.protocol.betaFlight.V2.1.2017.11.21.pdf
Frsky FPort compatible receivers list
| Receiver | Compatible ? | Firmware download page |
|---|---|---|
| FrSky RXSR | Yes (beta) | here |
| FrSky X4R | Yes (beta) | here |
| FrSky X4R-SB | Yes (beta) | here |
| FrSky XSR | Yes (beta) | here |
| FrSky XSR-M | Yes (beta) | here |
| FrSky XSRF3O | Yes (beta) | here |
| FrSky XSRF3PO | Yes (beta) | here |
| FrSky XSRF4O | Yes (beta) | here |
| FrSky XSRF4PO | Yes (beta) | here |
| FrSky R9M Slim | Unknown | here |
| FrSky R9M Slim+ | Unknown | here |
| FrSky R9 mini | Yes (beta) | here |
Updates history:
2018-03-16 – Compatible receivers list and installation instructions
2018-03-16 – Compatible receivers list updated with R9 series
-
 ESC Firmware Guide
In this concise overview, we’ll explore the evolution of ESC (Electronic Speed Controller) firmware,
ESC Firmware Guide
In this concise overview, we’ll explore the evolution of ESC (Electronic Speed Controller) firmware, -
 BetaFPV SuperG NanoTX – first dual diversity ELRS TX
BetaFPV, in collaboration with the ELRS developer team, has unveiled another first in the
BetaFPV SuperG NanoTX – first dual diversity ELRS TX
BetaFPV, in collaboration with the ELRS developer team, has unveiled another first in the