Review: BetaFPV ELRS Micro TX module
BetaFPV ExpressLRS Micro TX module is the second TX module from BetaFPV. This is JR module sized TX and has a few new things that you can see on the ELRS TX module.
Lets take a close look at this interesting ELRS Module.
Page Contents for Review: BetaFPV ELRS Micro TX module
Specifications
BetaFPV ExpressLRS Micro TX transmitter
Available @ BetaFPV: https://betafpv.com/products/elrs-micro-tx-module
Banggood: https://www.banggood.com/BETAFPV-ExpressLRS-ELRS-…-Micro-TX-Module-…-1912251.html
Packet refresh rate: 25Hz/50Hz/100Hz/200Hz (915MHz/868MHz), 50Hz/150Hz/250Hz/500Hz (2.4GHz)
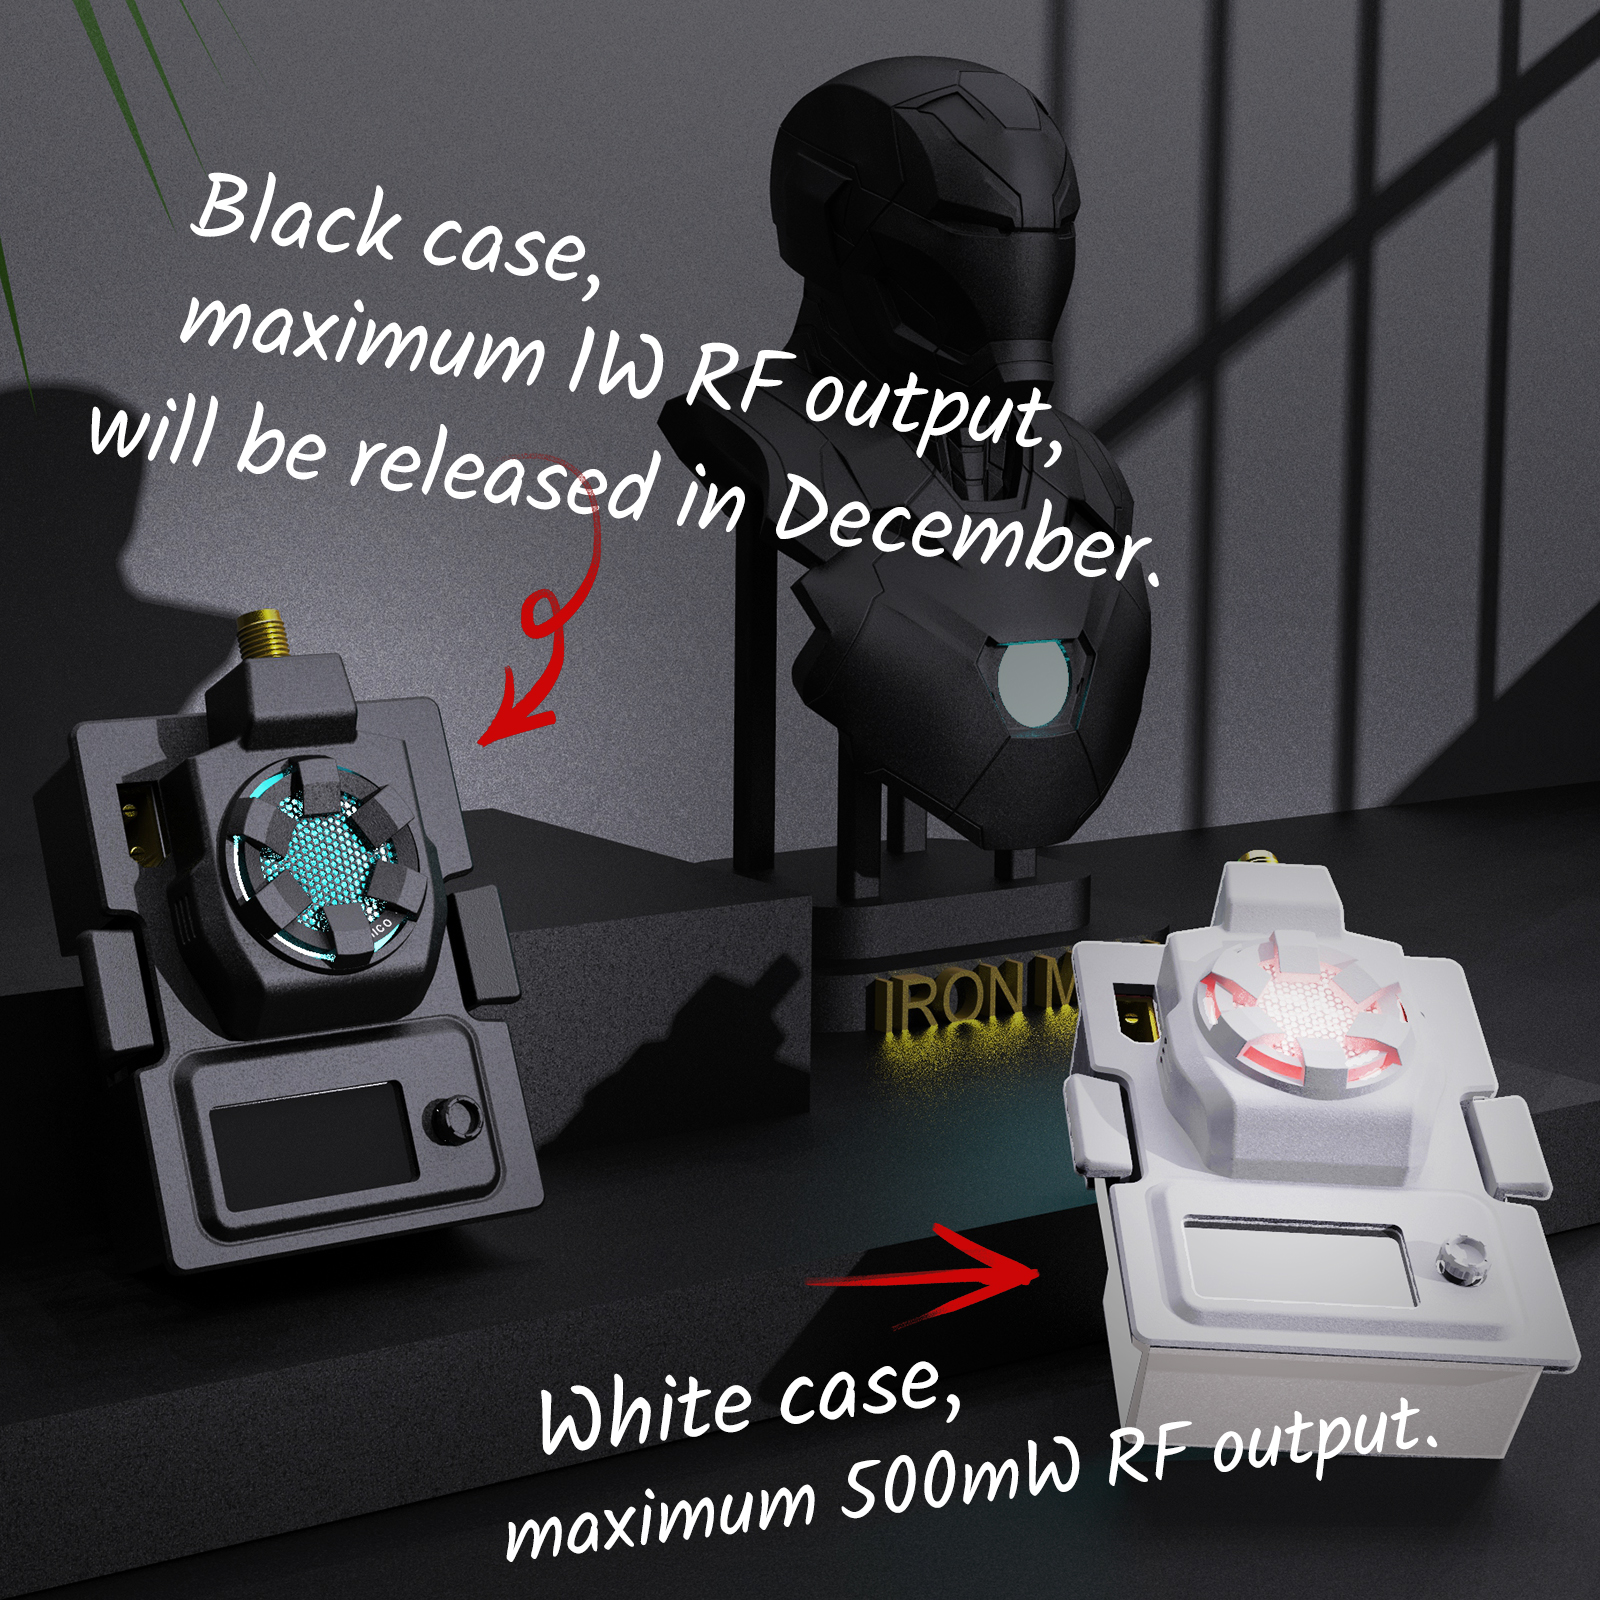
RF output power: 25mW/50mW/100mW/250mW/500mW (2.4GHz), 100mW/250mW/500mW (915MHz/868MHz)
Frequency bands (Micro RF Module 2.4G version): 2.4GHz ISM
Frequency bands (Micro RF Module 915MHz/868MHz version): 915MHz FCC/868MHz EU
Input voltage: 5V~12V
XT30 port: 5V~12V, recommend 2S (8.4V) battery, DO NOT support 3S (12.6V) or above
USB port: Type-C
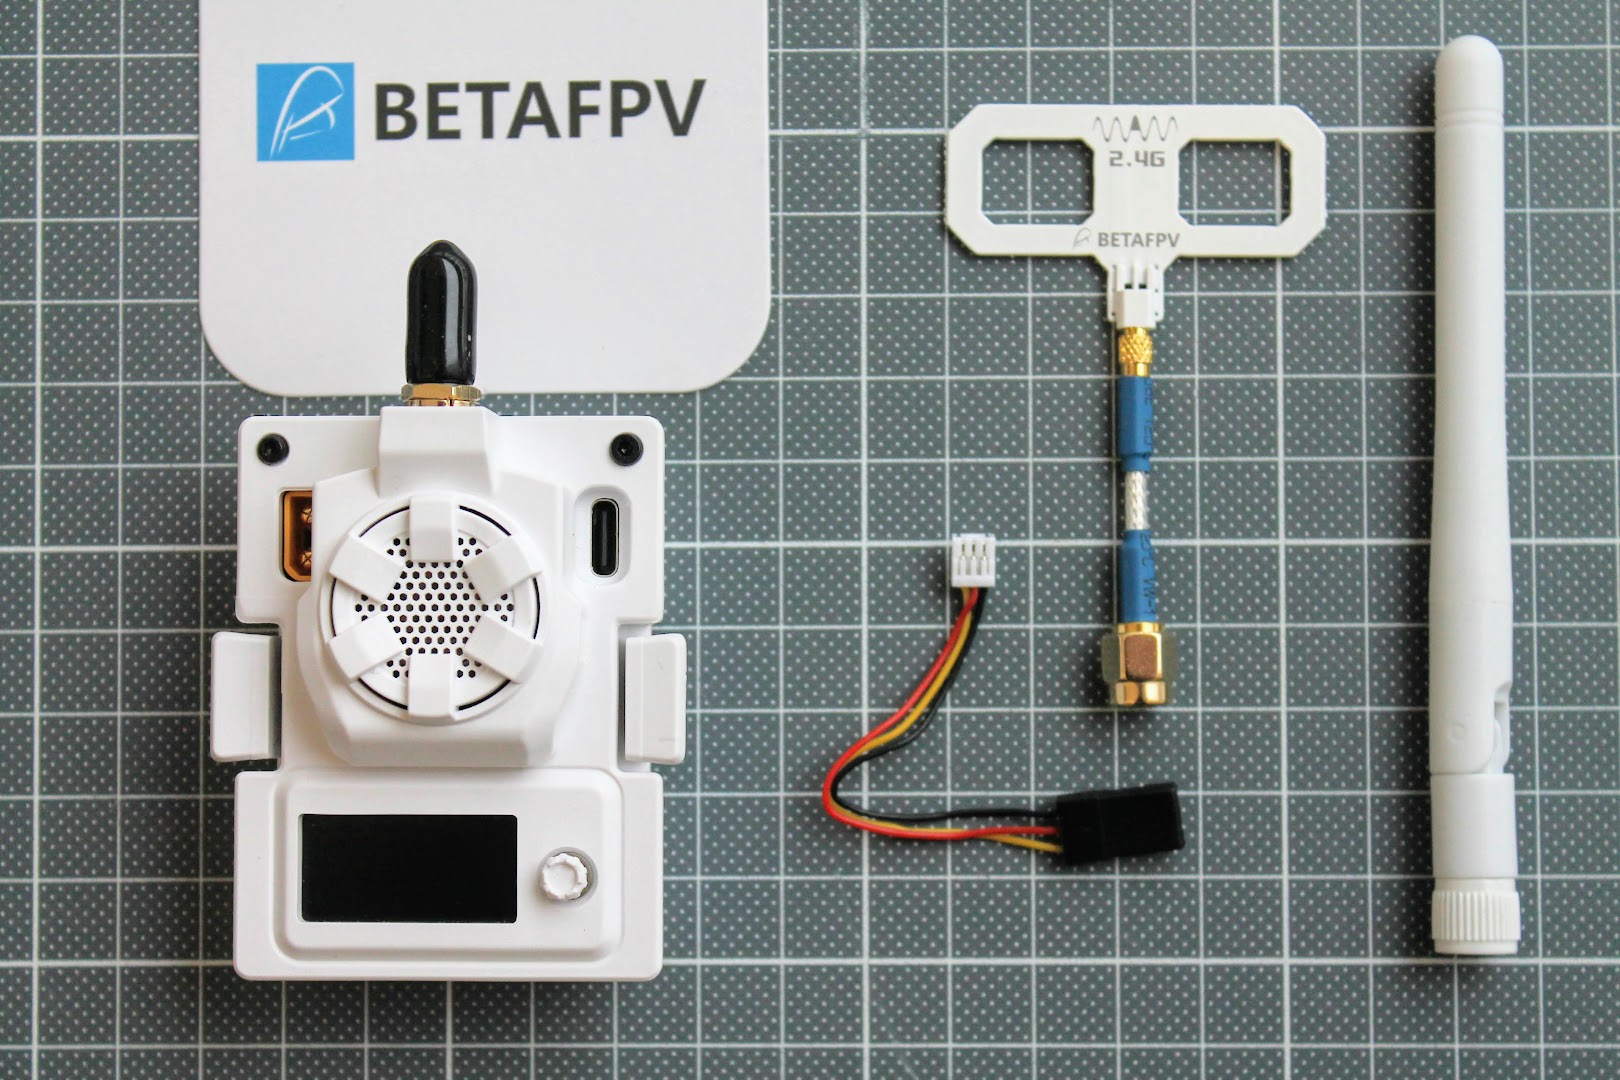
Package contents
BetaFPV ExpressLRS Micro TX module comes with two antennas – linear whip style dipole antenna and Moxon type antenna. You also get 3-pin connector cable for connecting the module to radio transmitter.
Closer look
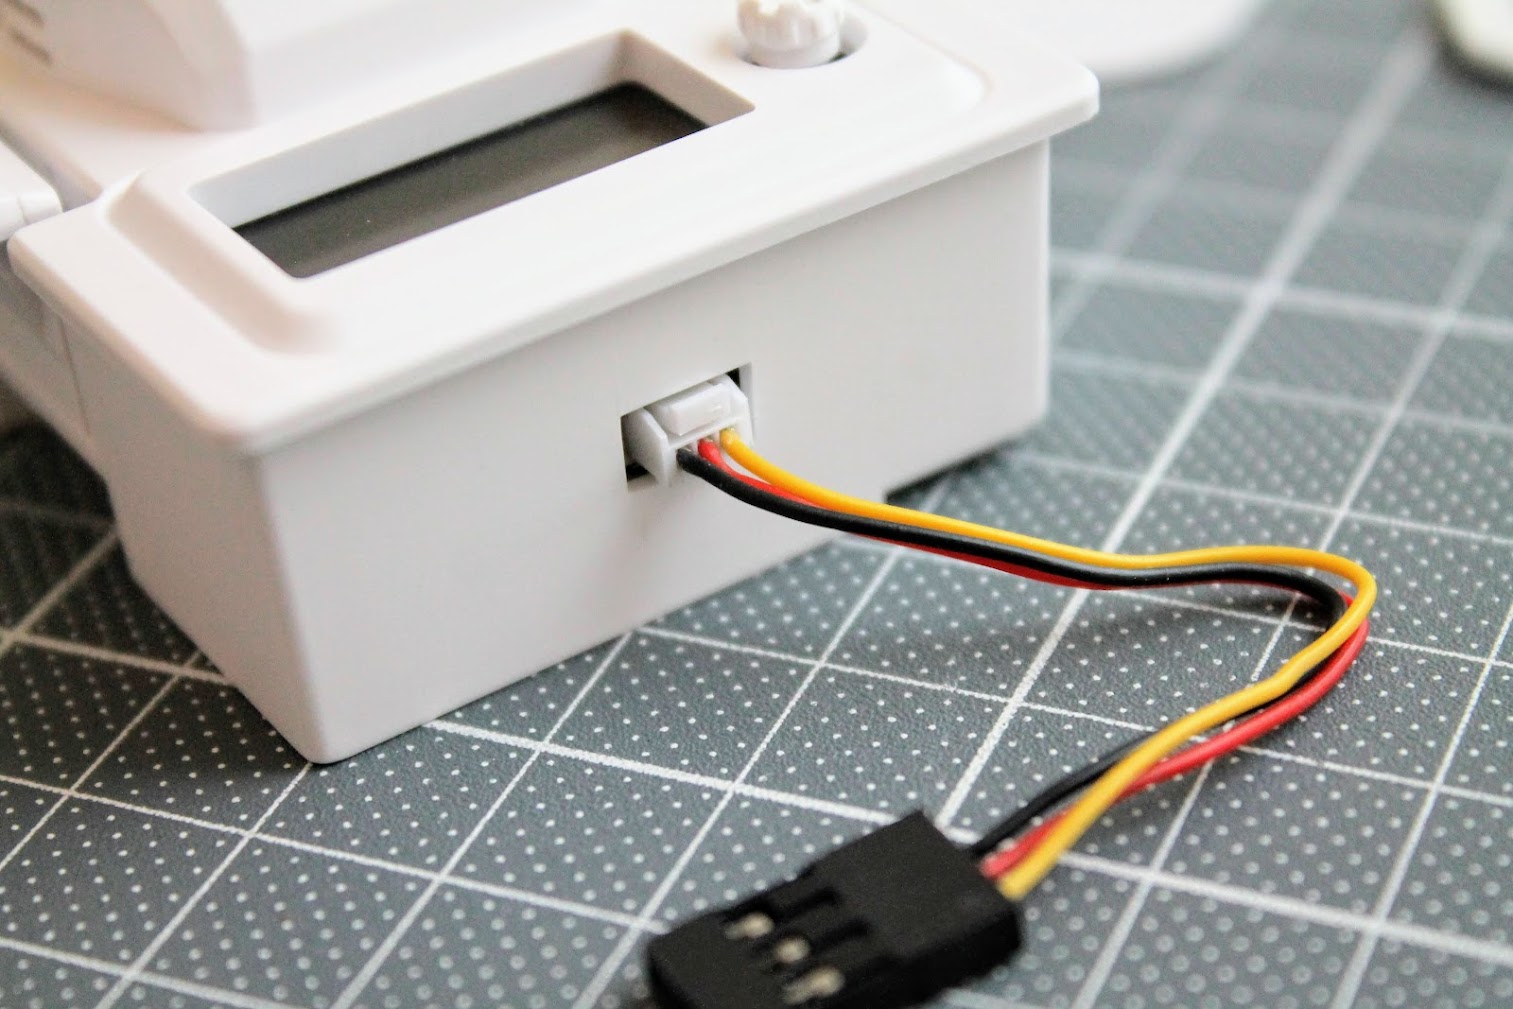
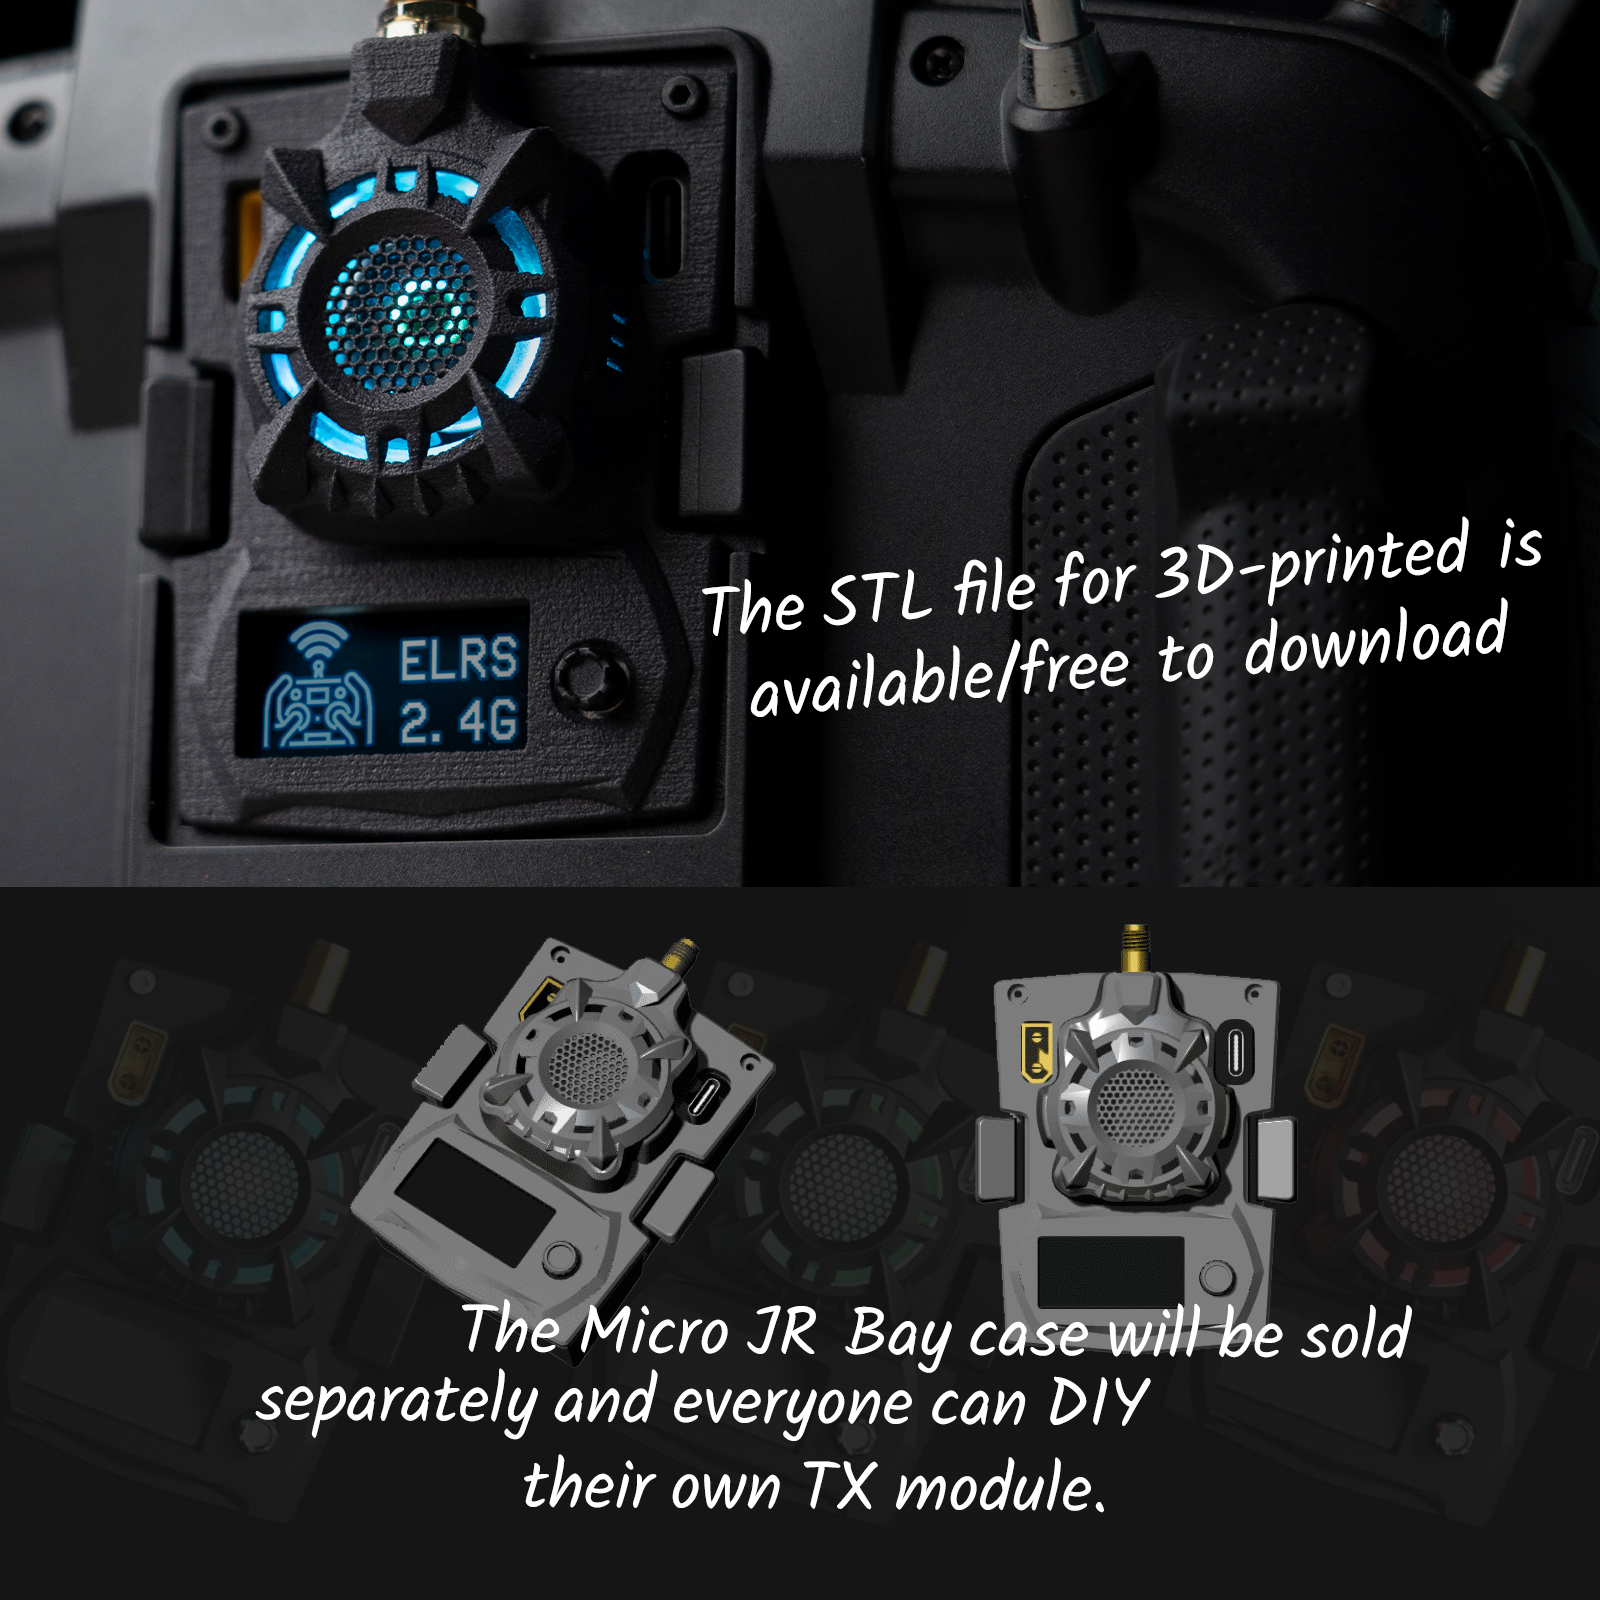
There is a JST-GH 1.25mm 3pin connector socket on the bottom side of the Micro TX module. It can be used for connecting the module with the radios that don’t have the JR module bay (but support CRSF protocol to communicate with the TX module)
BetaFPV Micro TX Module can be powered by external power supply (5V~12V) for providing the supplement power especially on the higher RF power output levels (250mW-500mW)
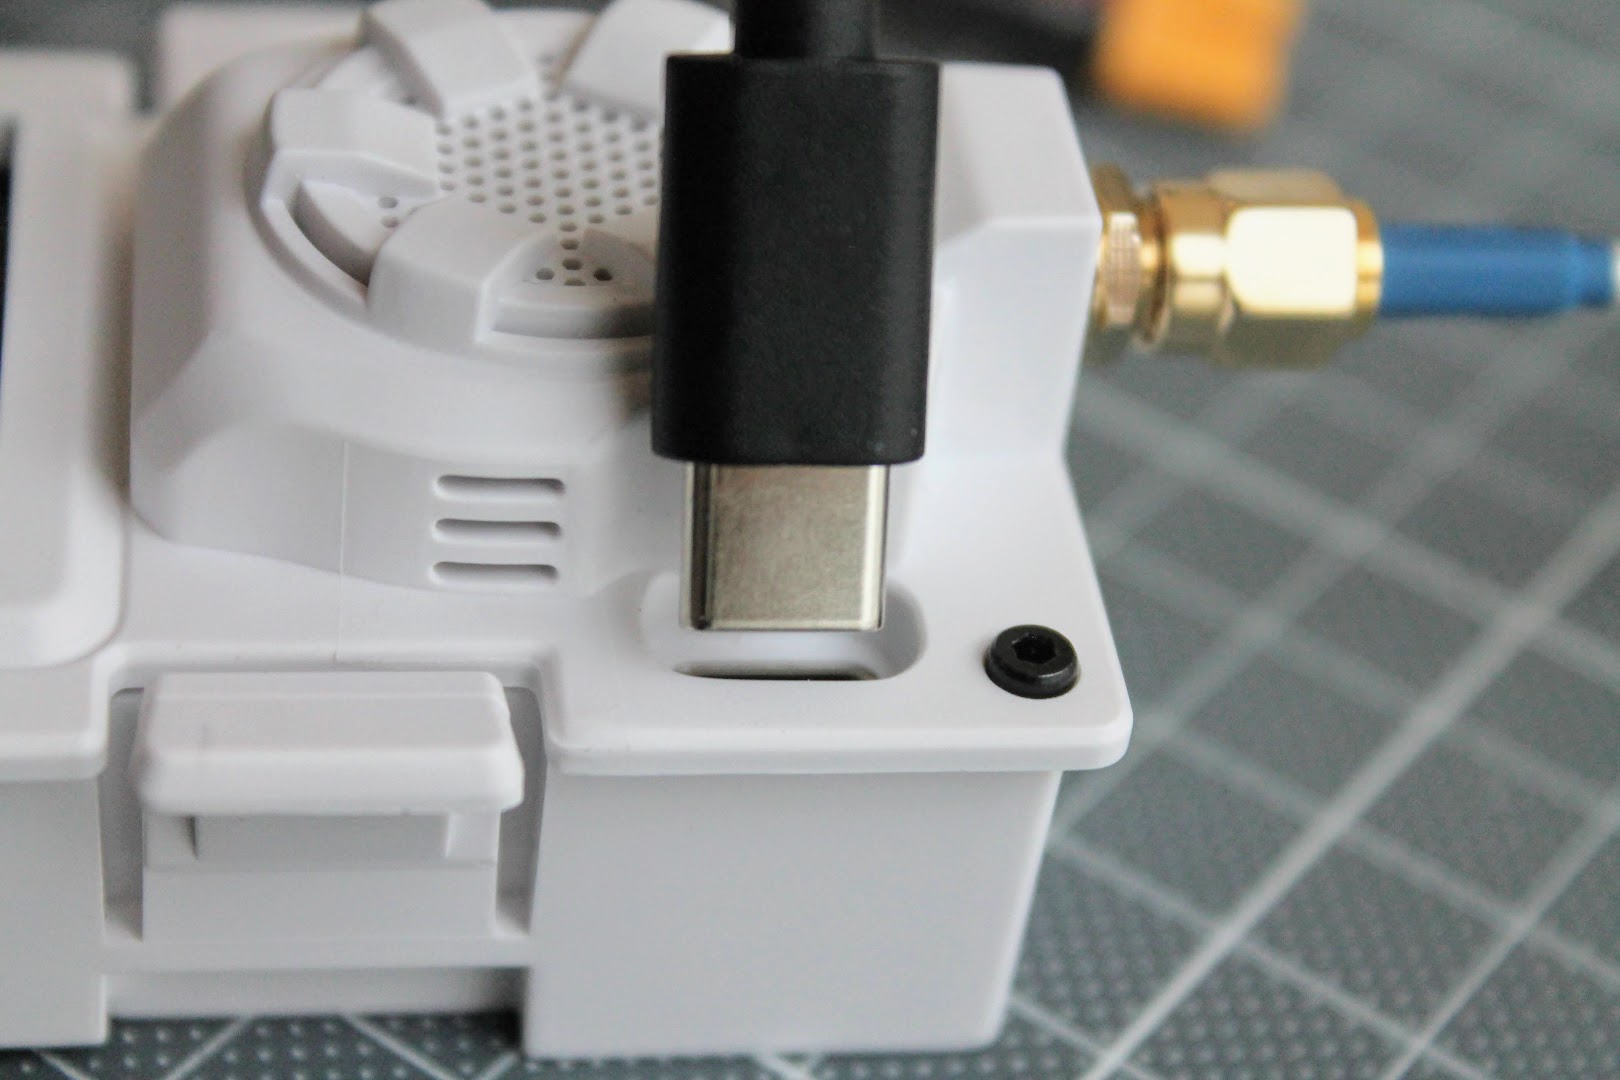
Max allowed input voltage is 12V. DO NOT use 3S or above battery to power up the TX module via XT30 port. Otherwise, the power supply chip in the TX module will be damaged permanently.
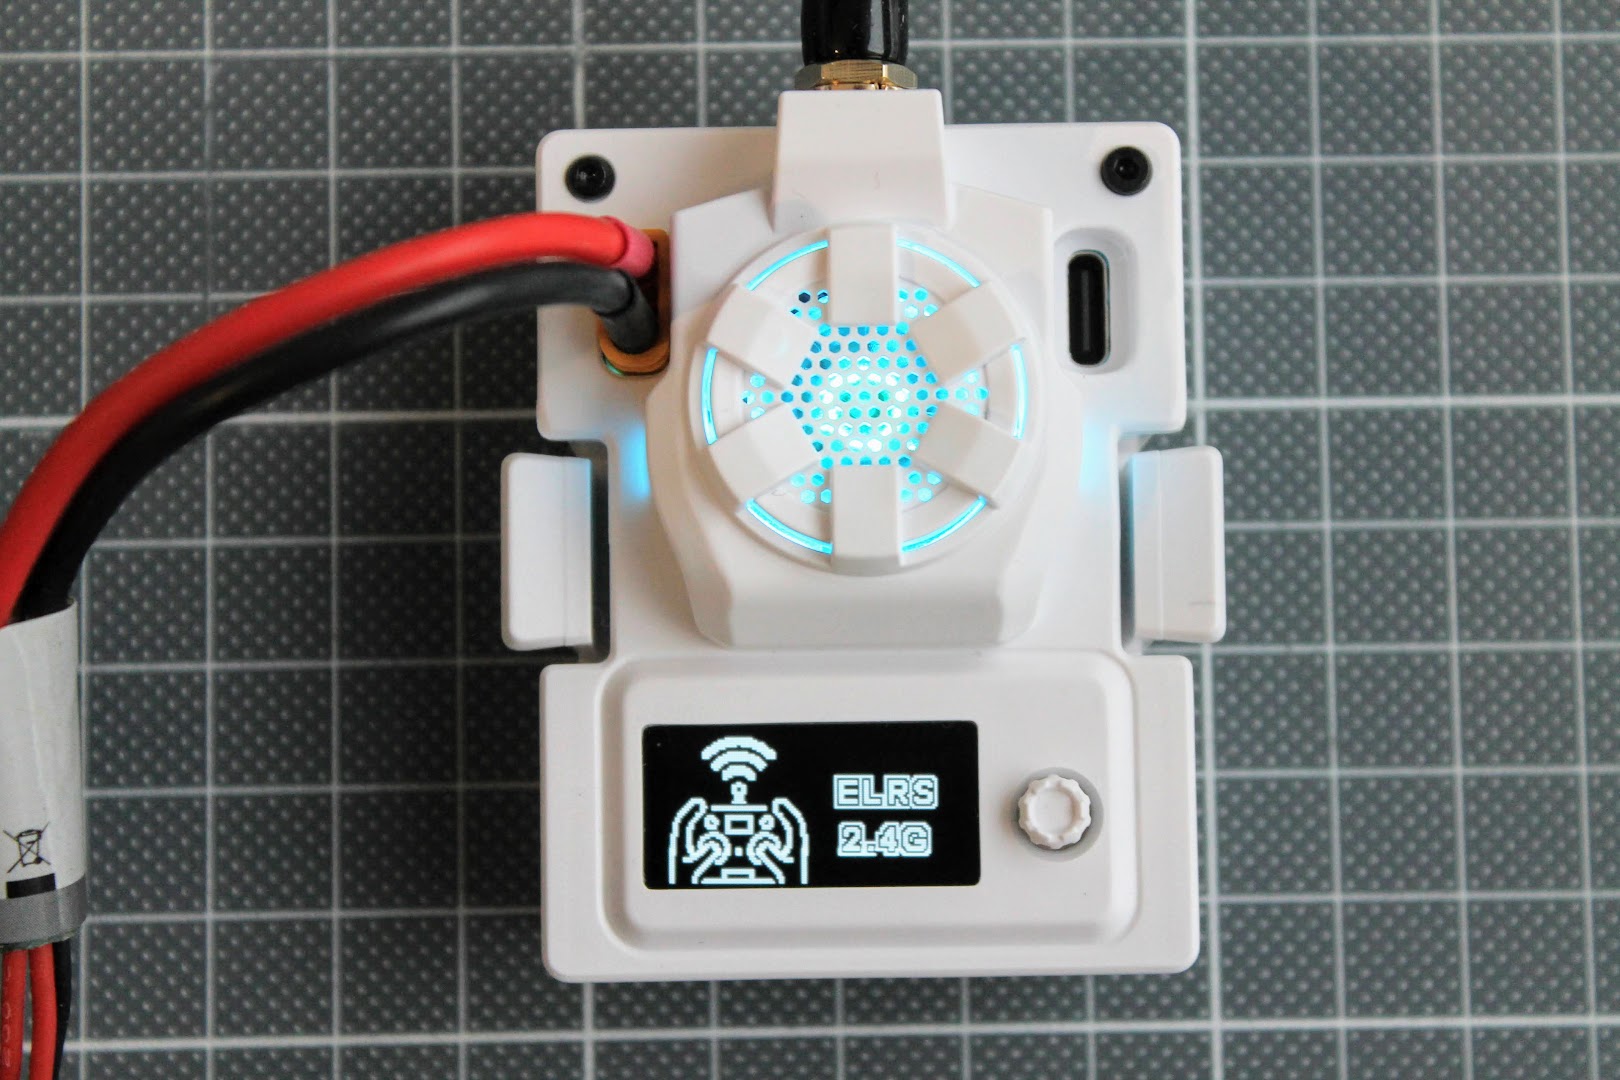
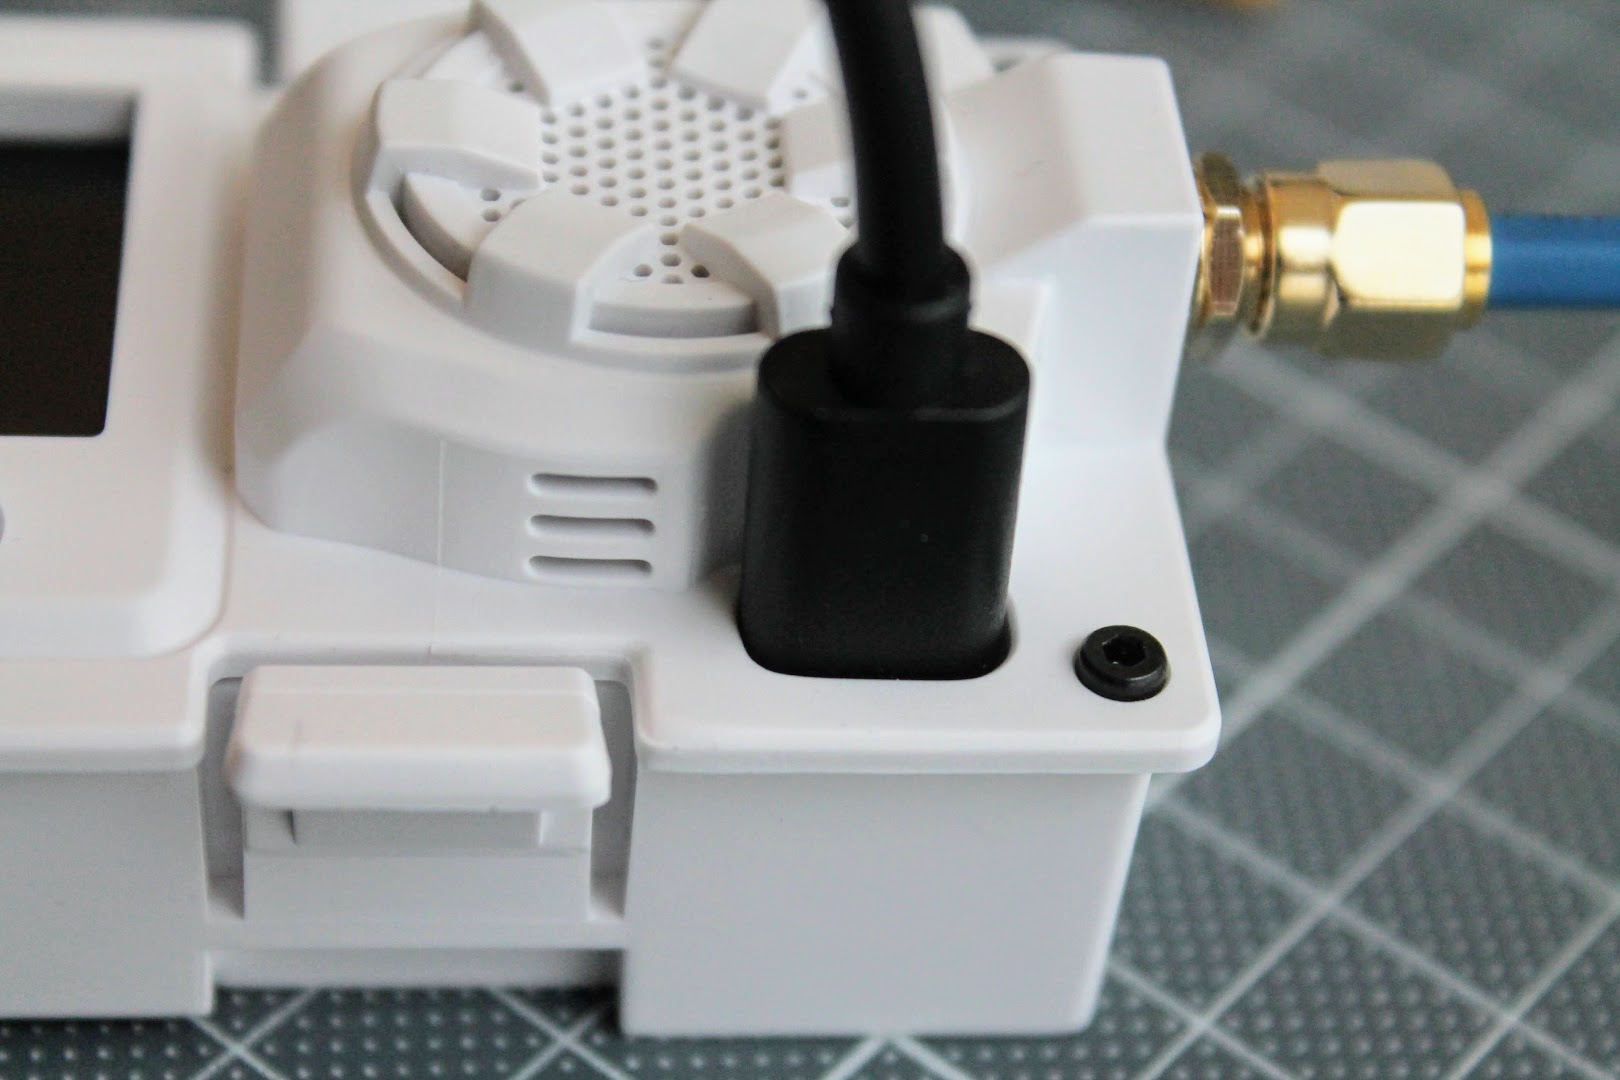
On the top right side of the module you can find the USB Type-C connector slot for connecting the module to the computer and updating the firmware. Read the notes about the USB cable compatibility below.
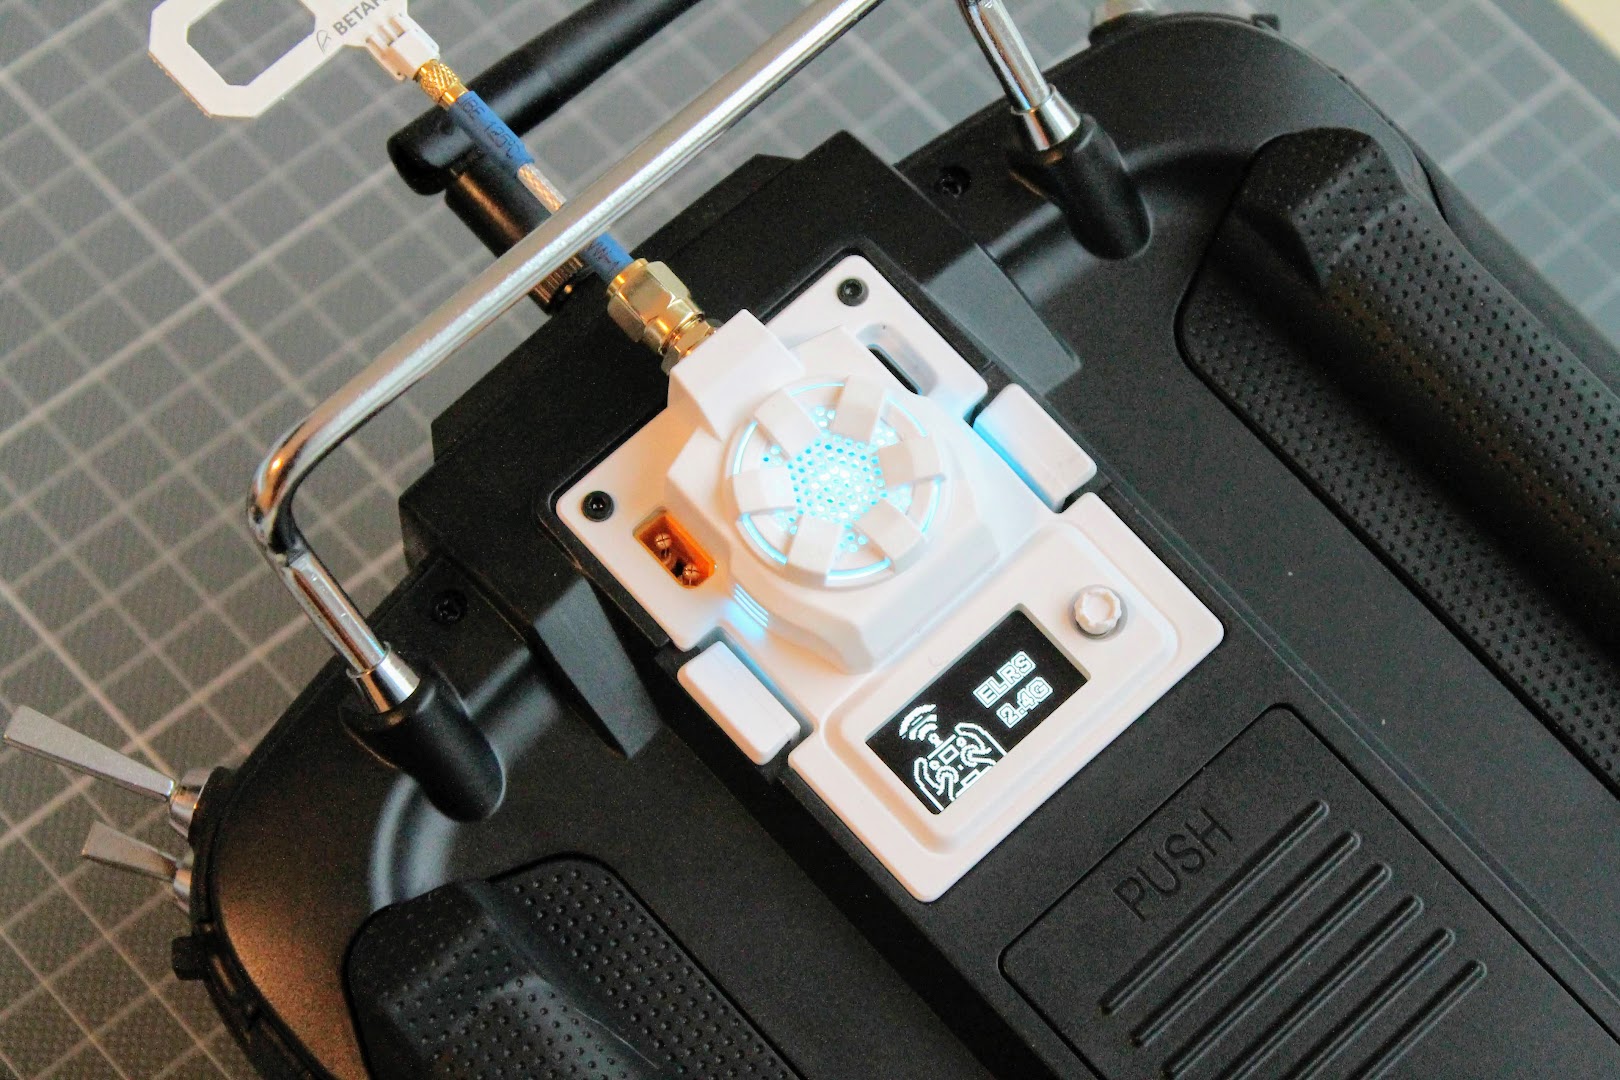
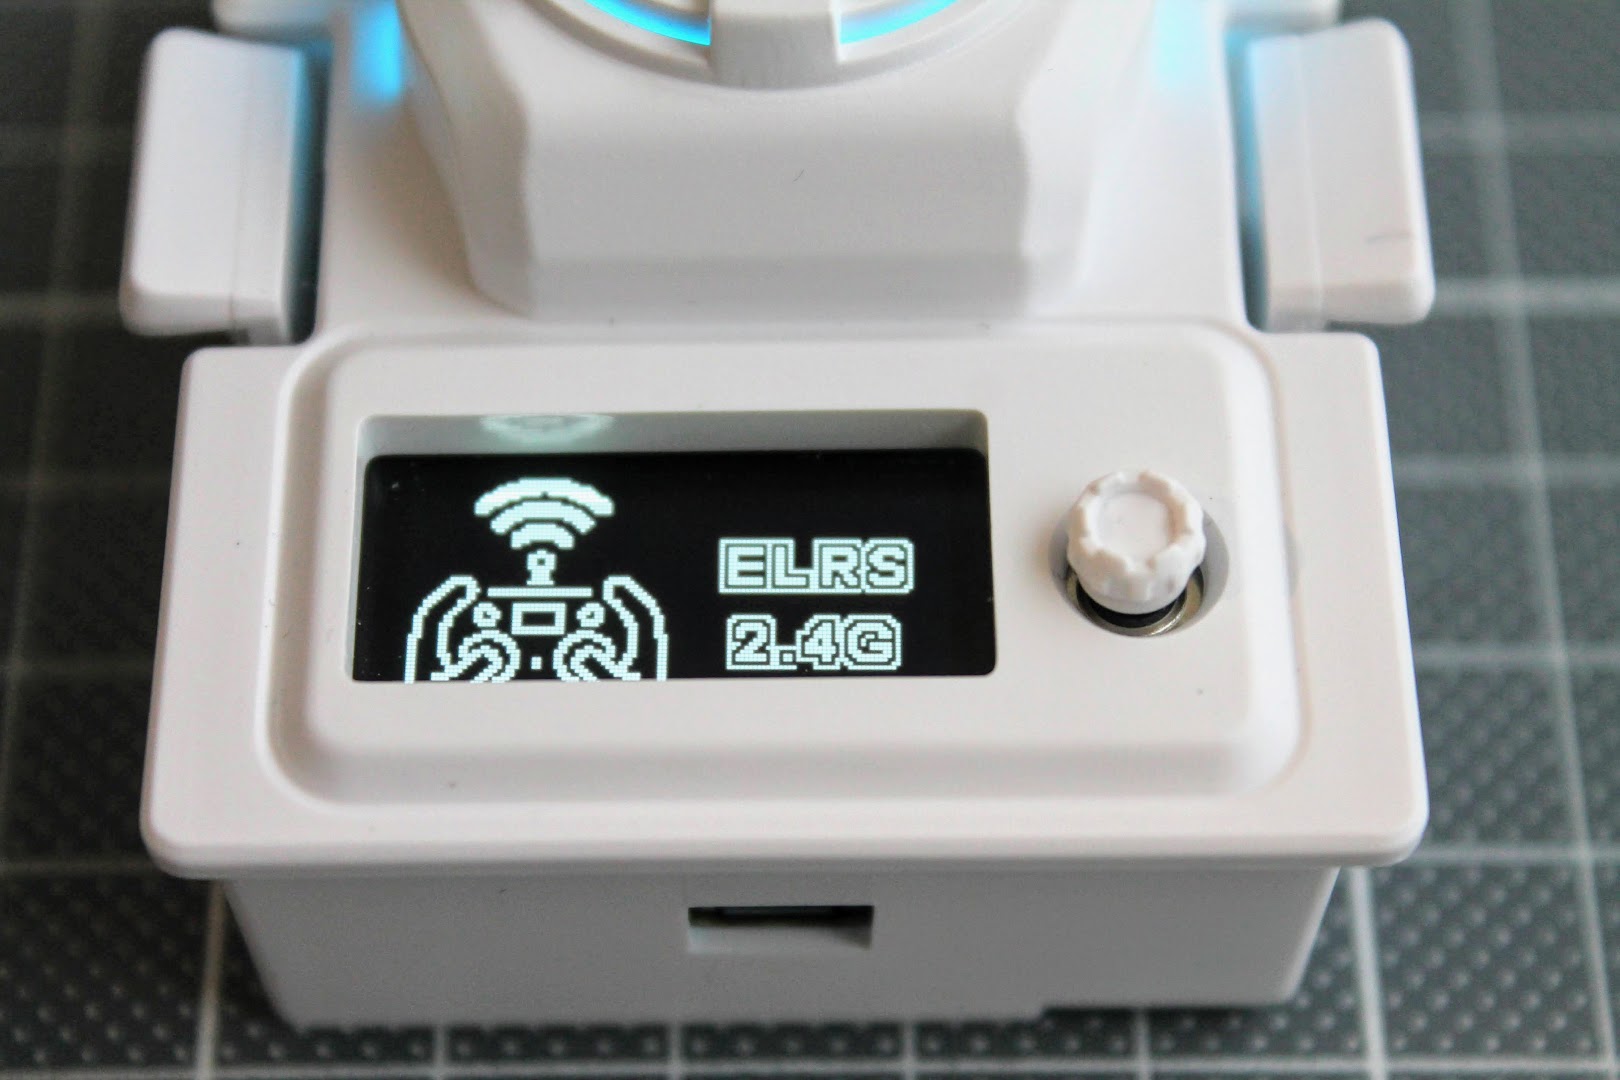
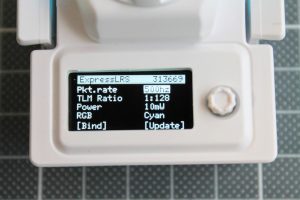
BetaFPV Micro TX has OLED screen and the 5-way joystick for navigation through the ELRS module settings. OLED screen shows the ELRS logo screen and the settings page is “locked”. you need to long press the joystick to “unlock” the settings.
 |
 |
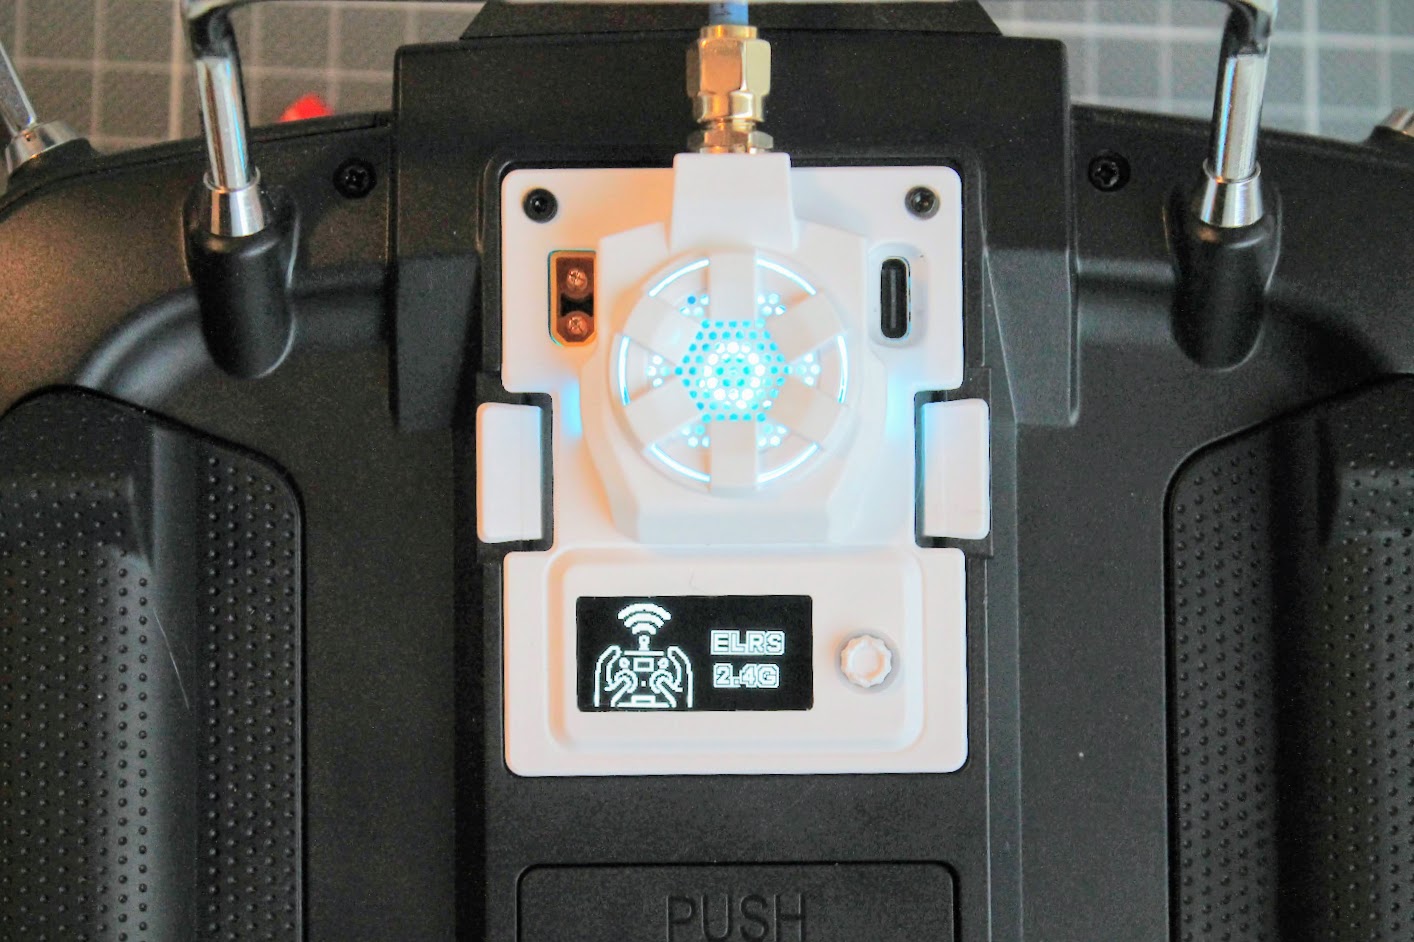
The BetaFPV MicroTX module can be powered by JR bay or can be powered by external power source and be used with ANY radio transmitter that supports CRSF protocol. Examples of such radios: TBS Mambo, Futaba T18SZ, Futaba T16SZ, Flysky NV14 and others.
 |
|
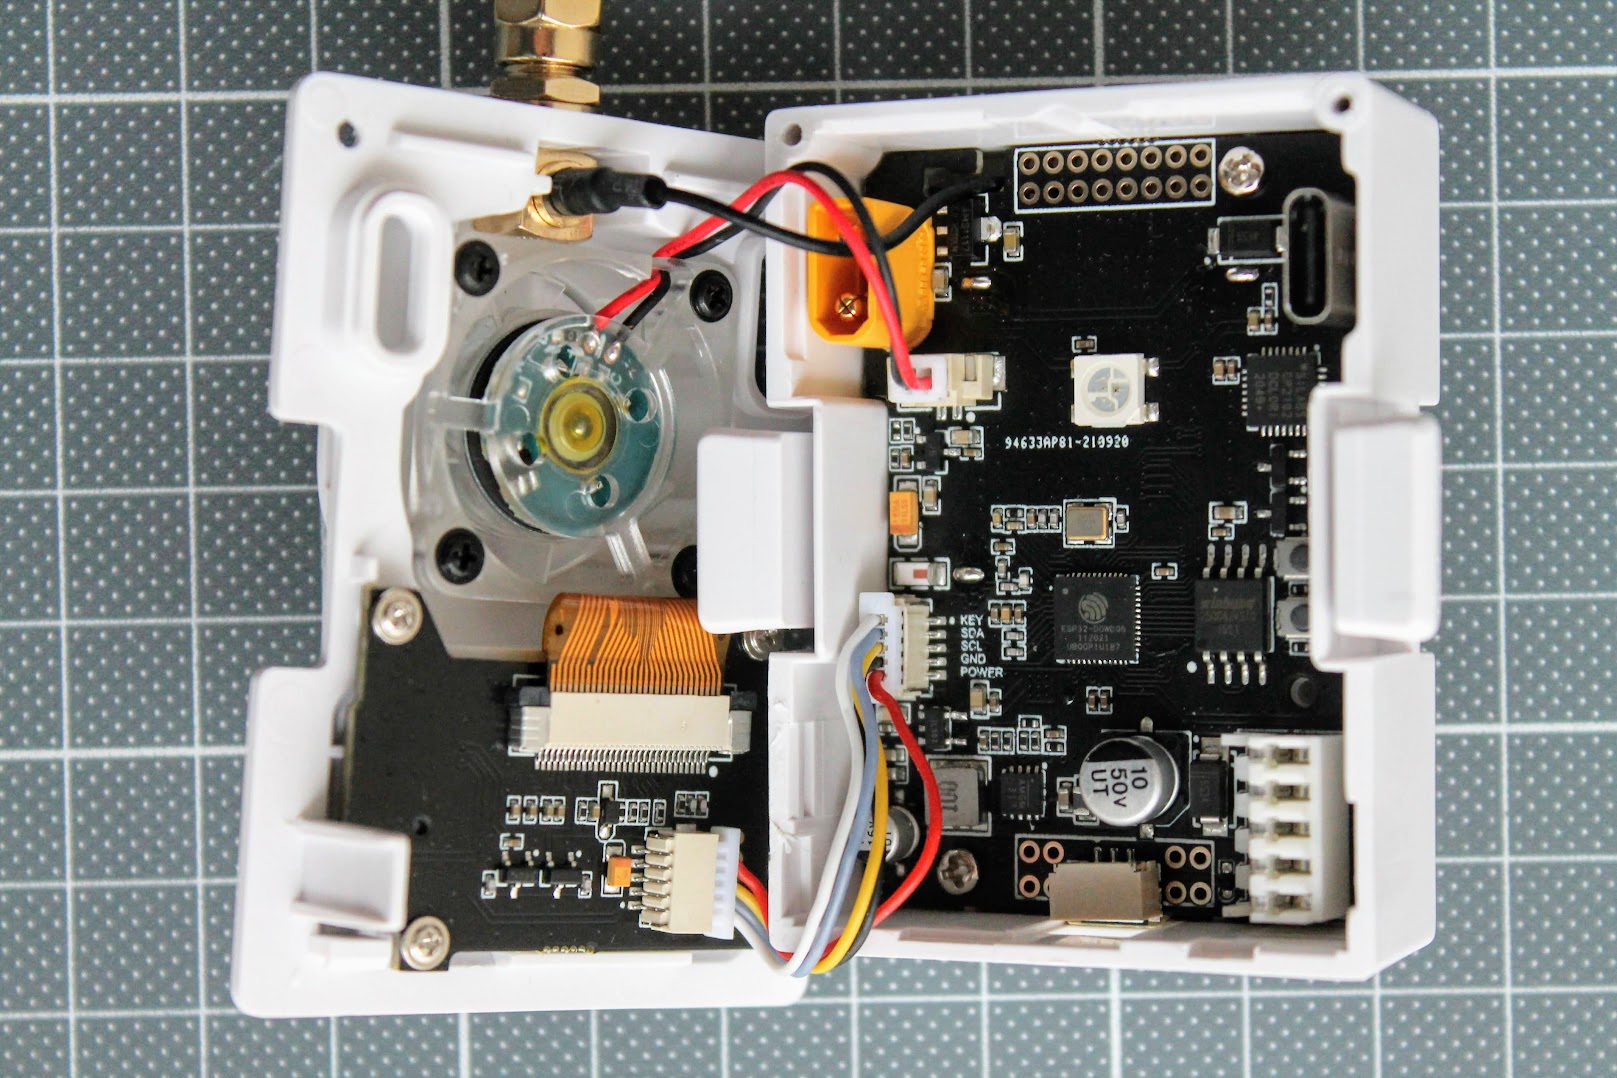
Inside the module
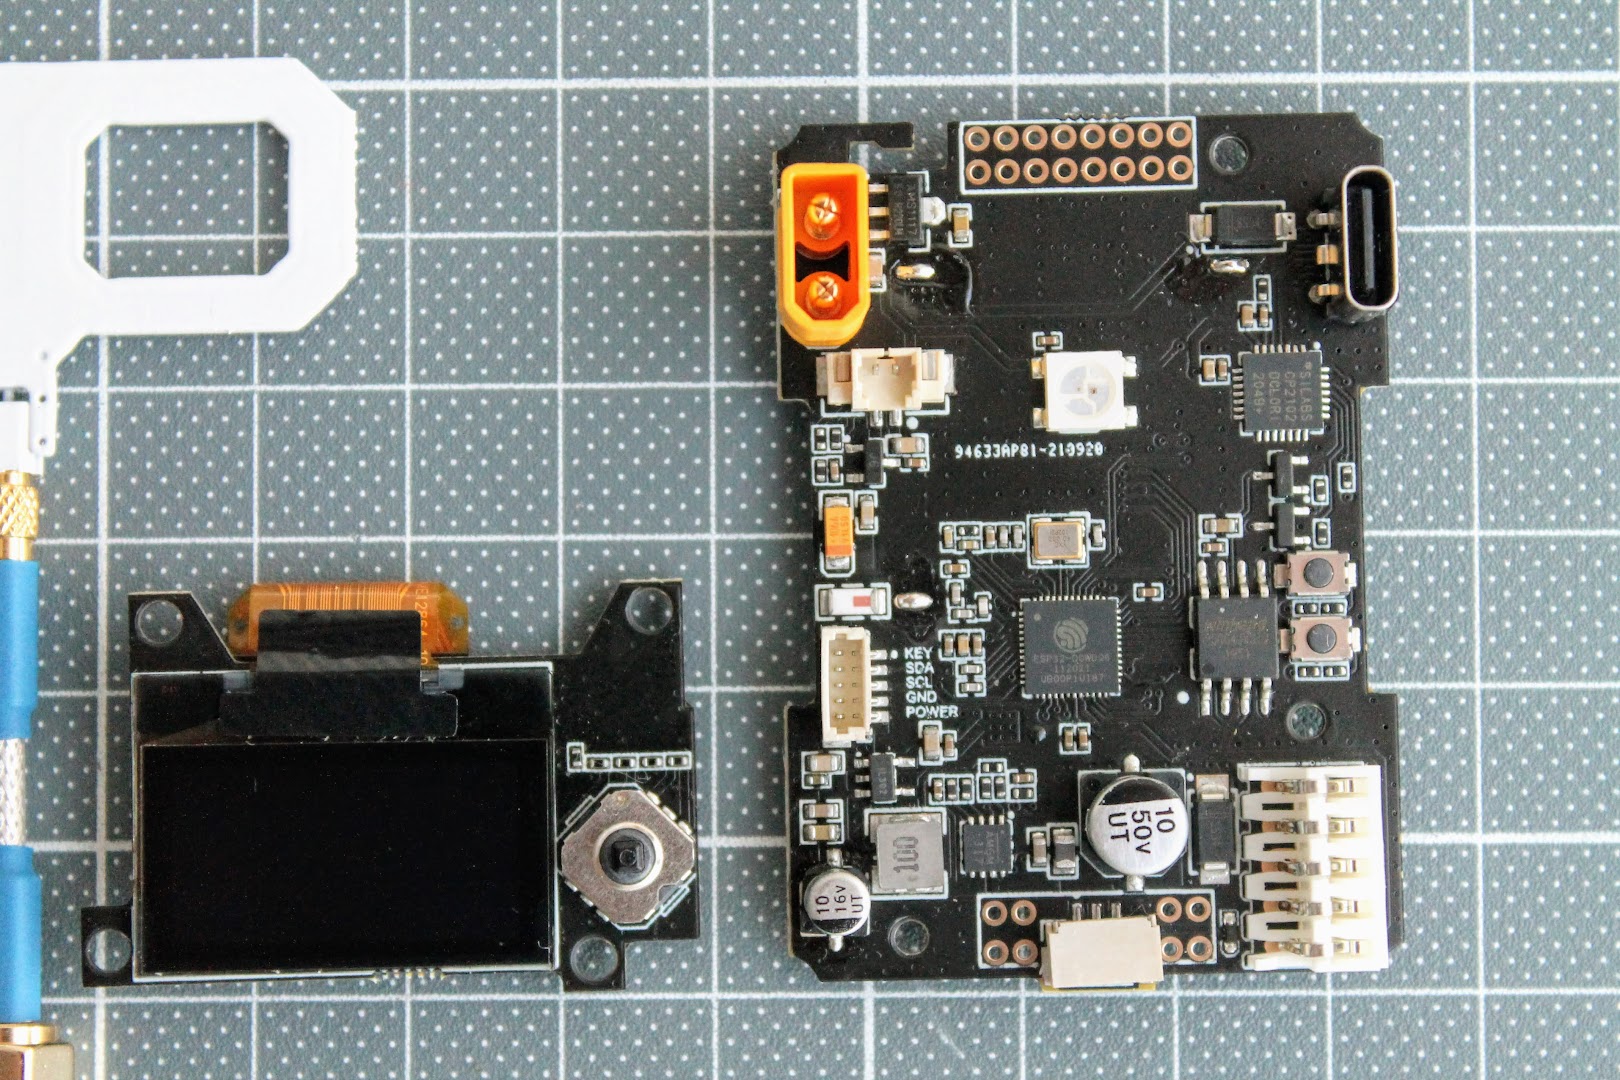
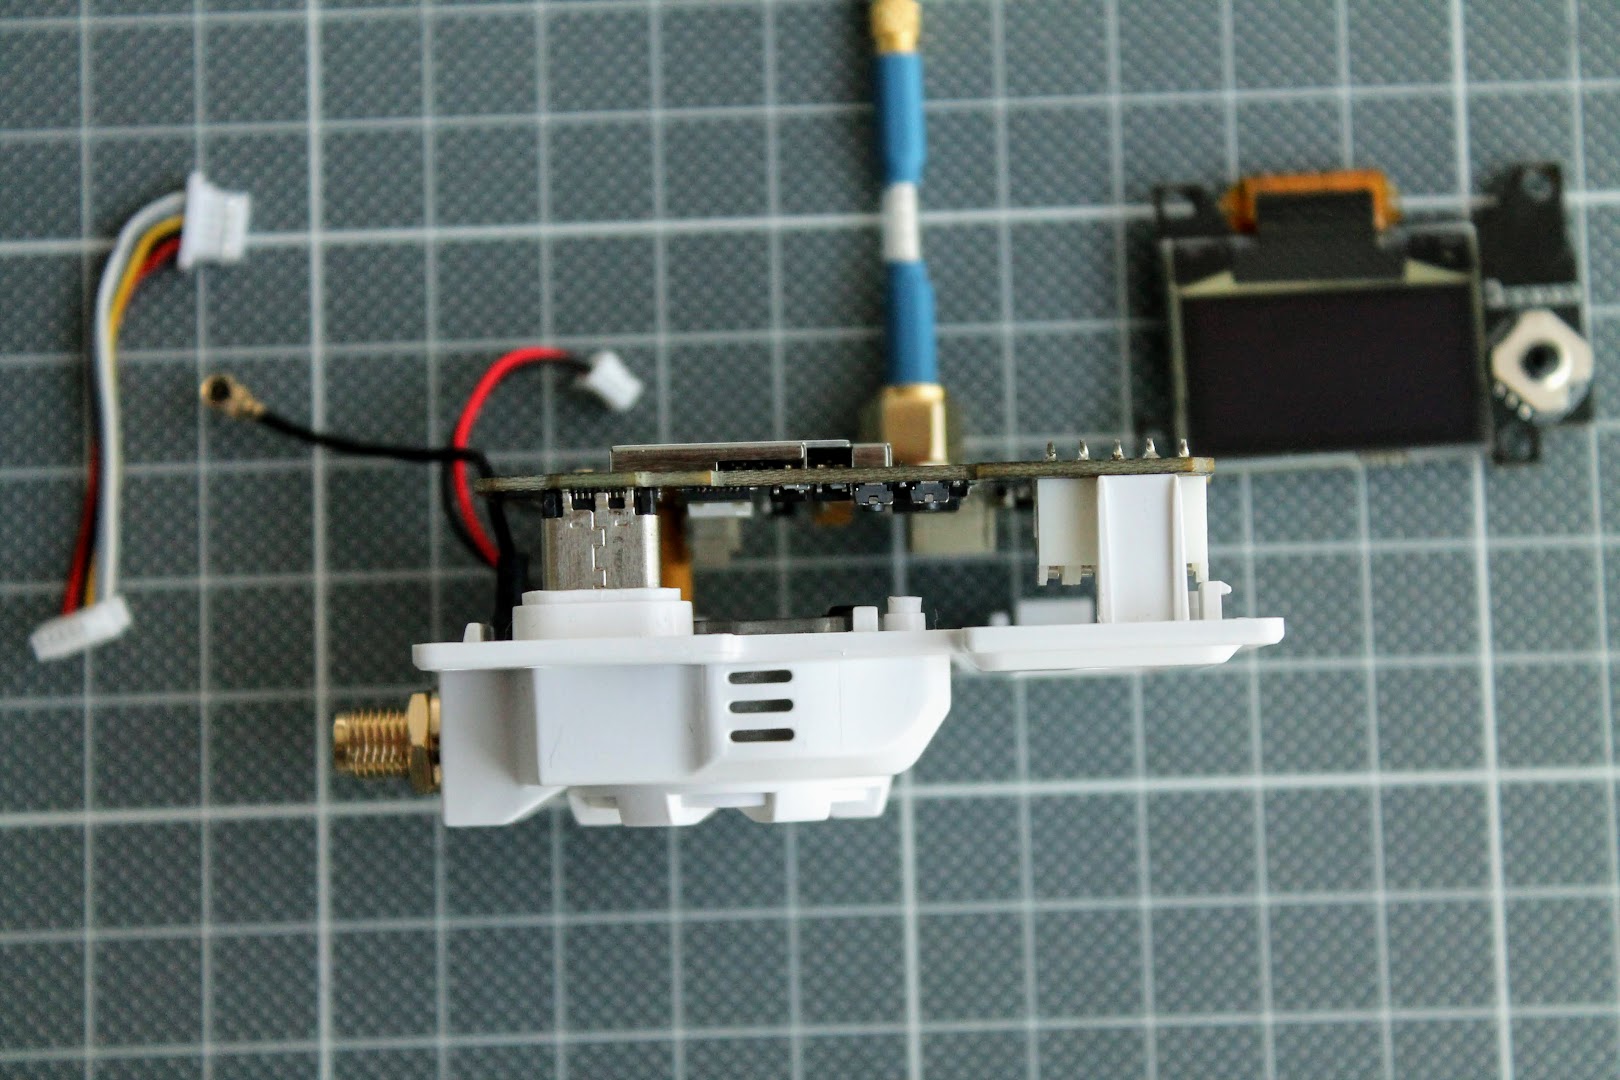
Inside the module you can find the main PCB, cooling fan, antenna pigtail and the daughter board with OLED screen and 5-way joystick.
The top and the bottom views of the module PCB.
 |
 |
There is a RGB LED in the middle of the module on the top side and the RF part is located on the bottom of the board.
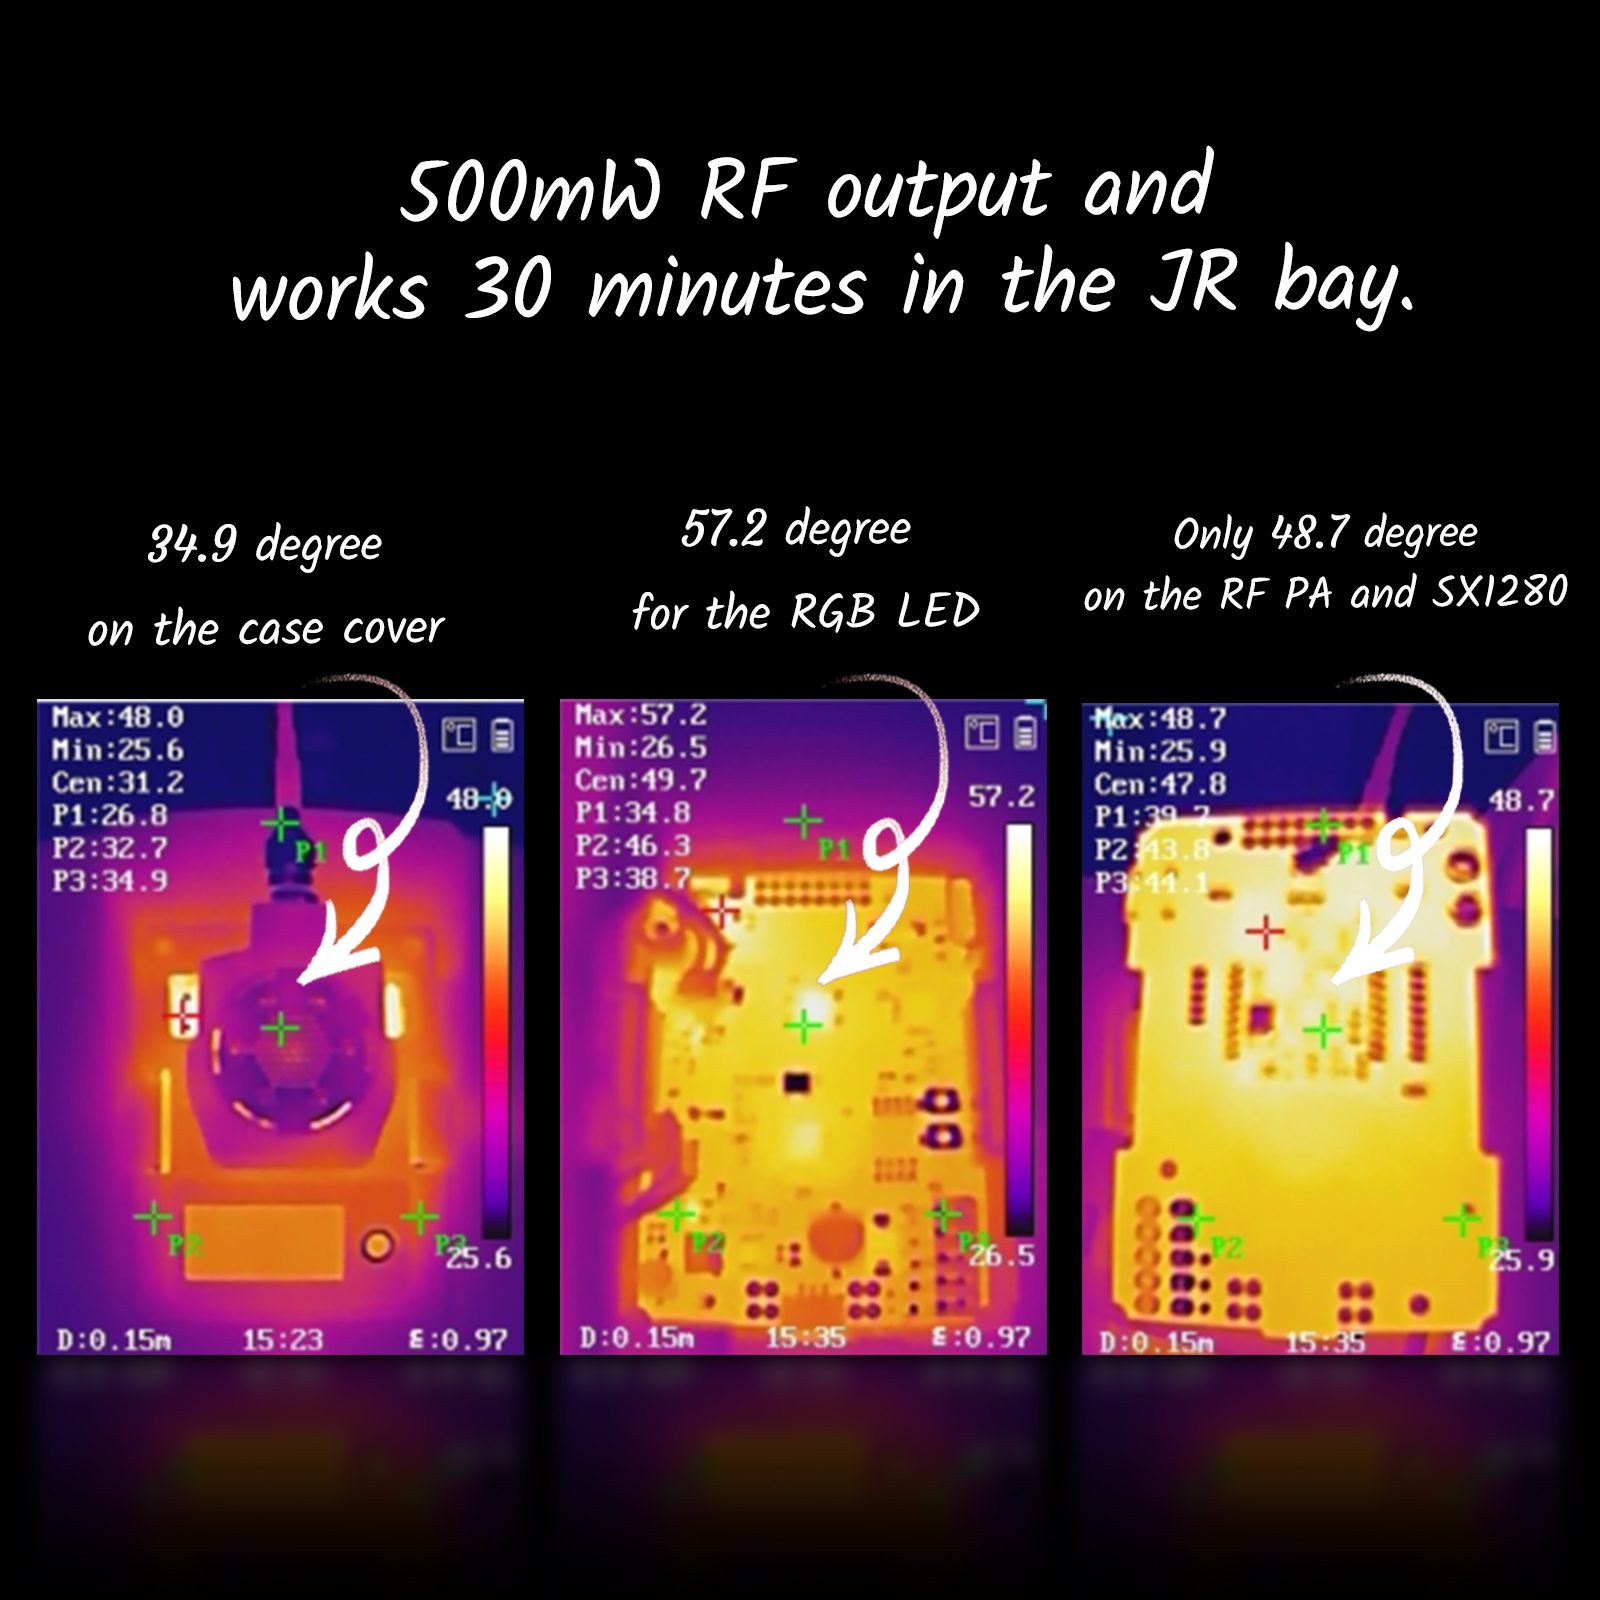
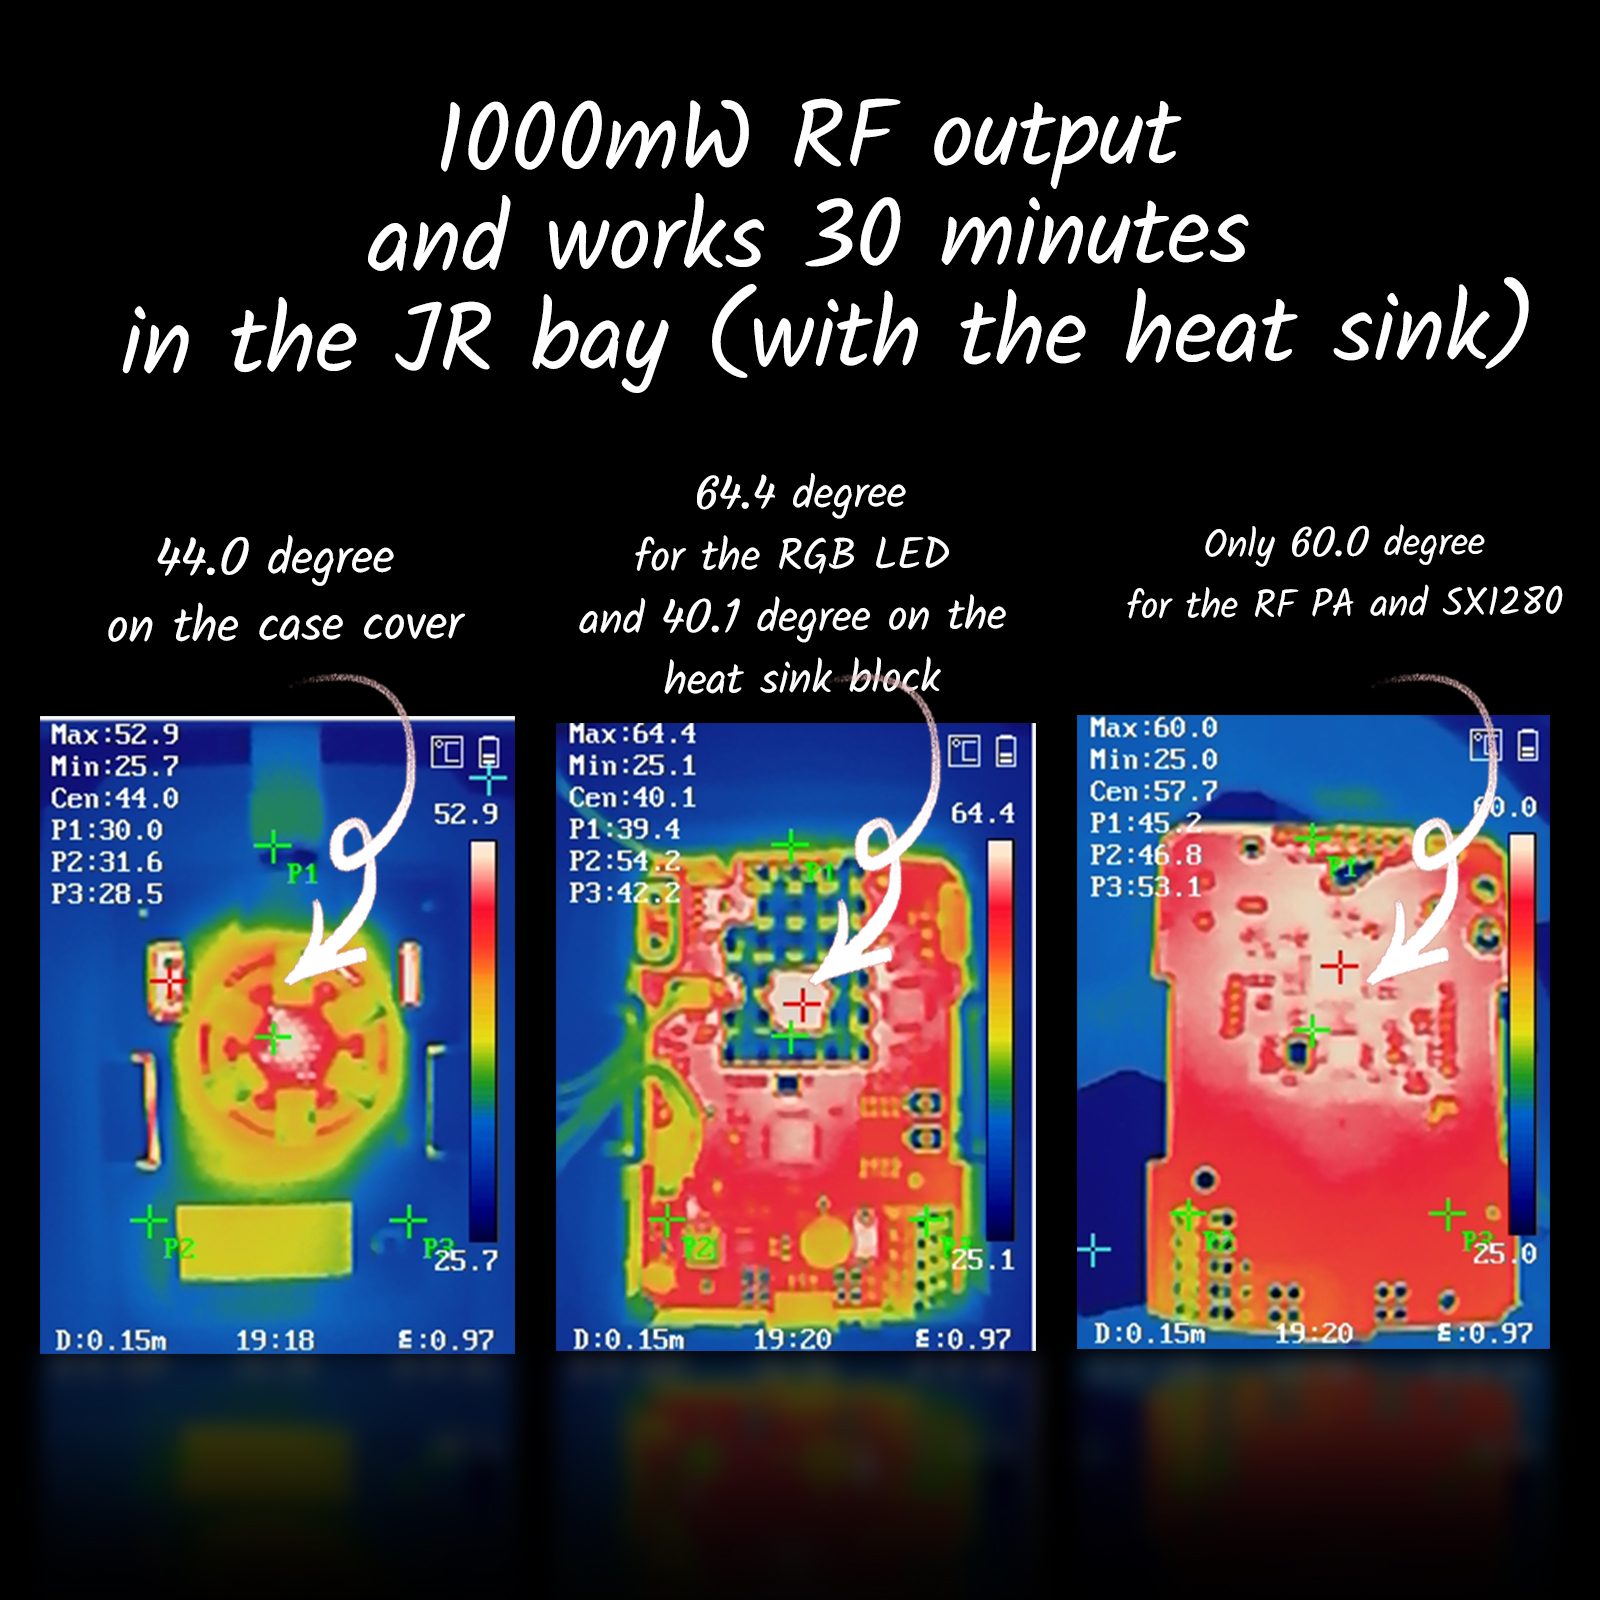
There is a lot of space inside the module for air to circulate and keep the module cool. RF power output test show that this module does not overheat and power output does not degrade on heating up.
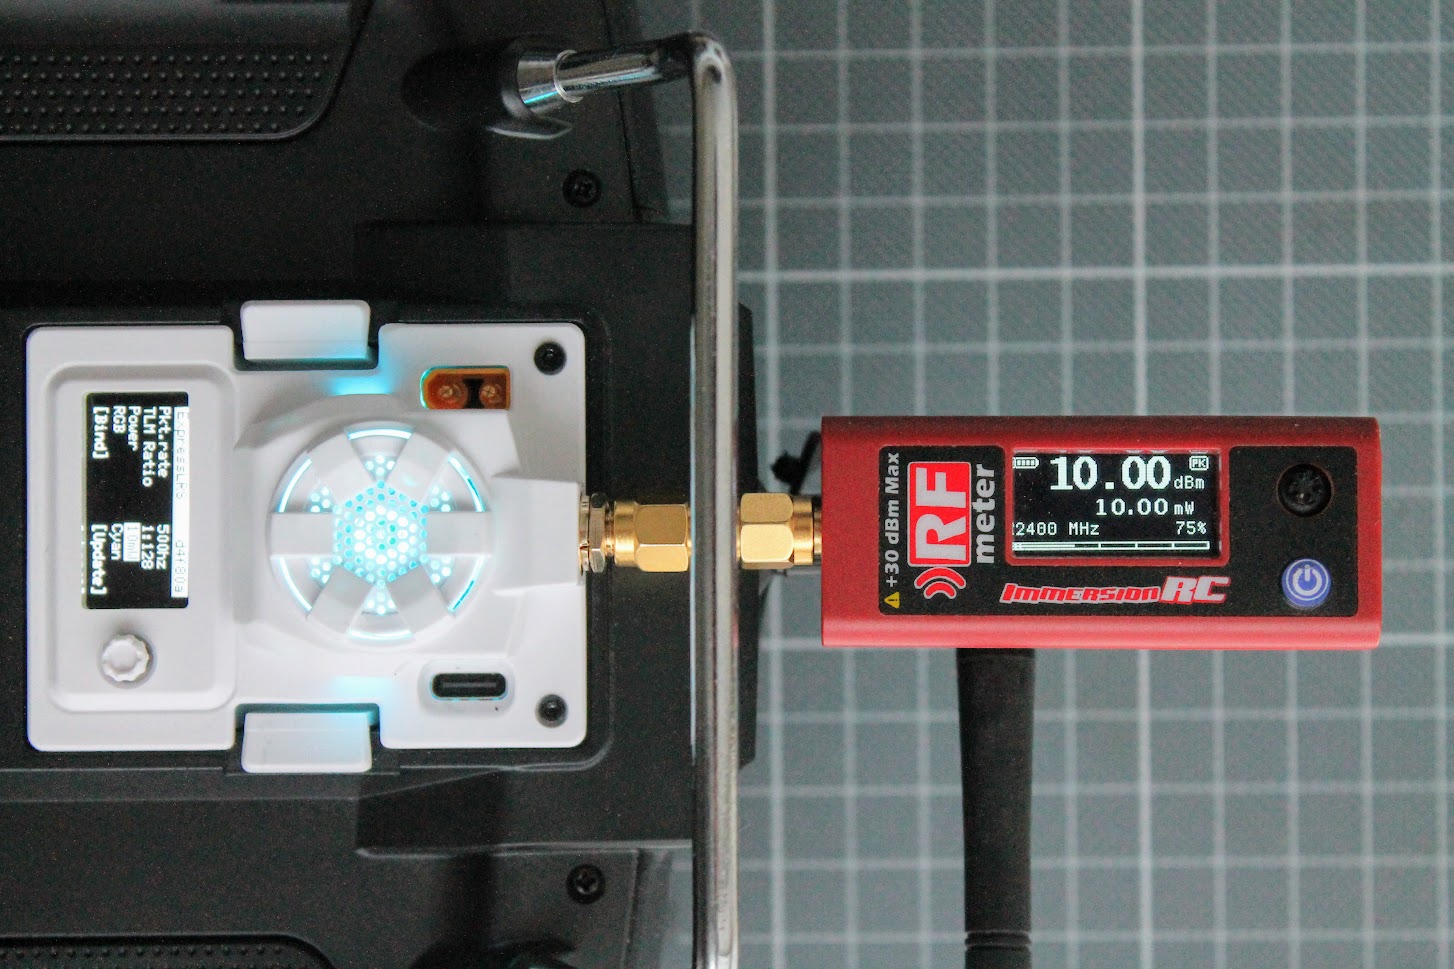
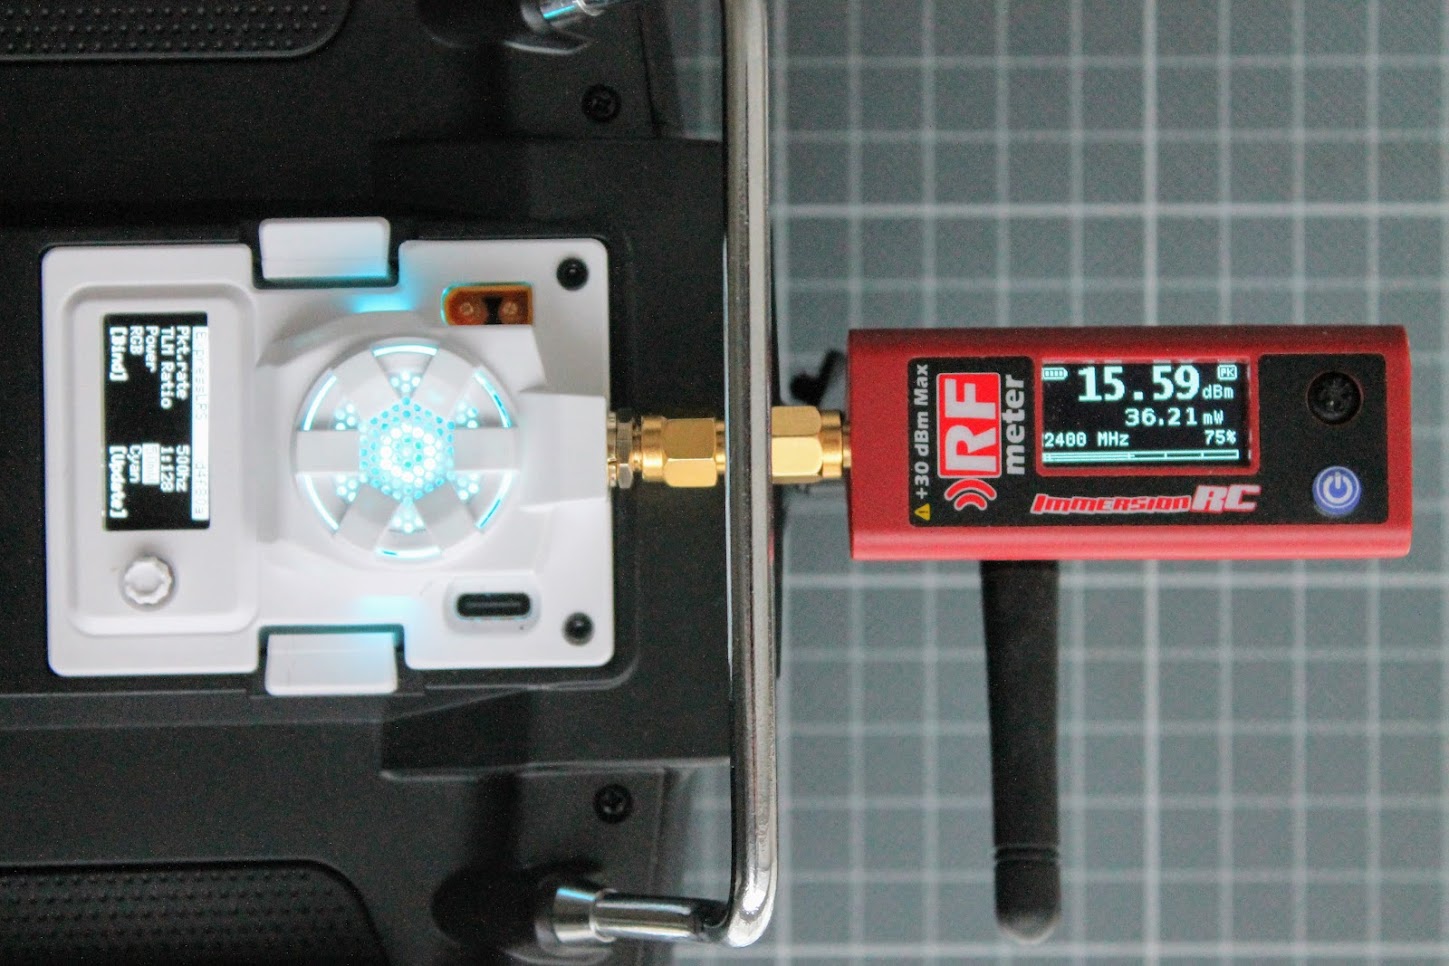
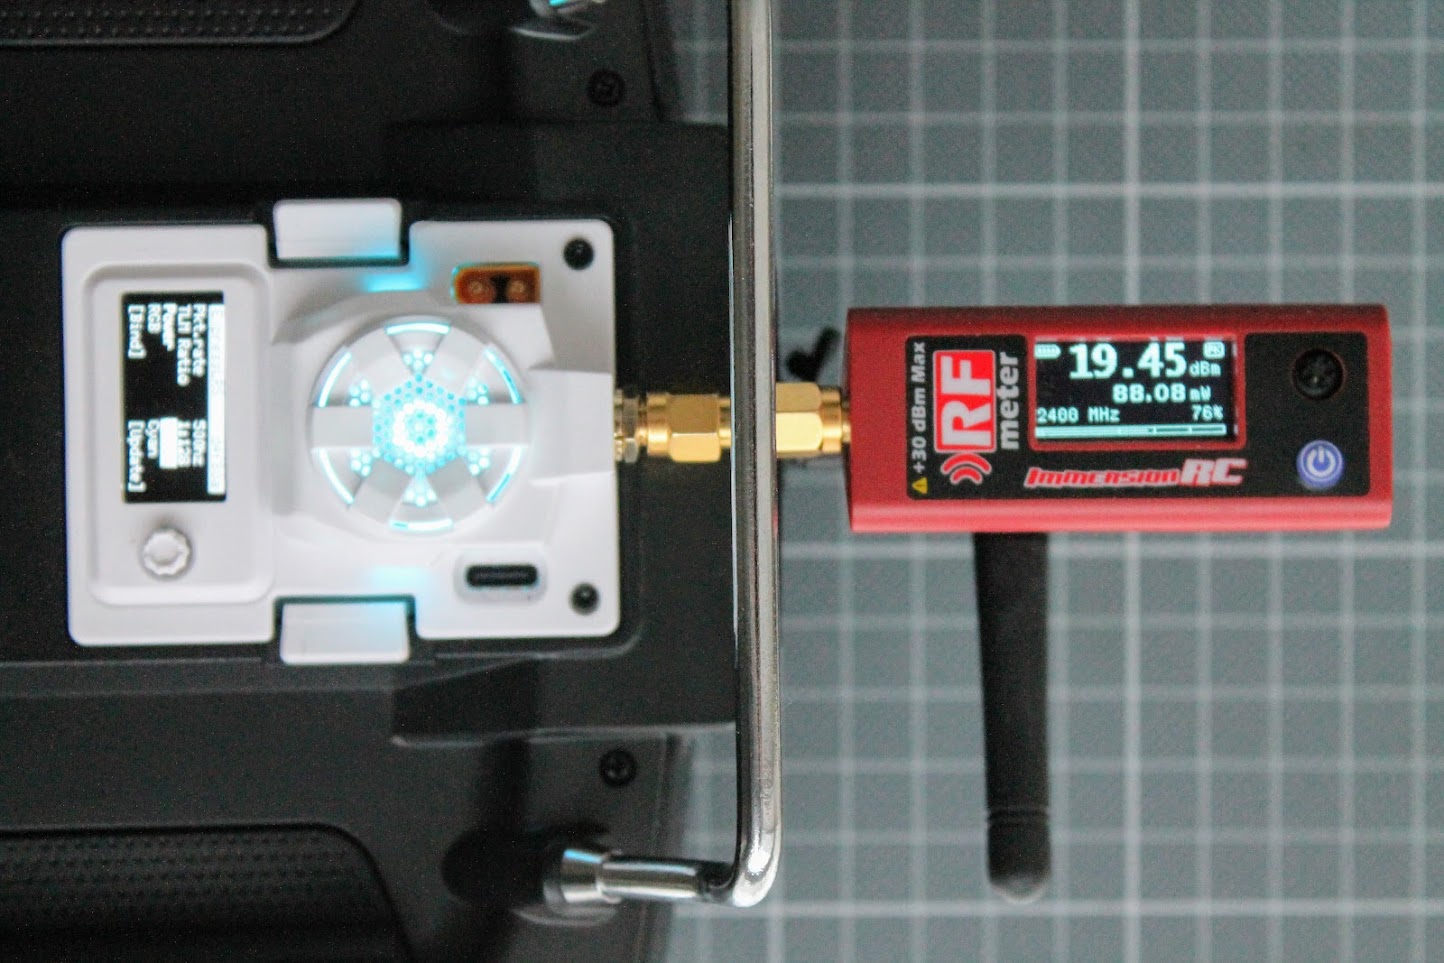
RF power output measurements
I have tested the power output with ImmersionRC RF Power meter on 10mW, 25mW, 100mW, 250mW and 500mW settings.
10mW
25mW

50mW
100mW
250mW 
500mW 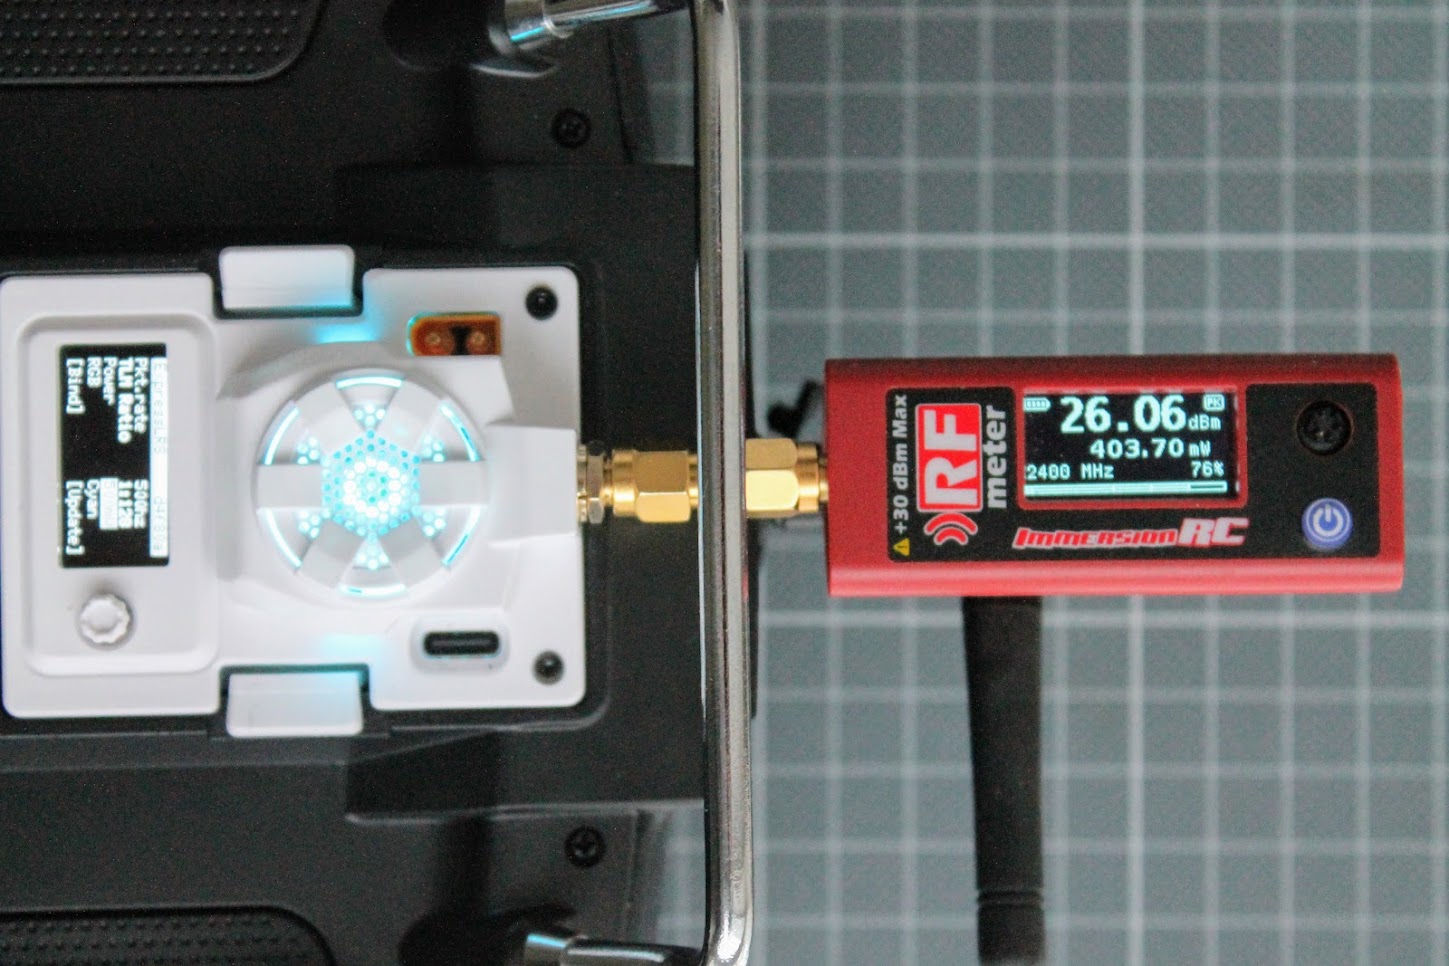
500mW after 30min of runtime.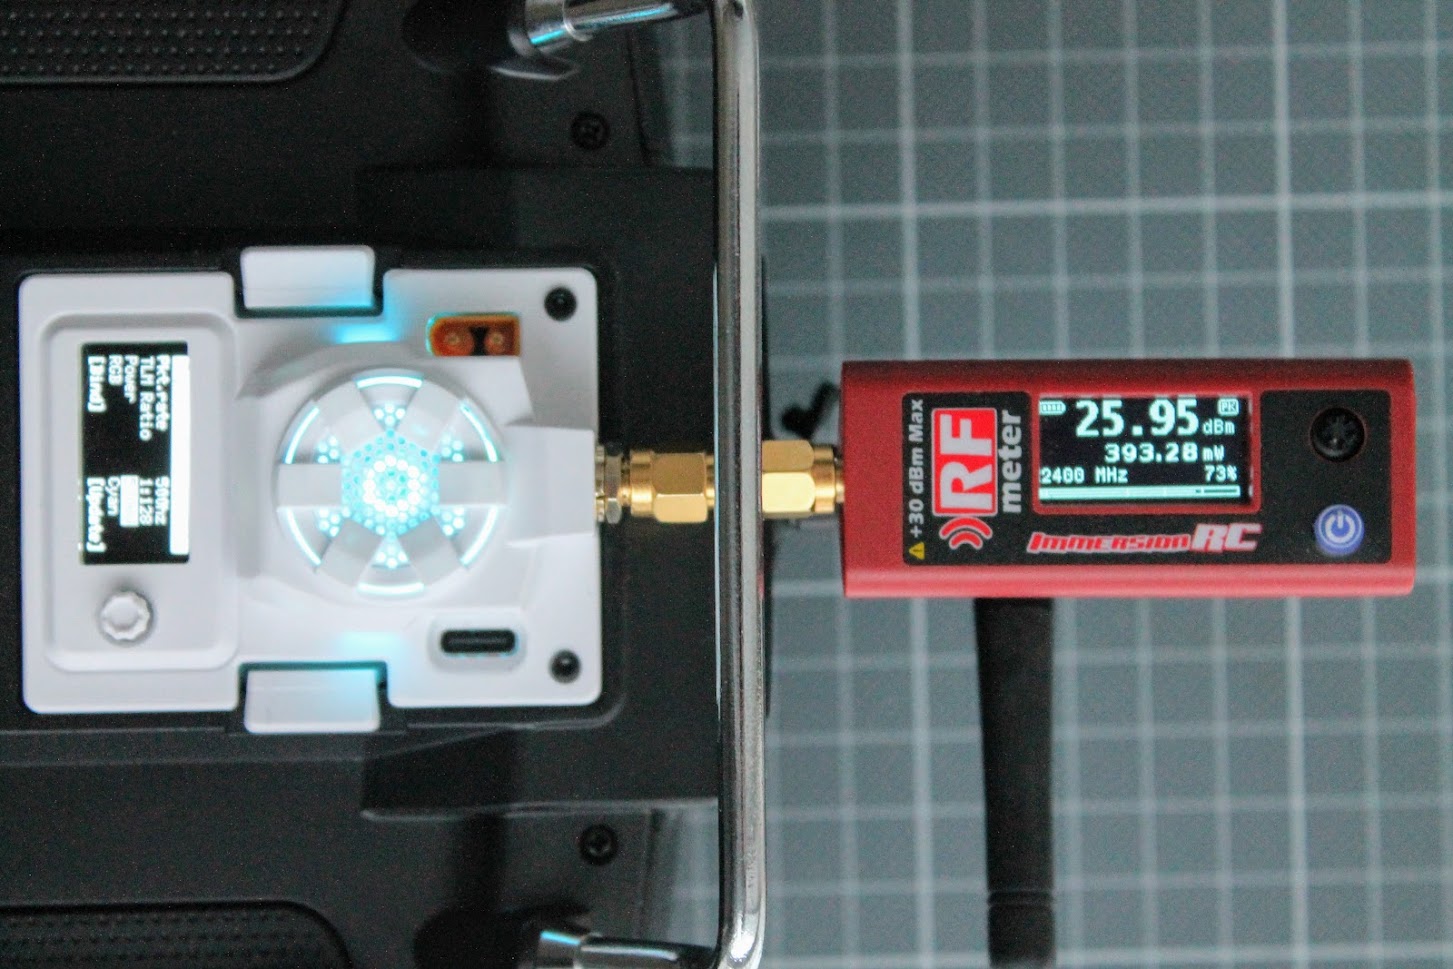
Known issues
There are several known issues so far. BetaFPV has faced them, provided the feedback and is taking actions to fix them. Some of that issues are already fixed or at least explained in detail below.
The moment when you enter the BetaFPV Micro TX OLED menu by long pressing the joystick button, RC link with the receiver is lost and this can lead to your aircraft to failsafe. It is expected to be fixed in the official ELRS version 2.1. Meanwhile there is an unofficial BetaFPV firmware with this issue fixed. Look for the “How to update (unofficial) ELRS firmware ” section below.
OLED screen is not supported in the ExpressLRS
The Micro TX module comes with the custom BetaFPV firmware and it’s OLED screen is not supported in the official ExpressLRS firmware for now. It is expected to be supported in the official ELRS version 2.1. Meanwhile there is an unofficial BetaFPV firmware with OLED support. Look for the “How to update (unofficial) ELRS firmware ” section below.
5-way joystick for navigation is working as simple button. No up-down, left-right positions work. If you want to move through the menu, you need to long press the joystick like a button.
It is expected that the 5-way joystick be supported in the official ELRS version 2.1. Meanwhile there is an unofficial BetaFPV firmware with full 5-way joystick support. Look for the “How to update (unofficial) ELRS firmware ” section below.
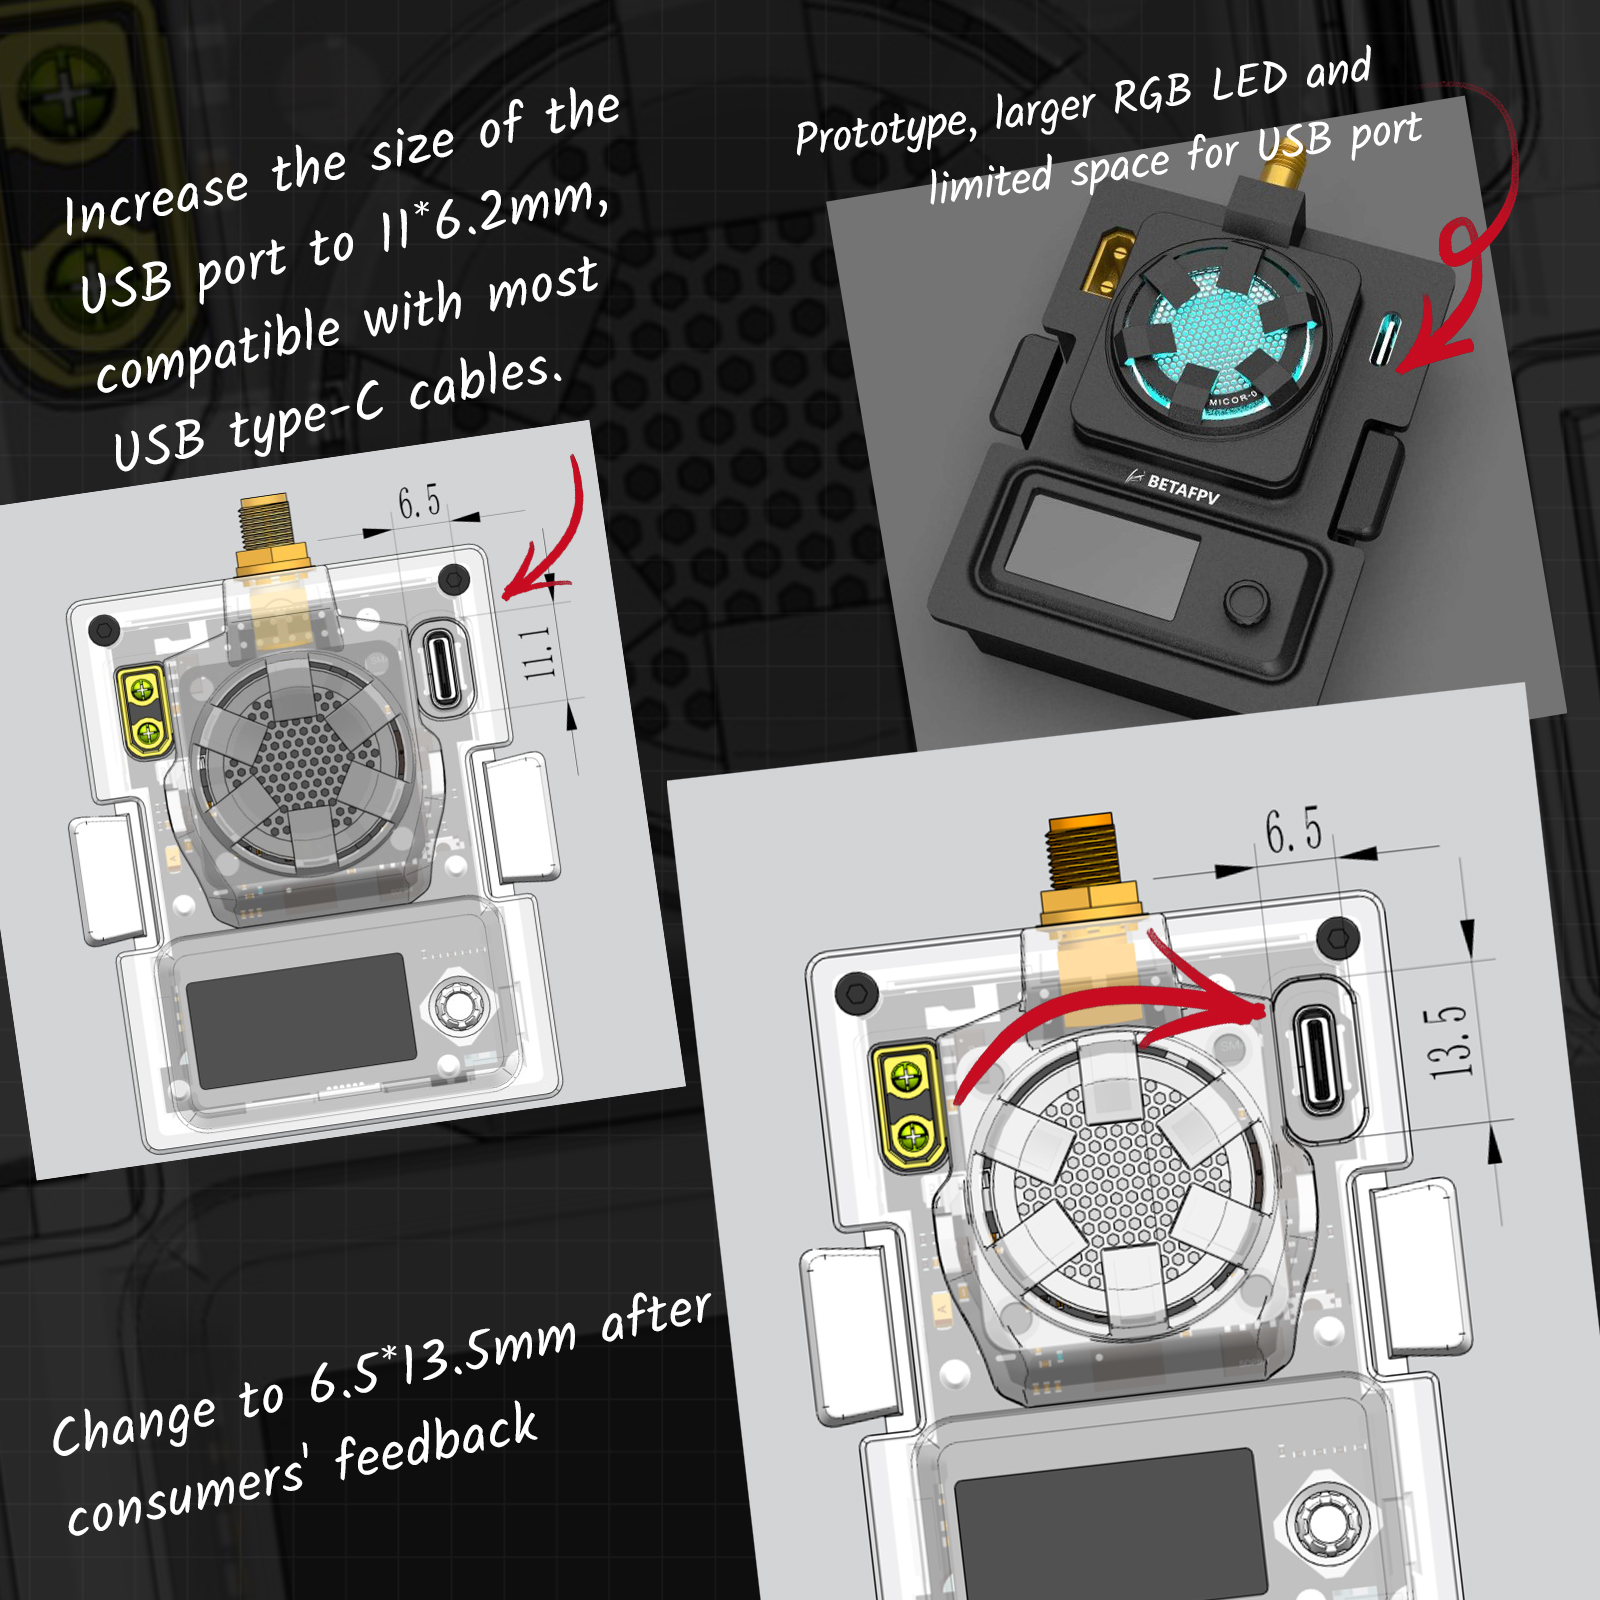
USB Type-C port too small
The USB port housing on the TX module is 6.2*11mm and may not fit with all the USB cables your own. A spare USB data cable (Type-A to Type-C) is included in the package for all order since November 18.
|
 |
BetaFPV response to the USB Type-C connector port being too small
 |
 |
 |
RF Chip on the back side of the module
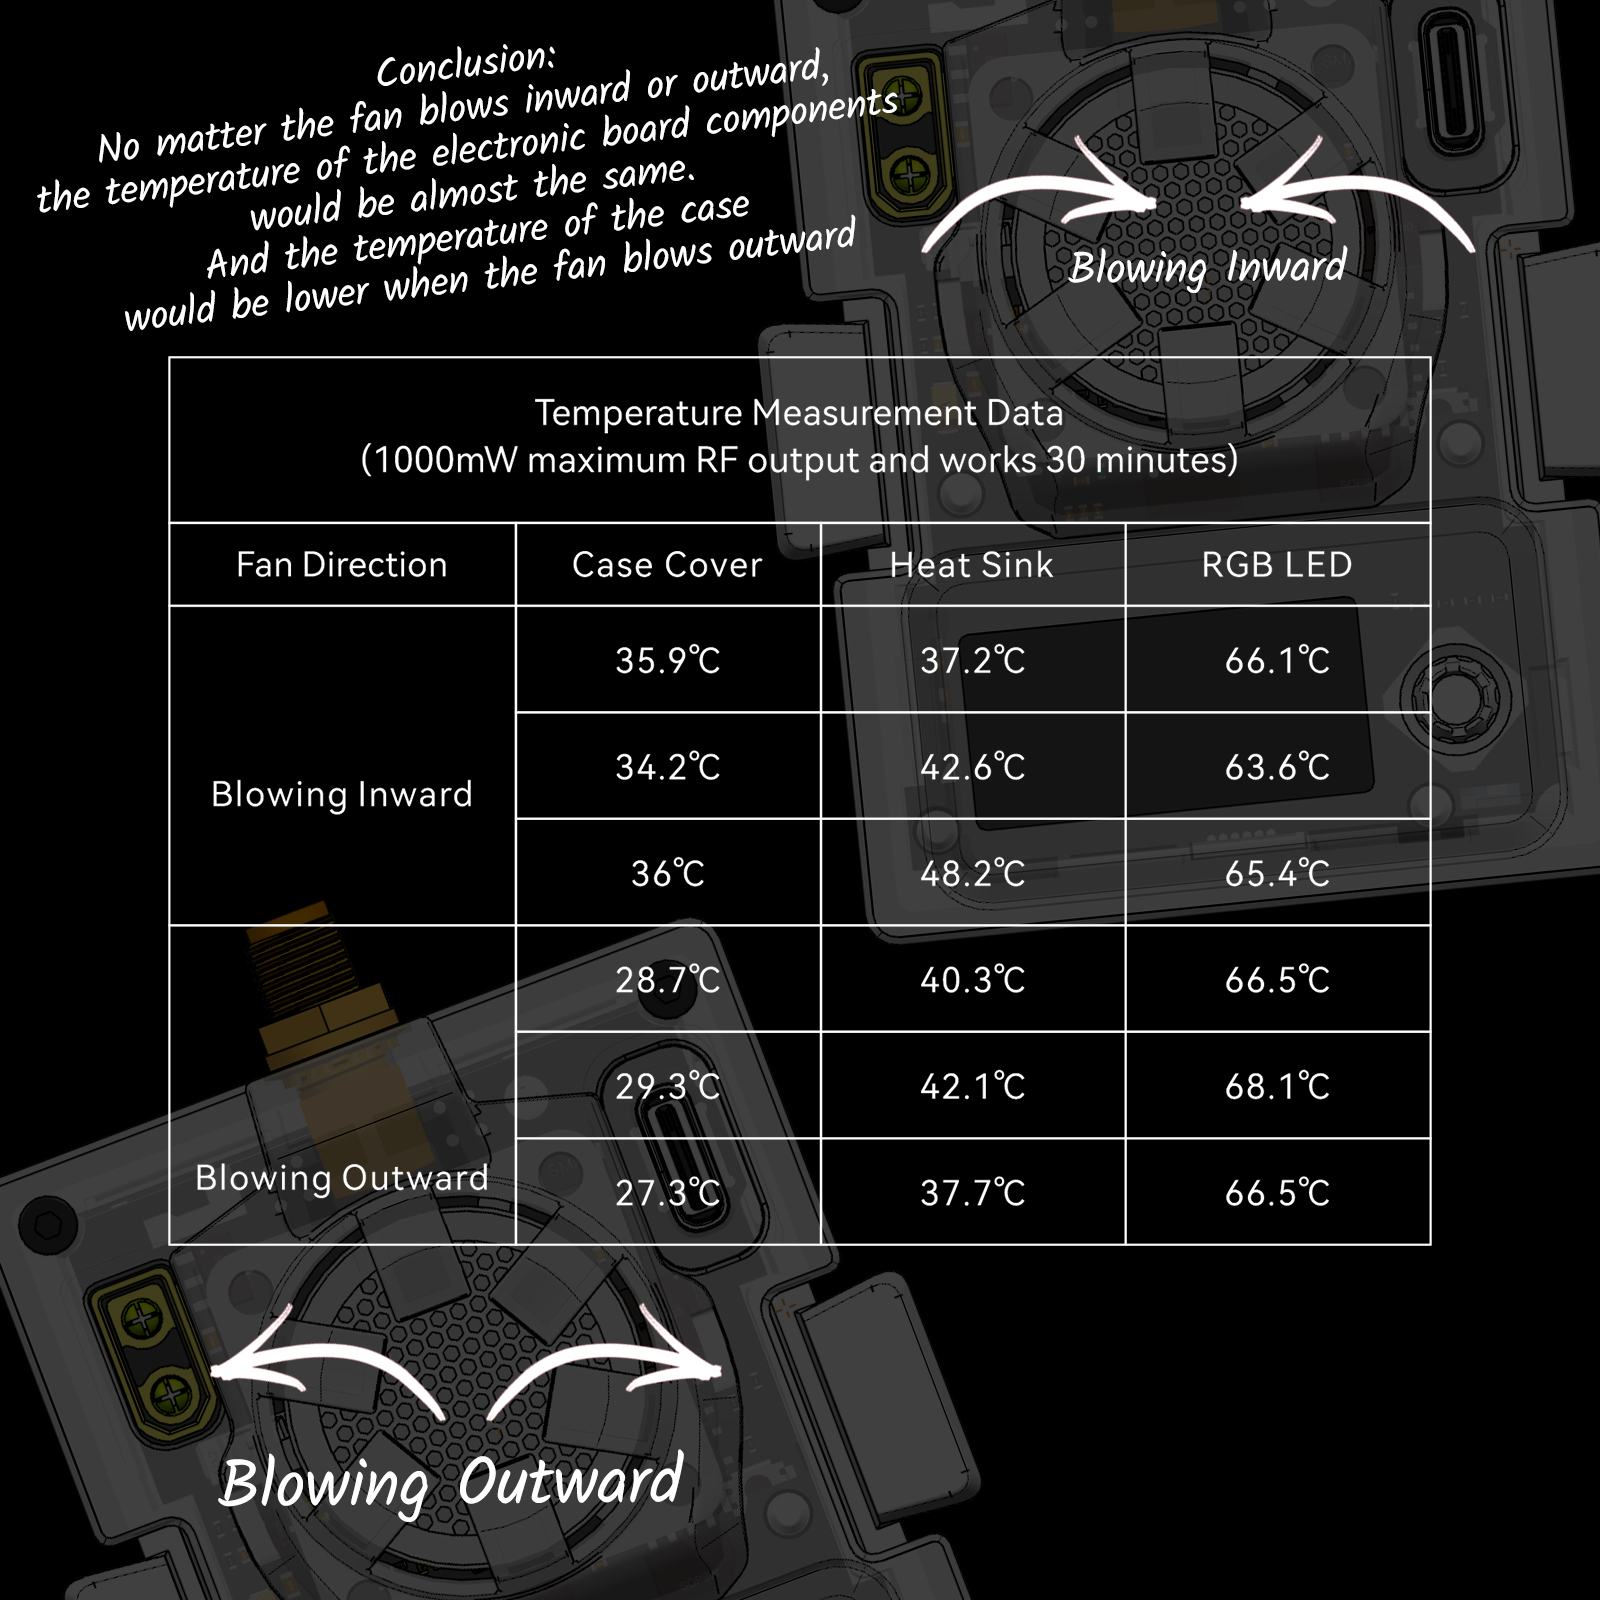
Some users made a concern that RF chip is populated on the back side of the TX module PCB and can not be cooled properly.
|
|
BetaFPV response about RF module being on the back side and crystal capacitors:
 |
 |
 |
How to update (unofficial) ELRS firmware
Until the BetaFPV Micro TX is supported by official ExpressLRS branch, you need to download the source code of master-betafpv-oled-menu branch to local disk from BetaFPV Github (https://github.com/BETAFPV/ExpressLRS).
Press the button [Code] and select the “Download ZIP“.
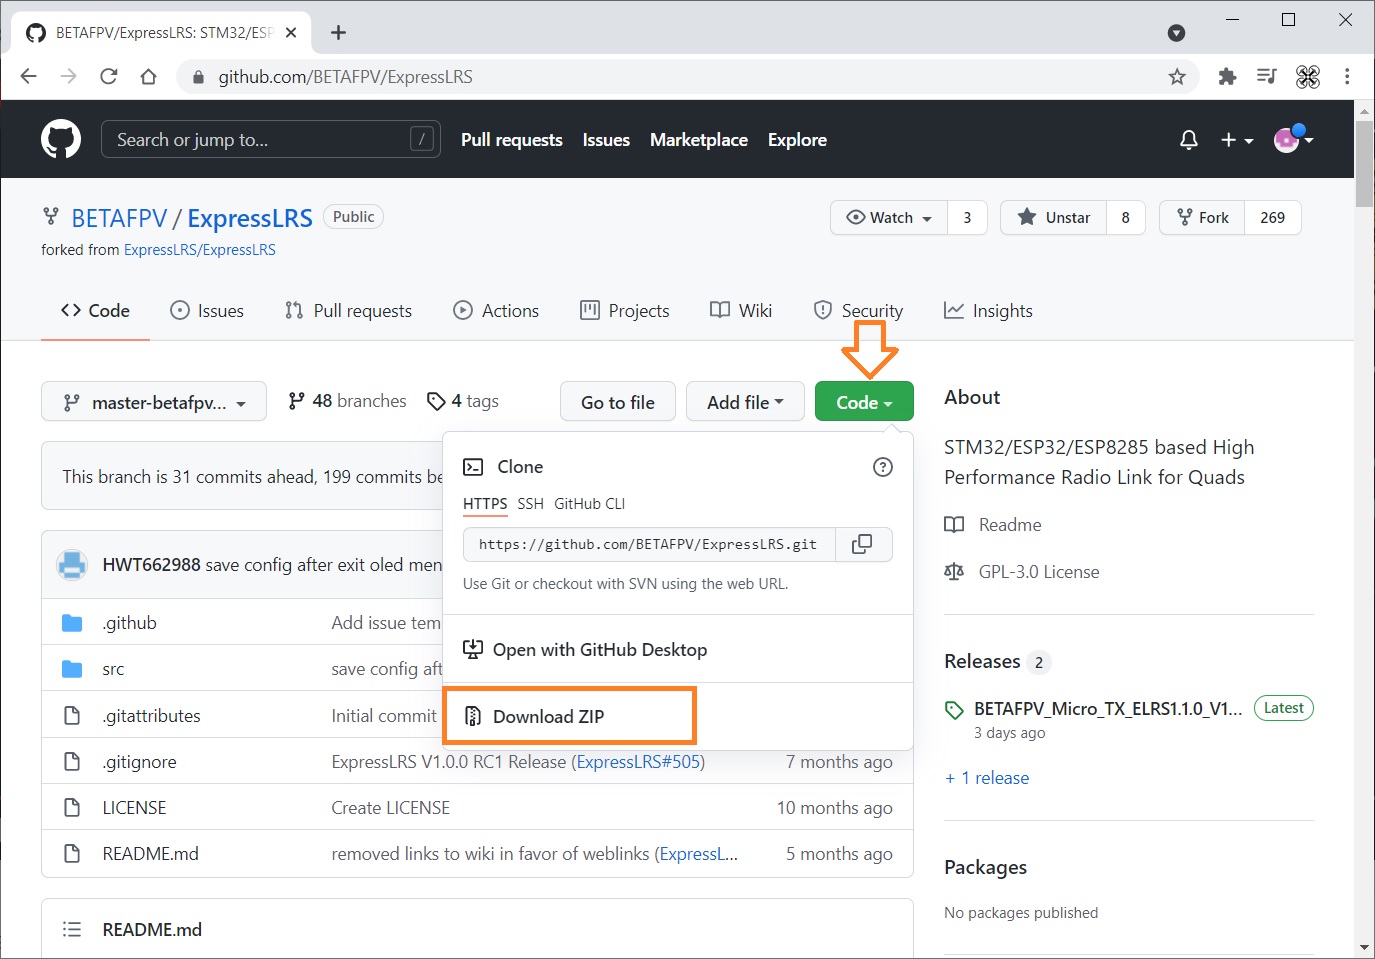
Unzip the downloaded source code to some local folder.

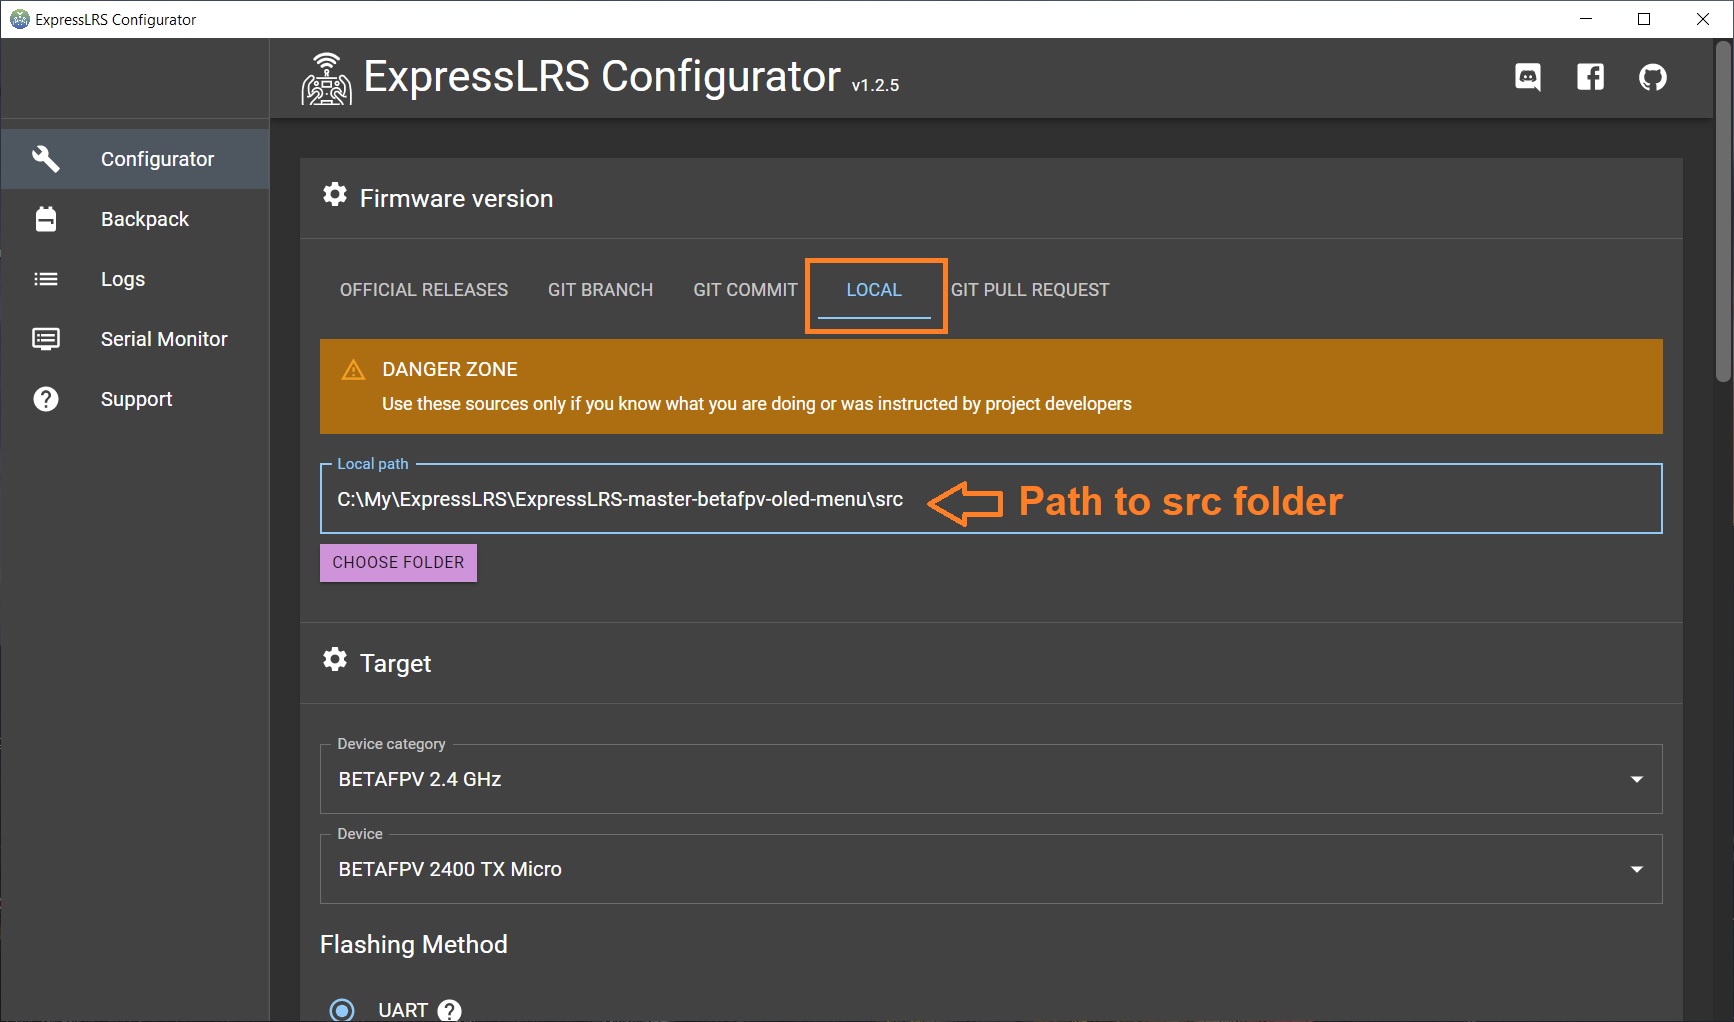
Open the ExpressLRS Configurator and select the [Local] tab and then navigate to the \src\ folder in “Local path setting” . Select the target device “BETAFPV 900/2400 TX Micro”. From that point, you can setup your own binding phrase and other options as usual flashing method. Read more on updating the ExpressLRS firmware here: ExpressLRS – Complete Guide.
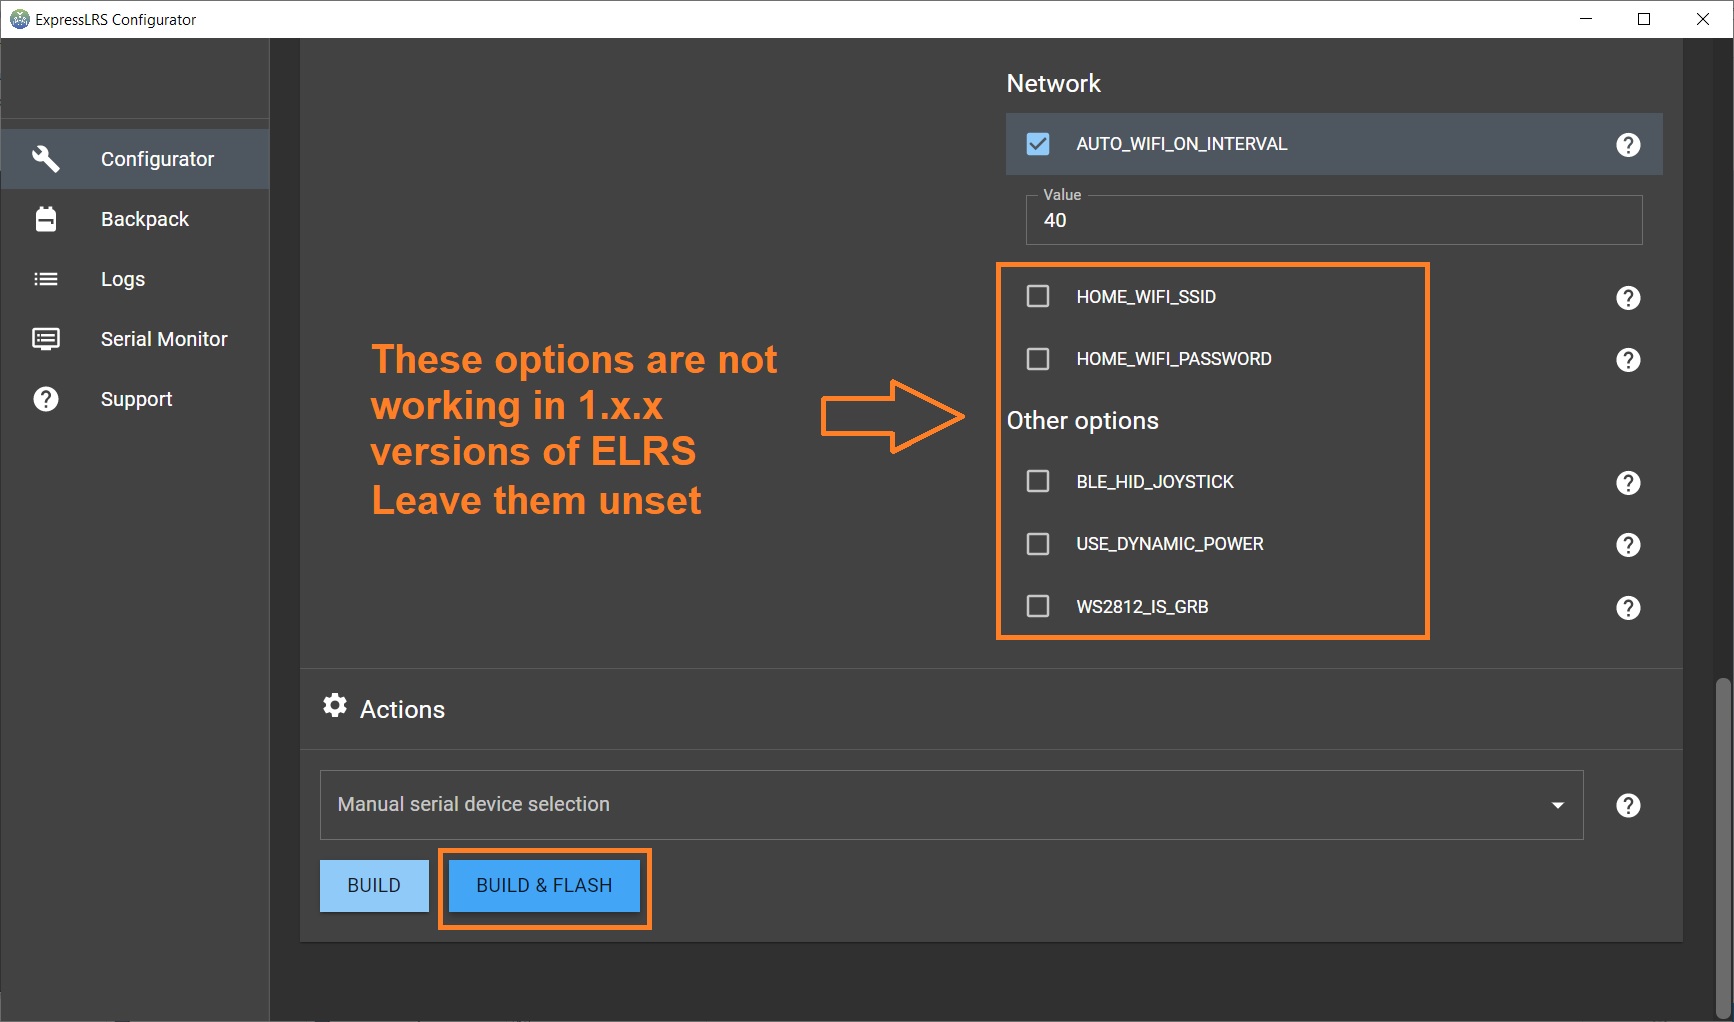
Press [BUILD & FLASH]
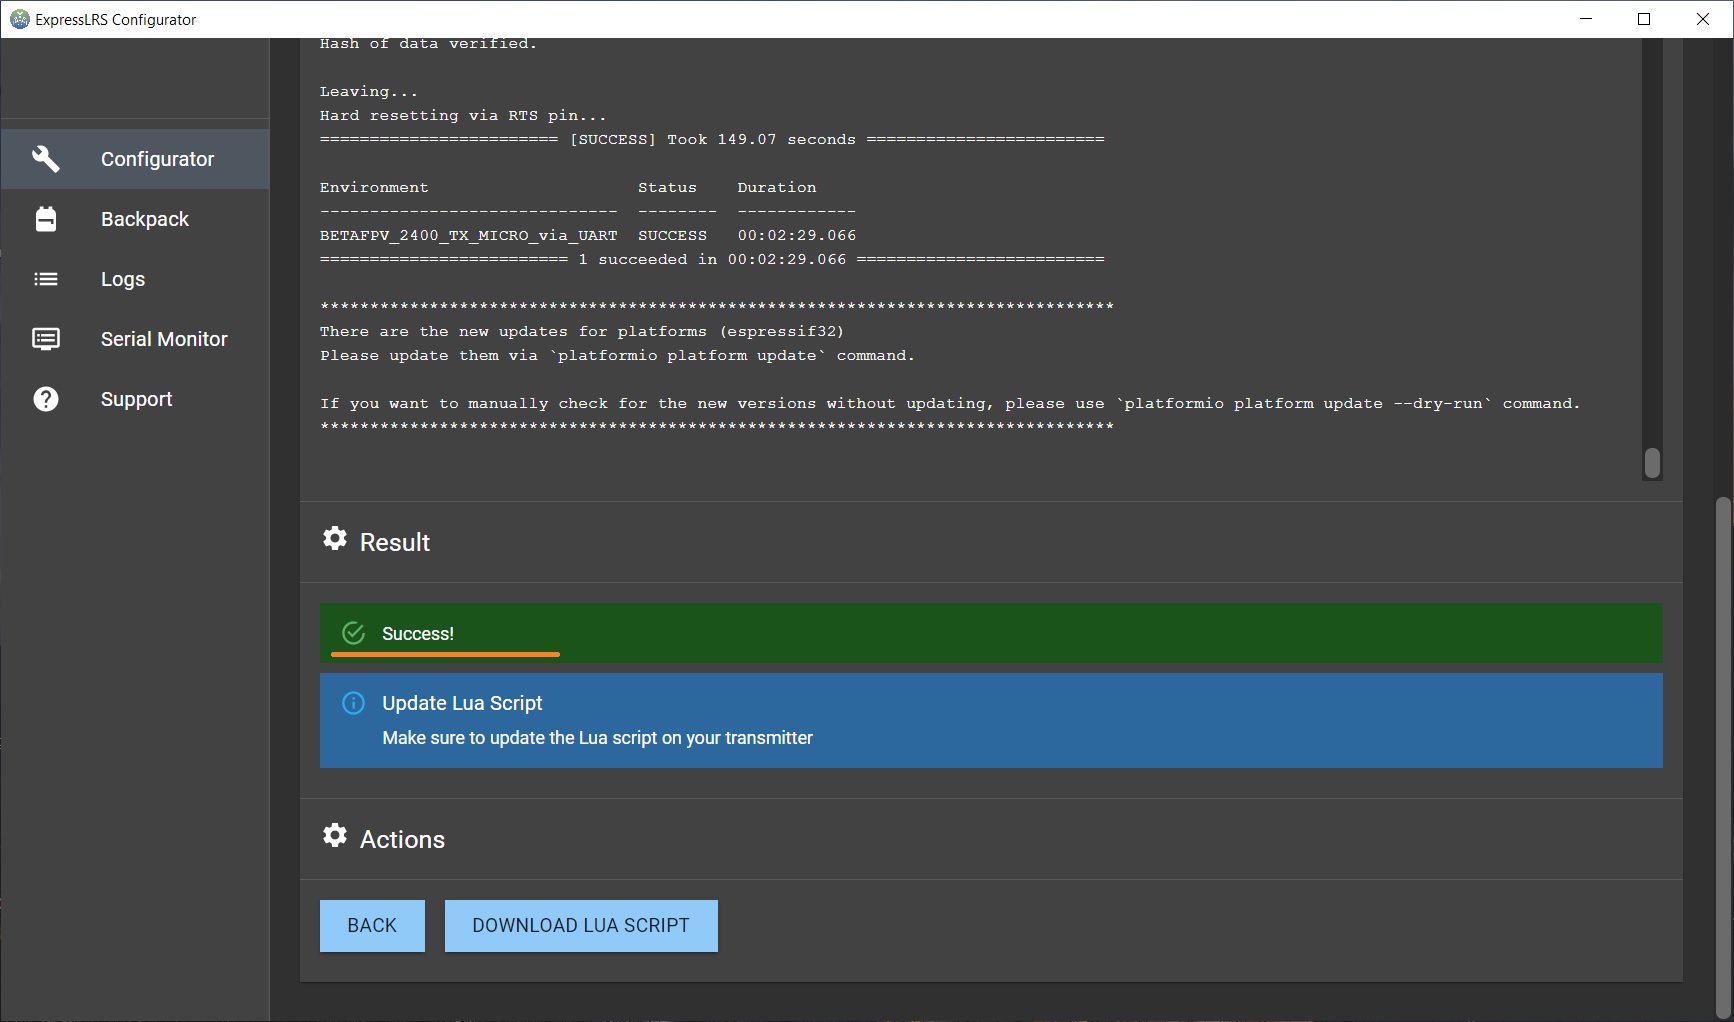
And wait for the module to be flashed successfully.
Conclusions
BetaFPV ELRS Micro TX module was the first module to introduce the OLED screen and 5-way joystick for navigation. Being first means you are doing something new and most probably mistakes too. This module was no exception. BetaFPV hurried to release this module and made a few mistakes. 5-way joystick was implemented as simple button, entering the module menu failsafed the aircraft. Some USB cables does not fit into the slot and overall module design. These mistakes are fixed now.
Comparing the similar ELRS TX modules with the similar price tag on the market, BetaFPV Micro TX has a few advantages – OLED screen, joystick navigation, up to 500mW RF output, possibility to use on non OpenTX radios.
I do like the possibility to set the settings via joystick and the LUA script. The output power of the 500mW is more than enough for almost any pilot and any aircraft – ELRS can go tens of kilometers on the 100mW.
Once the BetaFPV Micro TX ELRS module is fully supported by the official ExpressLRS code (scheduled for version 2.1), this will be the great choice of ELRS TX module. The only thing I’m missing in this module is ESP backpack feature.
Links
BetaFPV ExpressLRS Micro TX module website: https://betafpv.com/products/elrs-micro-tx-module
BetaFPV ExpressLRS Micro TX on Banggood: https://www.banggood.com/BETAFPV-ExpressLRS-…-Micro-TX-Module-…-1912251.html
BetaFPV ExpressLRS Micro TX module User Manual: https://support.betafpv.com/hc/en-us/article_attachments/4409154931225/Manual_for_Micro_TX_Module.pdf
ExpressLRS guide: ExpressLRS – Open Source Long Range radio control system – Complete Guide
BetaFPV branch of the ExpressLRS source code: https://github.com/BETAFPV/ExpressLRS
Disclaimer: This item was supplied by BetaFPV for a fair and unbiased review. BetaFPV never asked for a positive review and never influenced my opinion in any way. I’m trying my best to stay uninfluenced and give only my own, honest and as much as possible unbiased opinion. All affiliate links, if there are any, help me purchase items for future reviews and tests.
-
 Review: MEPS Space SZ F7 Mini FC
MEPS (Mepsking) is a new, but emerging manufacturer, making its mark in the RC
Review: MEPS Space SZ F7 Mini FC
MEPS (Mepsking) is a new, but emerging manufacturer, making its mark in the RC -
 HGLRC Thor Pro parallel charging board
HGLRC Thor Pro charger board is battery parallel charging board with protection fuses and
HGLRC Thor Pro parallel charging board
HGLRC Thor Pro charger board is battery parallel charging board with protection fuses and