Review: Eachine EV100 goggles
Eachine EV100 goggles hit the market with the loud bang. At the price point of $99 they look very attractive. Finally we have Fat Shark style goggles with affordable price. Lets take a closer look at them, discover what are they good about and what are the issues. Also we will describe the ways how to improve them.
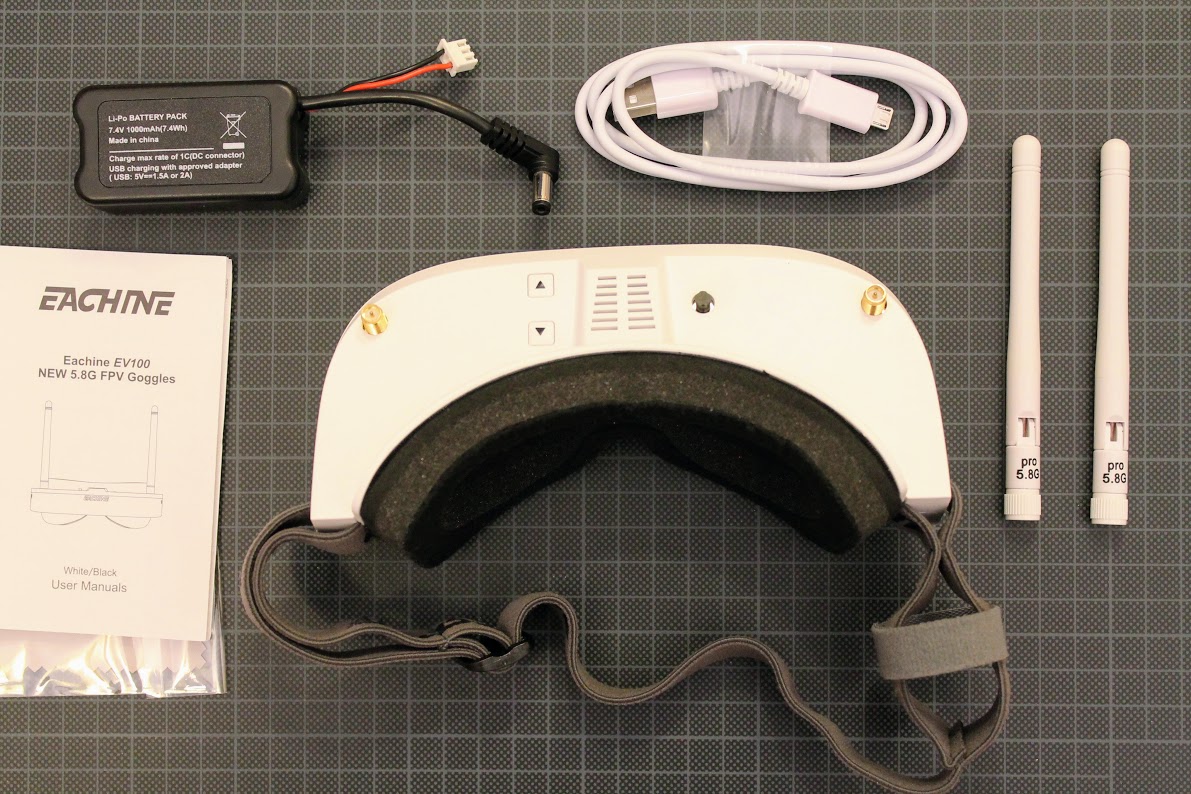
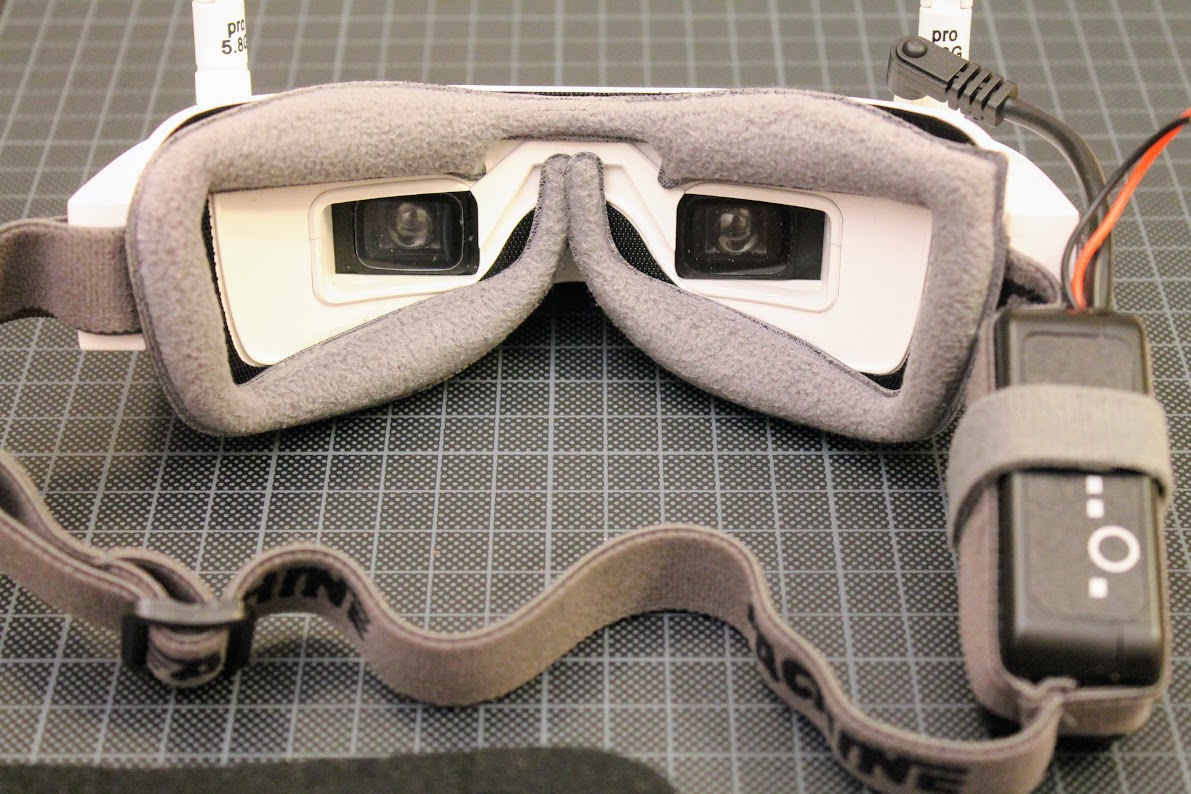
EV100 goggles come with battery, USB cable, two basic linear antennas, lens cleaning cloth and a user manual leaflet.
Battery
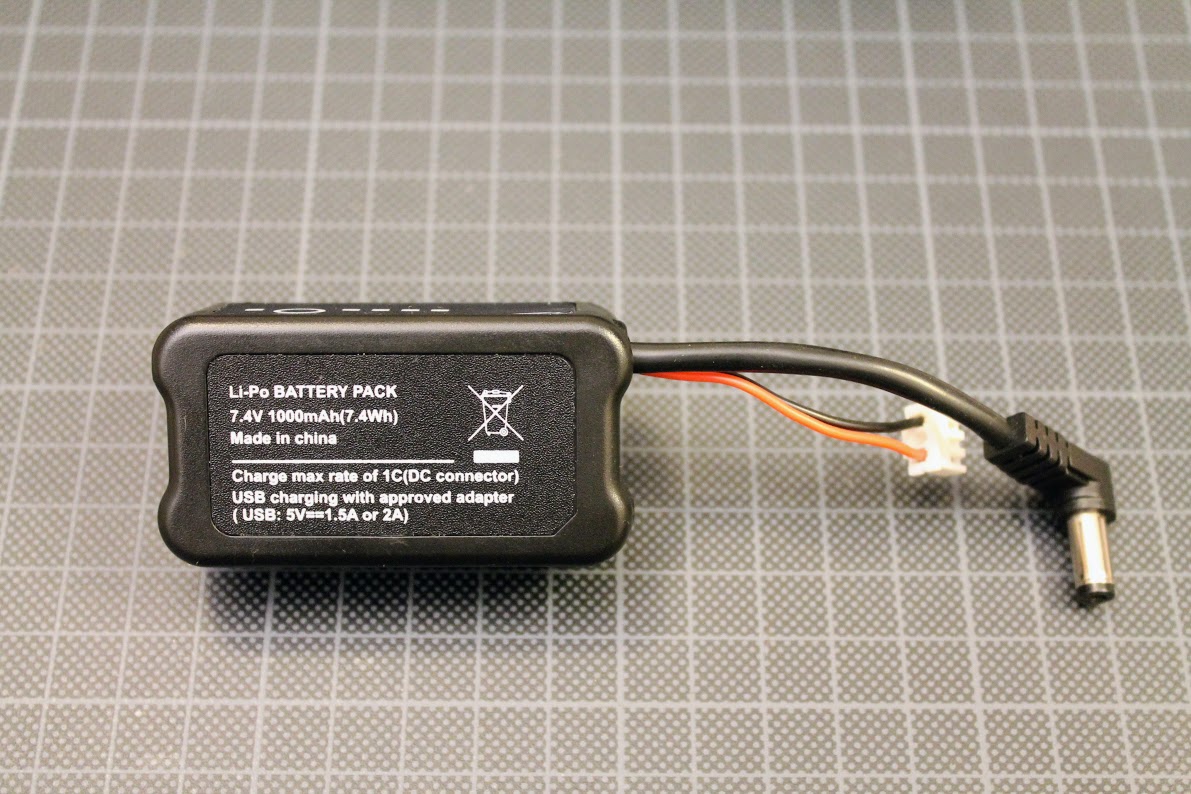
Supplied battery is 1000mAh LiPo battery with internal charging and balancing circuit. Connects to the goggles with 5.5mmx2.1mm plug. The cable with JST plug is not a banlancing plug – it is not a balancing plug as in regular lipo batteries, it is for powering the DVR unit only. Do not try to charge the battery via this JST plug.
You can check the battery by pressing button on the top side of the battery. It shows 4 blue leds corresponding the voltage level of battery charge.
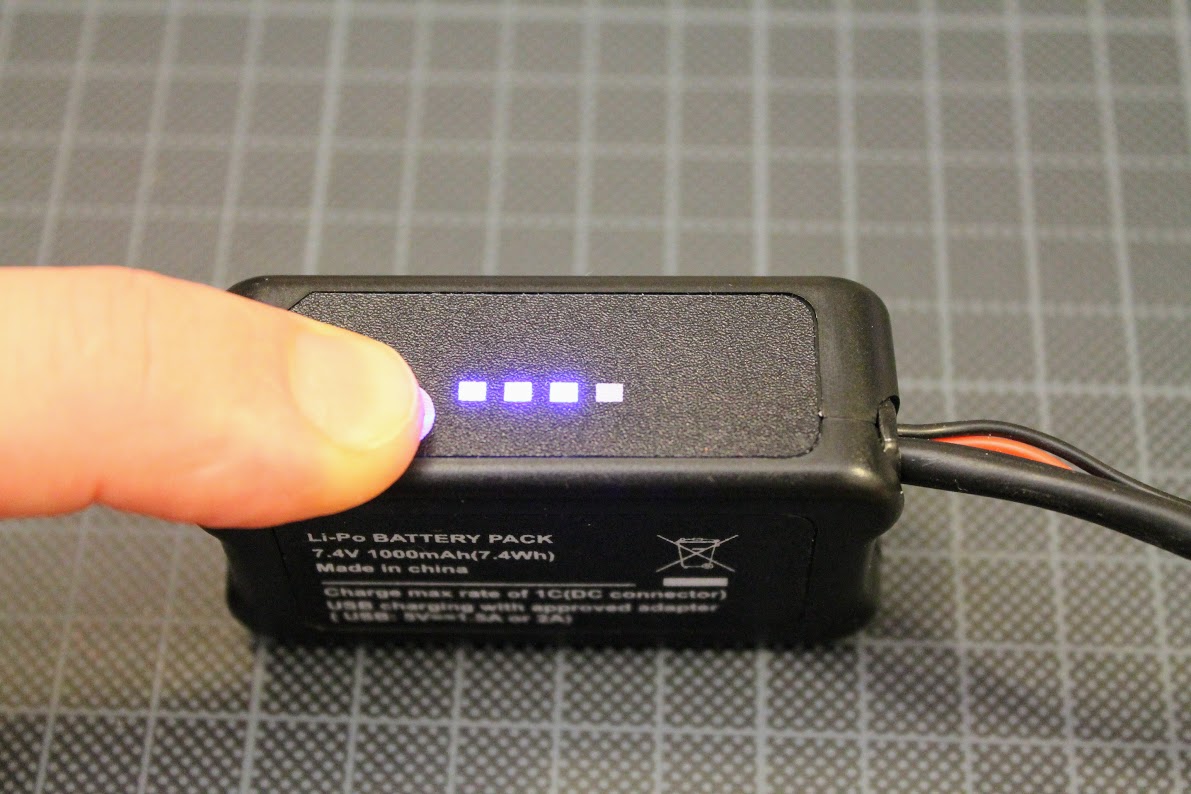
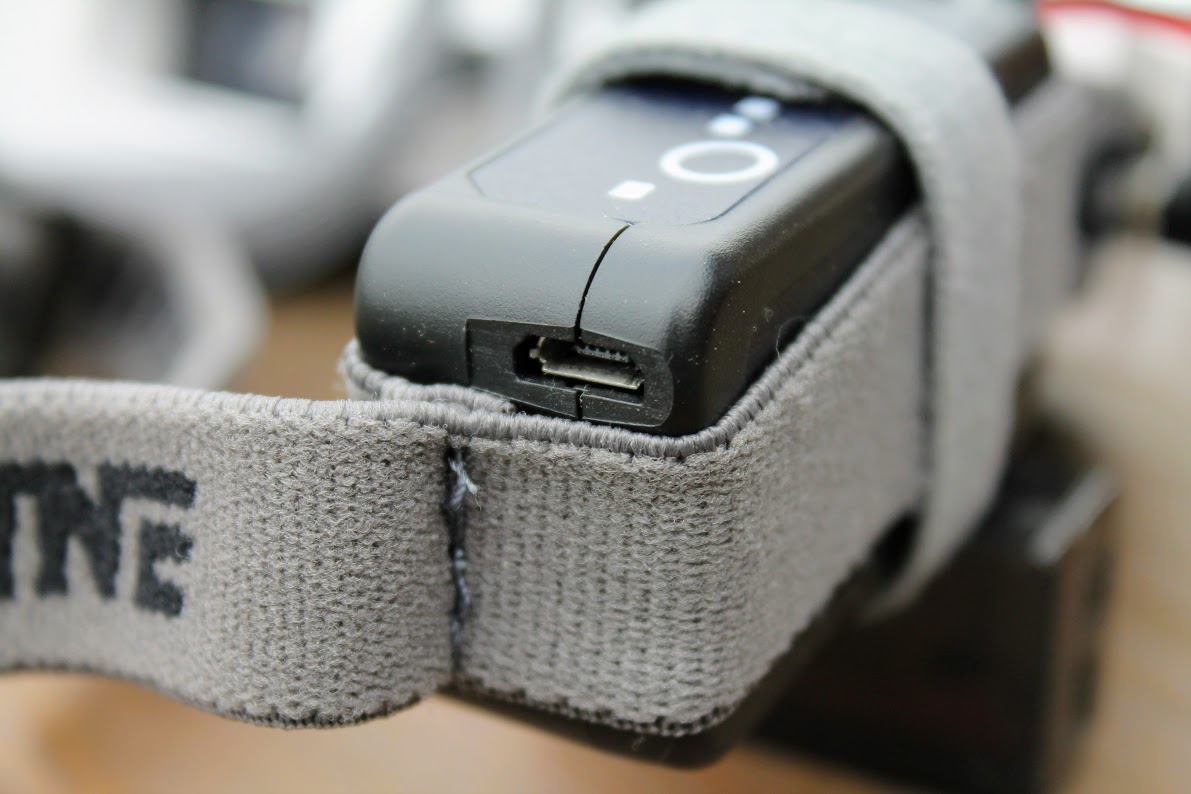
Battery can be conveniently charged via micro USB port with any mobile phone charger or any USB source.
Red led is on while the battery is charging. It turns off once the battery pack is fully charged. Battery charging takes at least 3-4hours.
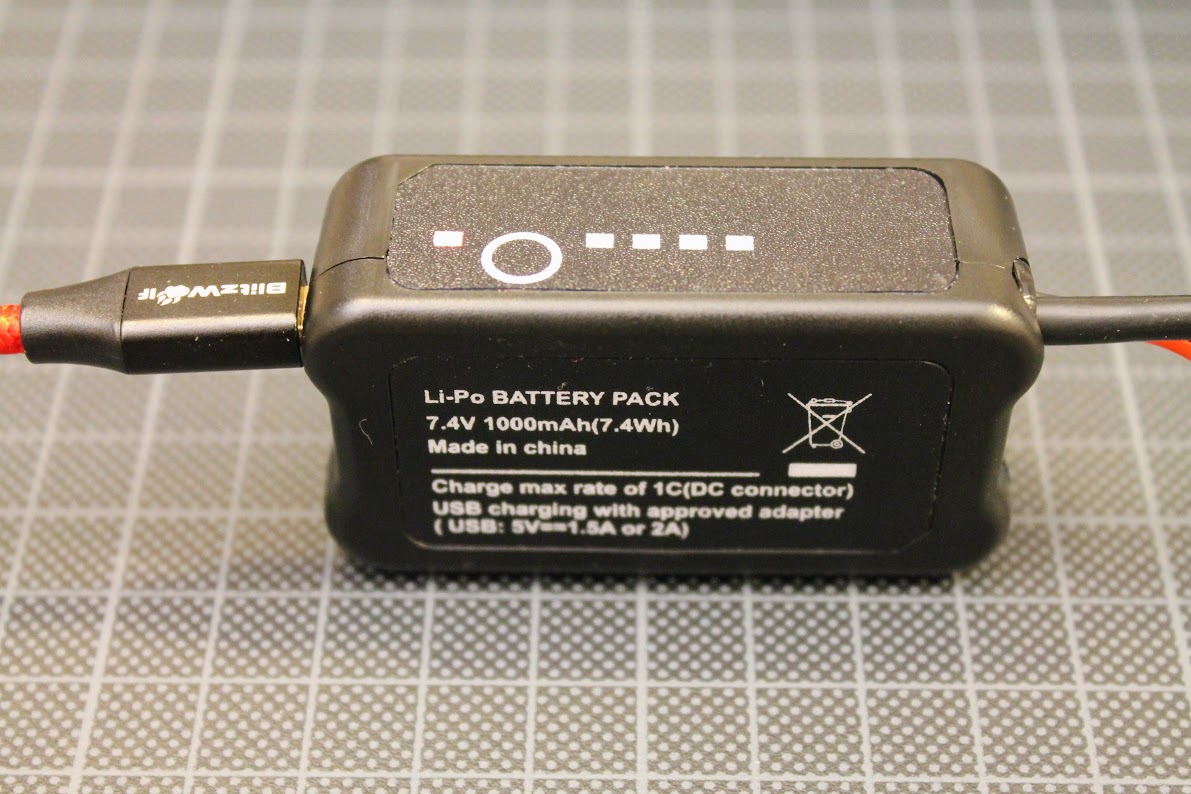
Spare battery pack for EV100 can be purchased separately from here: https://www.banggood.com/Eachine-EV100-2S-7_4V-1000mah-LiPo-Battery-DC-2_1mm5mm-2S-Balance-Plug-For-FPV-Goggles-Fatshark-p-1196324.html
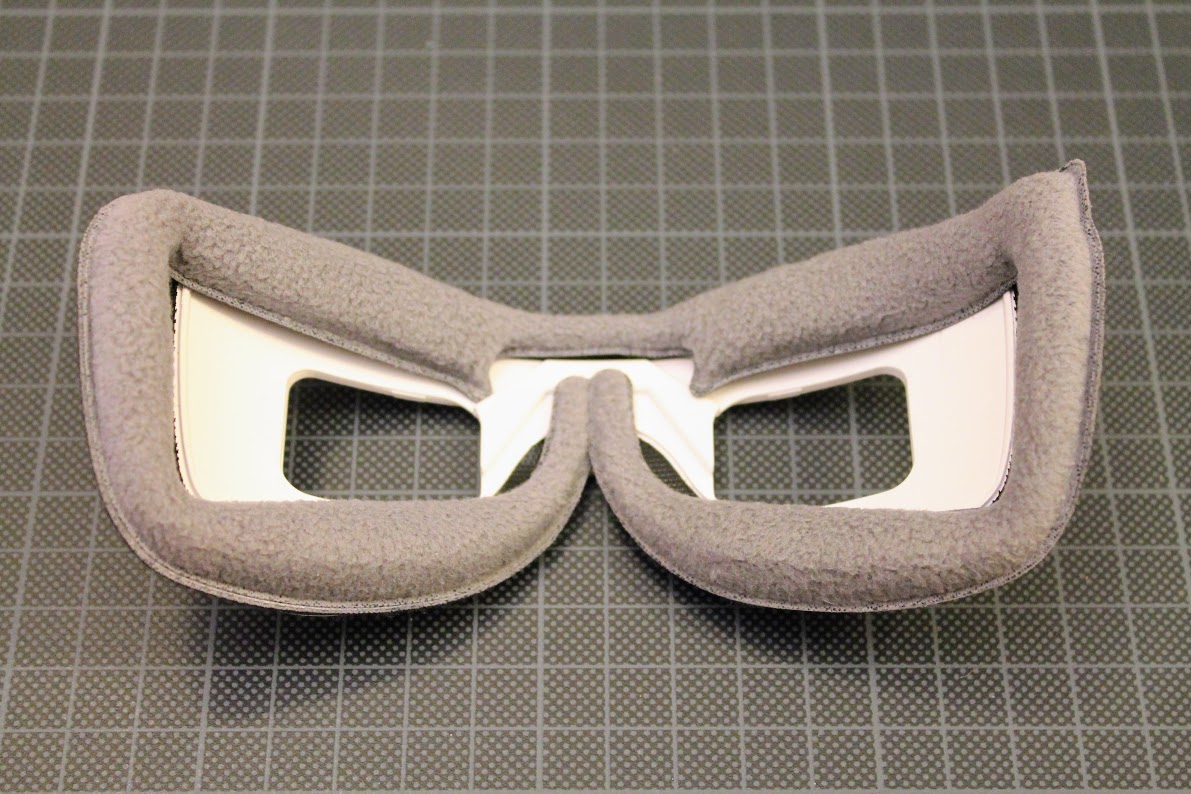
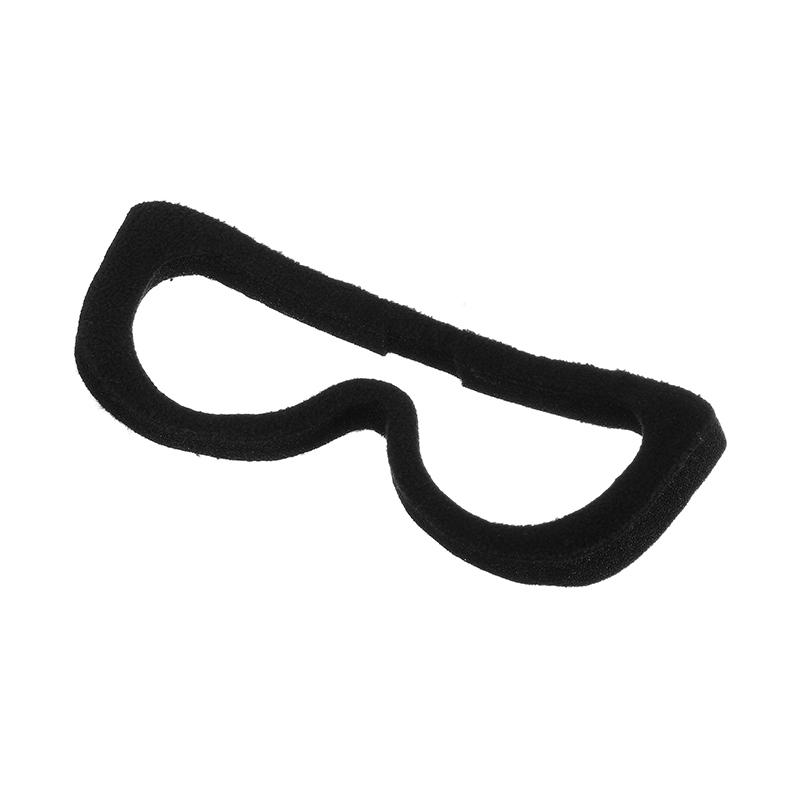
Foam pads
The foam pad, supplied with the goggles on the first batches is really thick. This was probably made to avoid the light leaks and add comfort, but it is just too thick. If you put the goggles on and push with a little force towards your face you’ll see how the tunnel effect goes away, picture improves and it looks like the field of view becomes wider. You can read about the possible fix of this issue below.
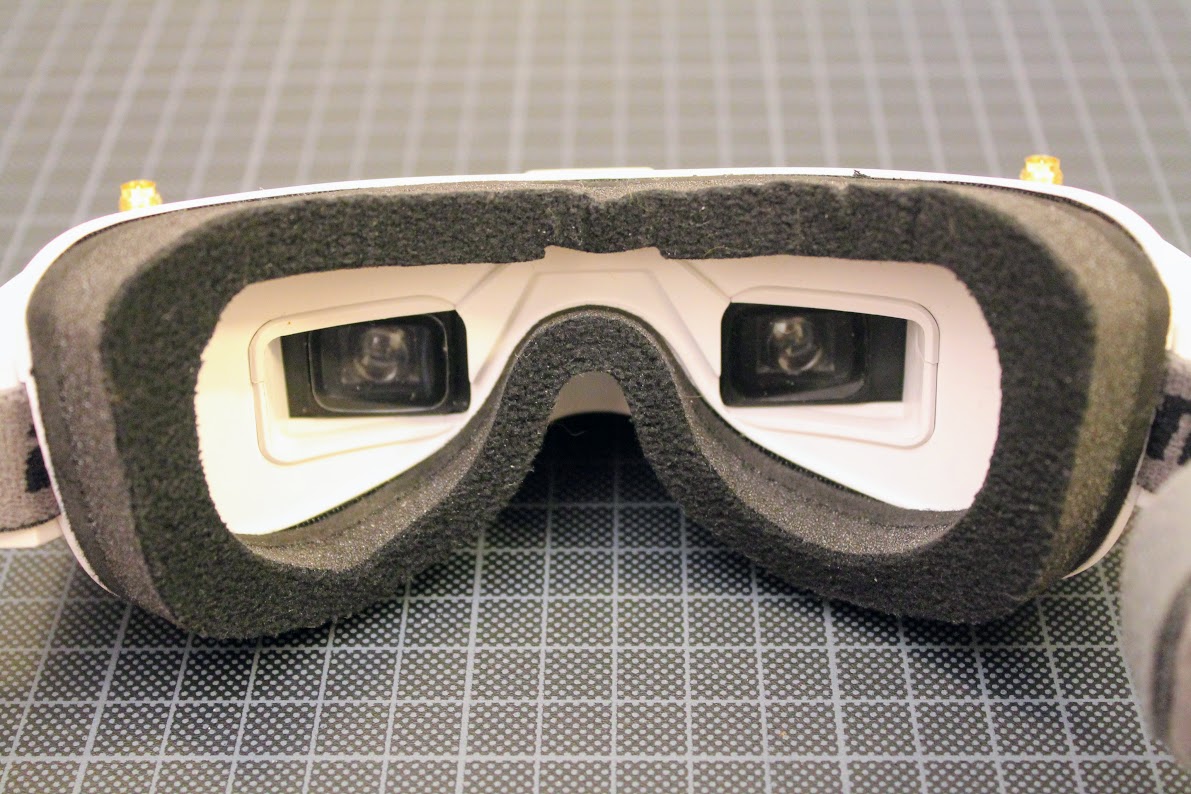
By the way – don’t forget to peel off the lens covering film. It was put on only for protecting the lens duaring manufacturing process, but should be removed before use. It improves the picture quality greatly!
Antennas, receivers, diversity
Goggles come with basic linear (whip style) antennas. They have RP-SMA connectors.
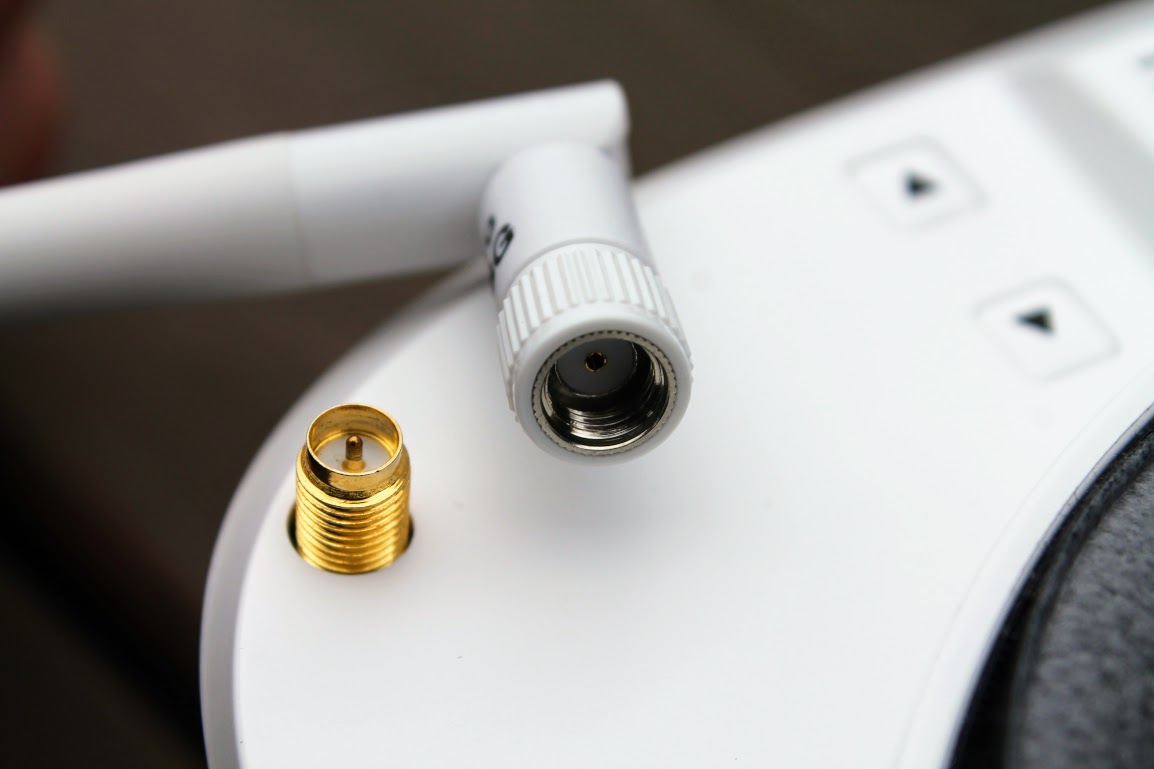
A few words about antennas, receivers and diversity. EV100 has two antennas, but is does not have two internal receivers, only one, so it is not a full diversity system. It has so called antenna diversity. Antenna diversity works in this way: Two antennas are connected to one receiver via some switching circuit, controlled by MCU. MCU is constantly measuring the strength of the receiving signal (RSSI). As long as RSSI value is high enough receiver is using the last switched antenna. When the RSSI value drops below the some threshhold, MCU commands the switching circuit to switch to another antenna. If the signal strength is also lower than threshhold on the second antenna, it switches back to the first antenna. So basicaly MCU is switching the antenna “blindly”, hoping that the signal strength is better on the other antenna. Receiver diversity is a way superior to the antenna diversity as MCU alway knows which antenna is receiving the stronger signal and is switching only when the other antenna is in fact receiving better signal.
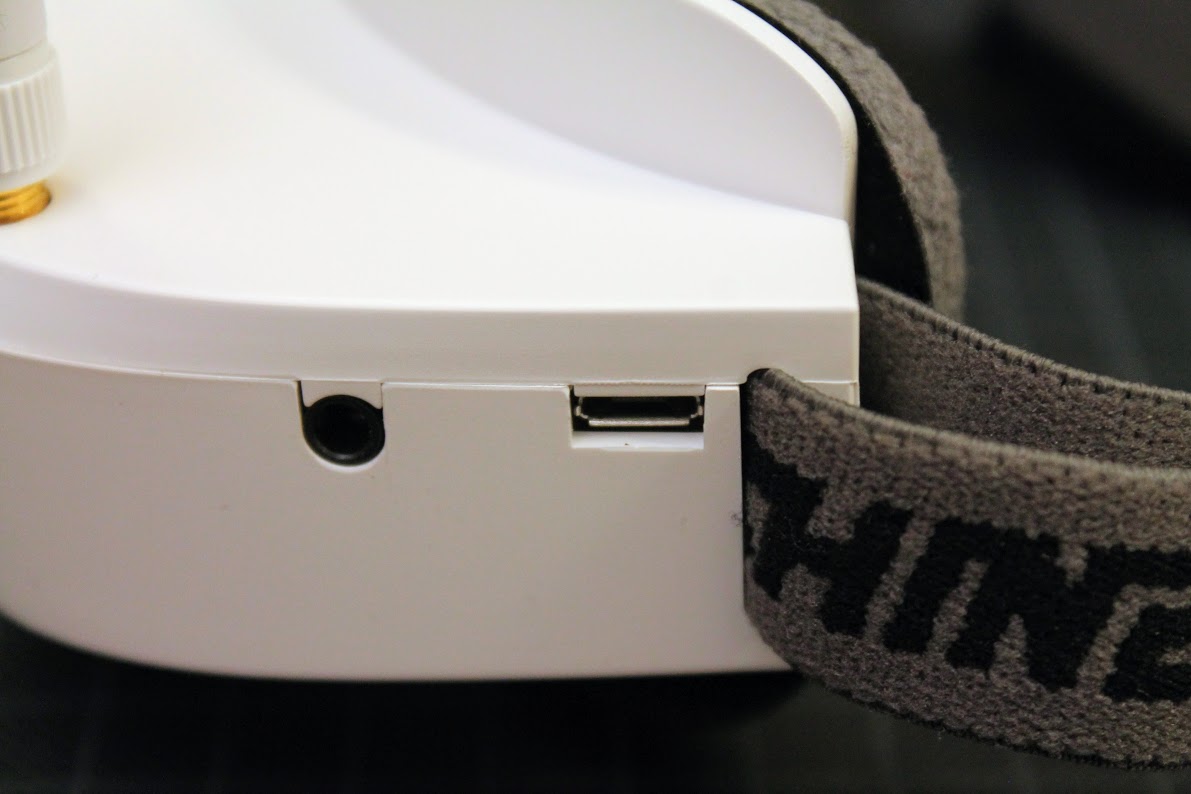
Inputs, connections
On the right side of the goggles you’ll find 5.5×2.1mm power input socket. Any FatShark compatible battery pack should fit. Powr input allows voltages up to 8.4V (2S LiPo). There is also 4 pole 3.5mm socket for Audio/Video In/Out.

On the left side you’ll find another 4 pole 3.5mm socket headphones. It supposed to output the Audio from the receiver, but in fact 1-st and 2-nd goggles batches were shipped with audio not working. More info about this issue – later.
Issues & fixes
First batches of Eachine EV100 goggles have such issues:
- Facial foam pad is too thick.
- Grey bars with distortion are seen on the high contrast video feed.
- Short random screen blackouts are present on the video.
- There is no sound from the receiver.
Issue #1
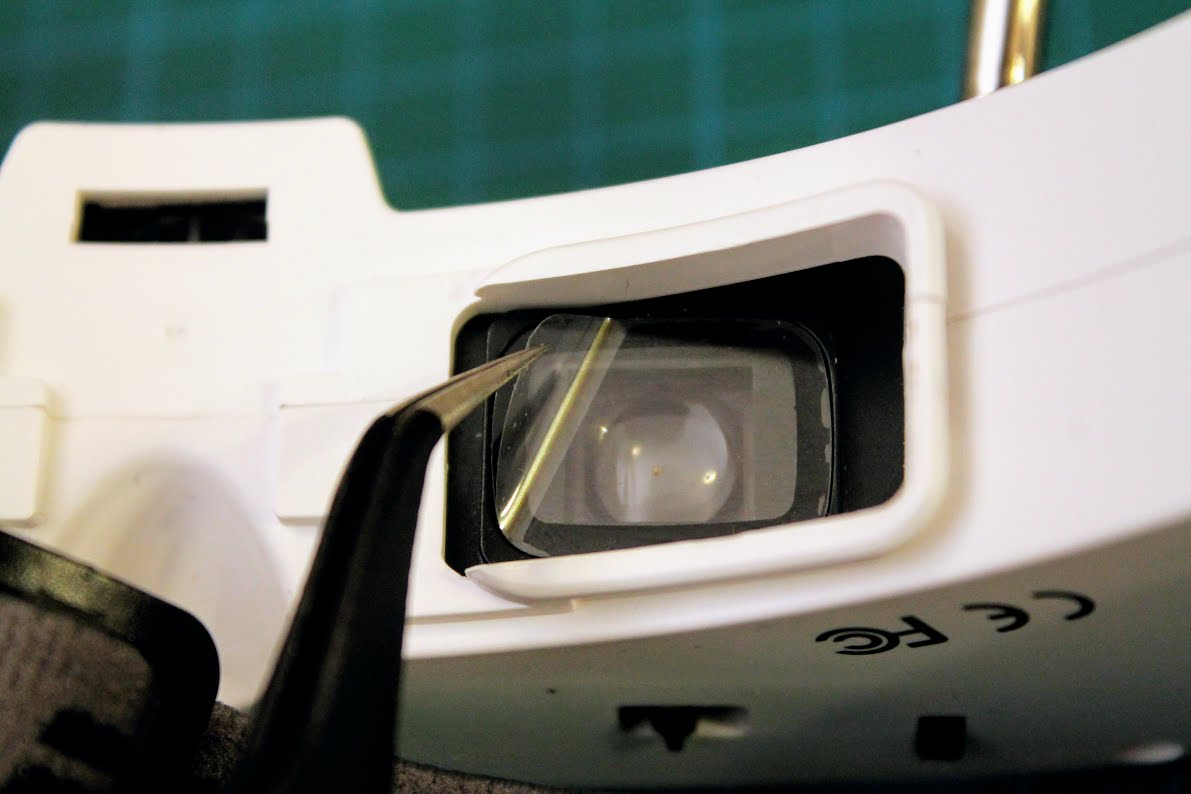
Foam pad beeing too thick, somehow adds tunnel effect – it looks like you are looking at the screen through the black tunnel. If you put a pressure to the goggles towards the face, you’ll notice the tunnel effect going away and the visual FOV beeing larger as the LCD screens are closer to your eyes. This can be fixed by using thinner foam pads. You can use the ones that are made for Fat Sharks.
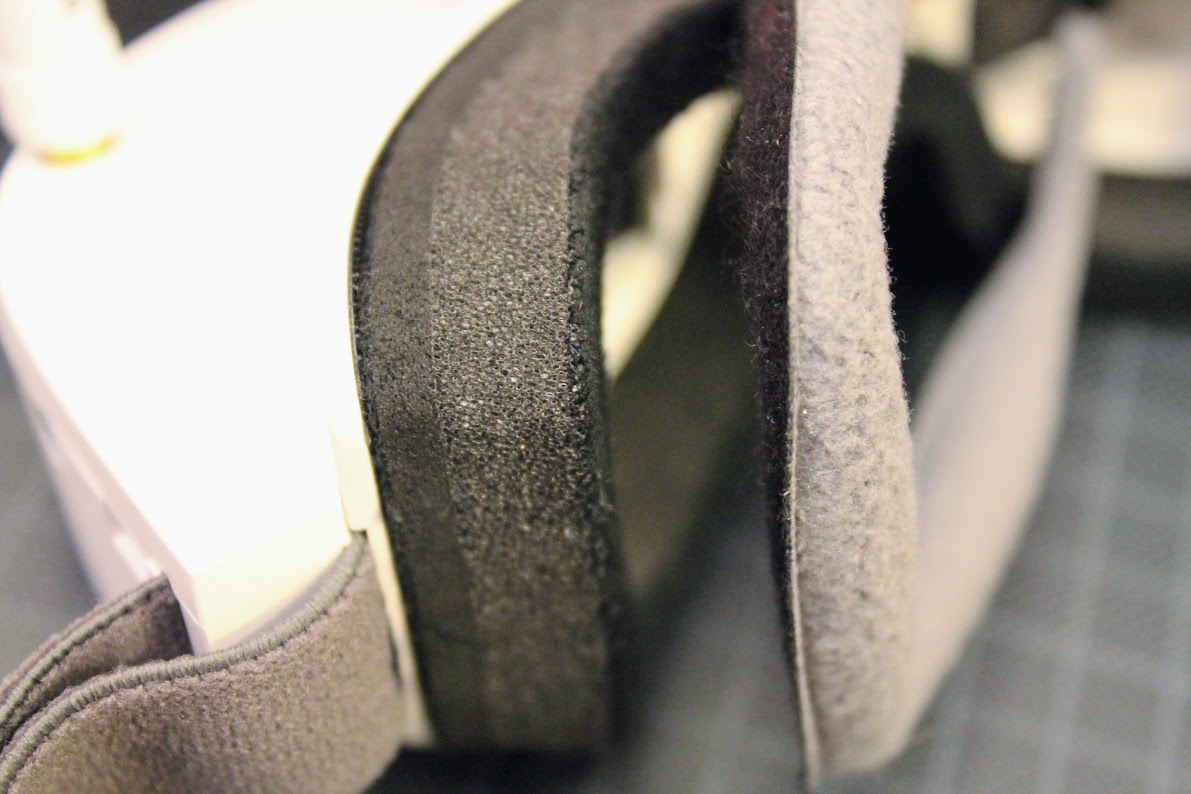
They are almost twice thinner, but they are a bit larger in dimensons.

There is some small light leak with this thinner foam pad, but the picture quality is much better.
You can purchase these replacement Fat Shark foam pads (these have hard plastic base): https://www.banggood.com/2-PCS-Fatshark-Replacement-Faceplate-Soft-Foam-Pads-…-1062372.html
or these (are sot and completely from foam): https://www.banggood.com/Upgraded-2PCS-Fatshark-Replacement-Faceplate-Soft-Foam-Pads-…-1185765.html
Issue #2
Grey bars on the hight contrast scenery. These bars also add some distortions. You can see the example of this issue in this video:
These distortions can be fixed by soldering aditional capacitor. This involves disassembling goggles and soldering. If you think you are capable of doing this, then follow these instructions:
First unscrew 4 screws from the bottomn part of the goggles.
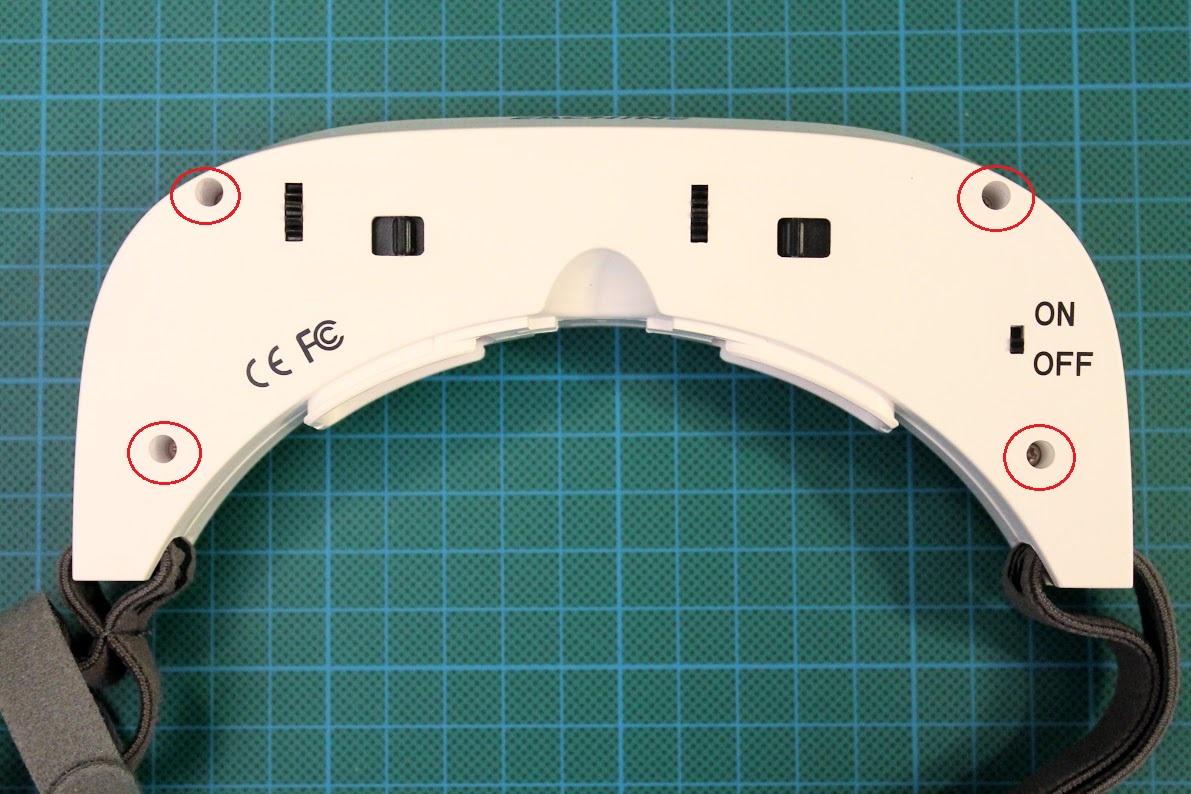
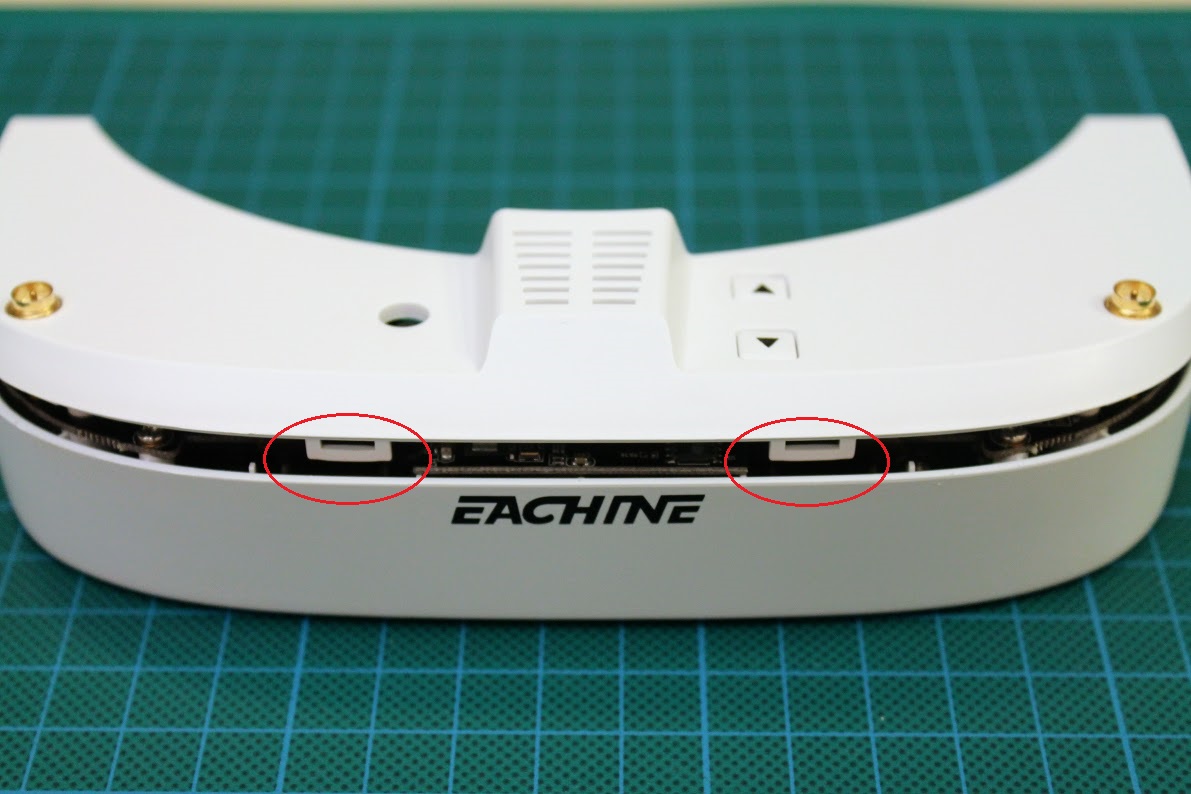
Then gently try to open the top part. First the back side then the front side, watch the two plastic retainer hooks in the front.
Locate the C458 capacitor on the bottomn part of the PCB. According to the original Banggood instructions, you need to desolder this capacitor and solder two tantalum SMD capacitors instead. Actually there is no need to remove the old capacitor. I recommend to solder the additional capacitor in parallel. Use simple electrolytic capacitor with 47-220uF (6.3V or any other voltage rating).
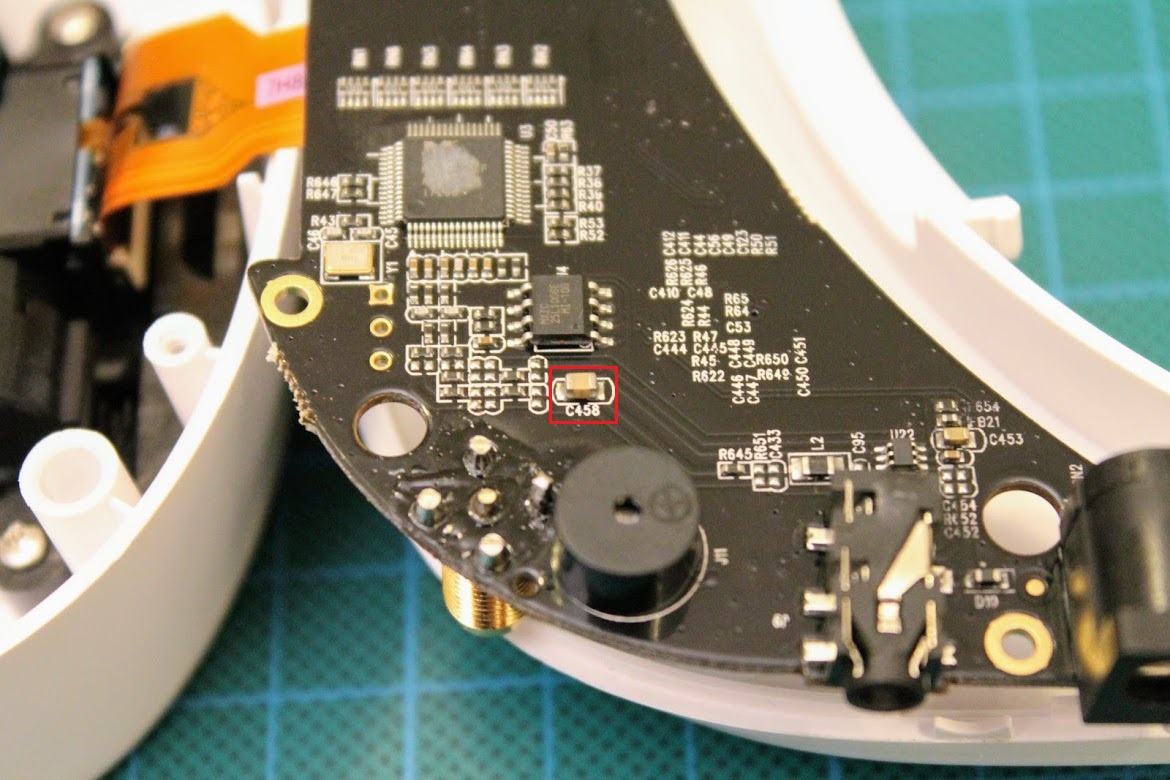
Solder the electrolytical capacitors legs to the according SMD capacitor pads.
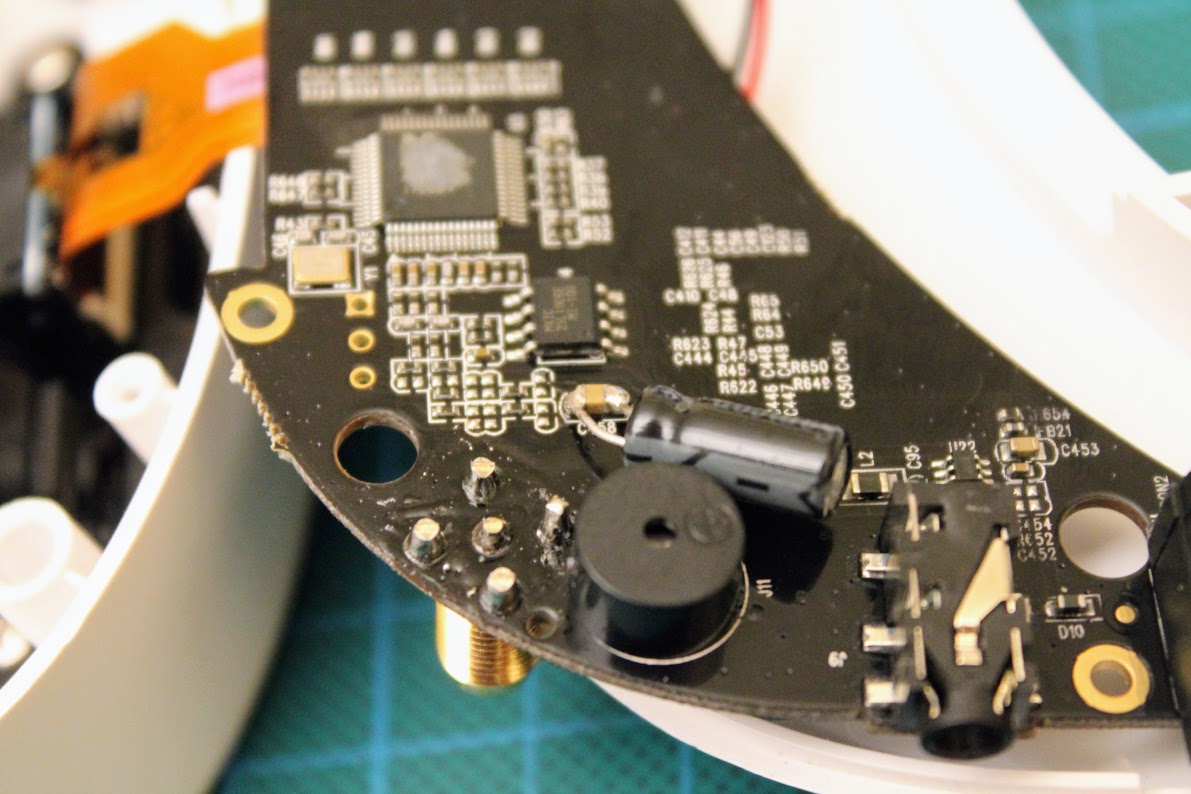
The suggested polarity is minus leg of the capacitor to the left side on the photo. Now assemble the goggles back and check the video feed and notice that grey bars are gone!
Issue #3
Intermittent short blackouts (also can be seen in the attached video sample) – first two batches of the EV100 had buggy firmware whitch caused these intermittent blackouts. Hopefully, goggles with firware dated 2017-09-23 had this firmware bug fixed. So we only need to update the firmware to the good one.
The update procedures and required hardware/software:
Hardware
- Arduino Mini Pro atmega328 board. (look only for ones supporting 3.3V, about 1.5-3$)
(Possible variants on ebay: https://goo.gl/HGAENH, Banggood: https://goo.gl/TQFiWd)
- USB to Serial adapter. It can be FTDI, CH340G (just look for ones that support 3.3V, about 1-2$)
(Possible variants on ebay: https://goo.gl/Ru7BXF, Banggood: https://goo.gl/4wg9Uj)
Software
- Flashrom programming utility (https://www.flashrom.org ). If your PC runs on Windows then I recommend to download already compiled windows version here: http://ra.openbios.org/~idwer/flashrom/mingw/
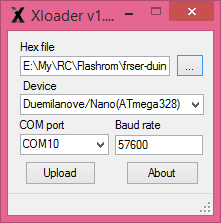
- XLoader to upload binary file to Arduino board (http://russemotto.com/xloader/ )
- Arduino firmware (frser-duino.hex) (download link: https://goo.gl/11m5pP)
- EV100 goggles firmware file (download link: https://goo.gl/Z9ZZn4)
Steps
Flashing Serprog firmware to Arduino Mini Pro:
- Connect USB – TTL converter to Arduino Mini Pro board
- If everything is ok, You should see “FTDI” or “USB-SERIAL CH340” device in device manager
- Connect Arduino Mini Pro to USB-TTL adapter (check that your FTDI or USB Serial adapter uses 3.3V for powering Arduino)
- Start XLoader, open [fser-duino.hex] file, set the right com port and hit “Upload”.
If everything goes right, You will have Flashrom compatible programmer.
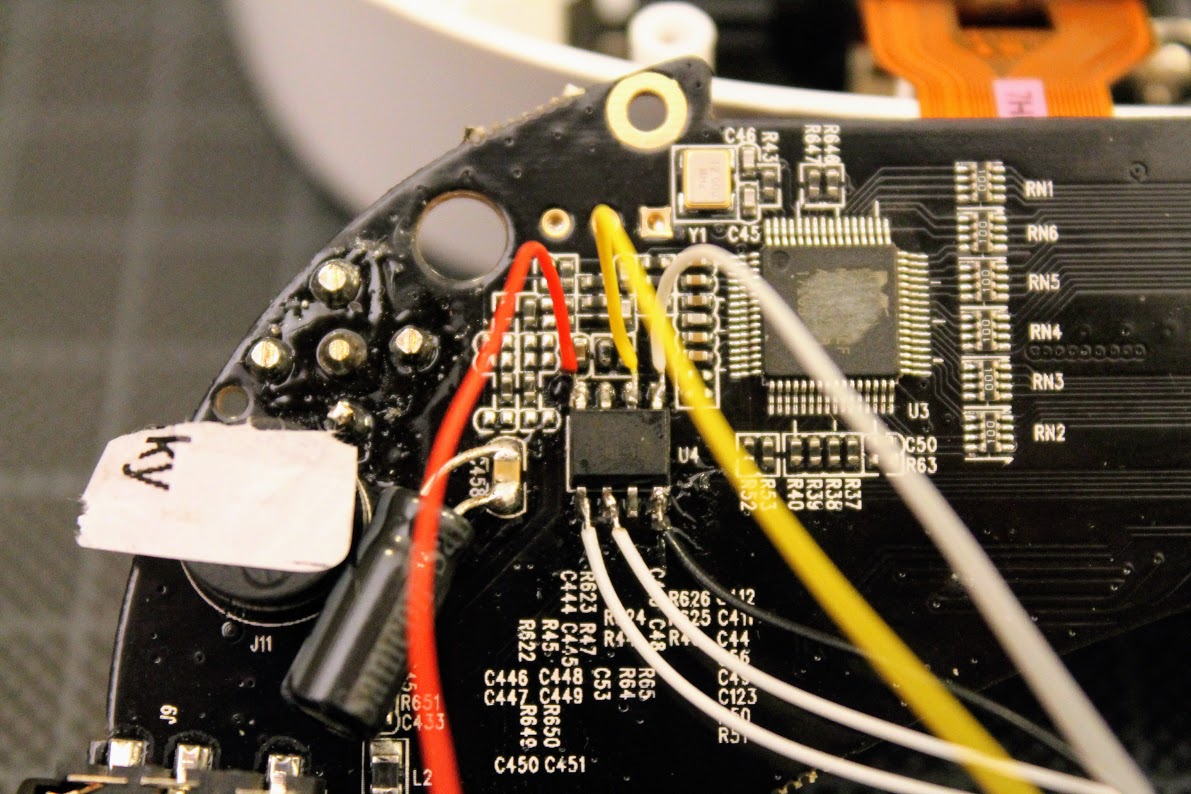
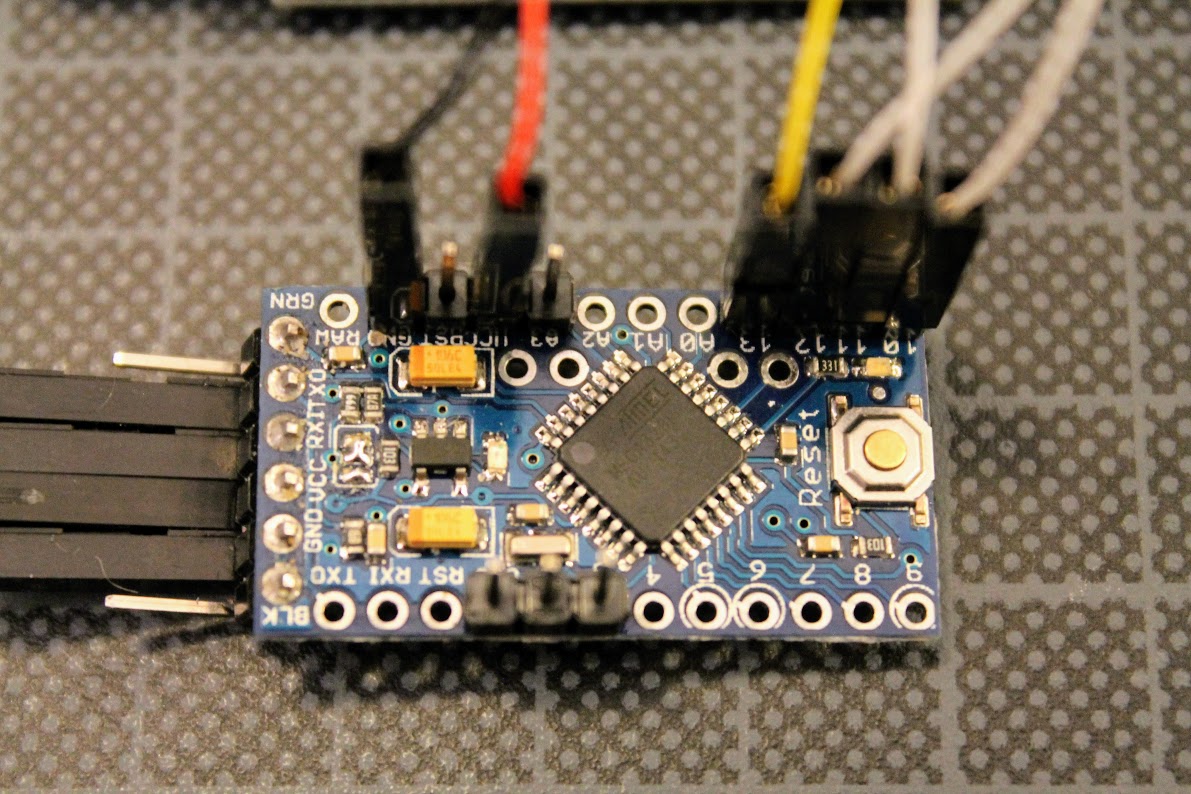
- Connect the EV100 flash IC to the Arduino. Use supplied connection schematics. For this you need to solder 6 wires: VCC, GND, CS, CLK, MOSI and MISO. Try to keep them as short as possible, about 10cm. I recommend to use small diameter wire.
WARNING: Before continuing you have to be shure that Arduino Pro Mini is outputting 3.3V only. 5V would likely kill the chip and other electronics in the goggles, so be carefull! Use the programmer at your own risk.
Connection table:
| FLASH CHIP | ARDUINO |
|---|---|
| VCC (pin 8 ) | VCC 3.3V |
| GND (pin 4) | GND pin |
| CS (pin 1) | pin 10 |
| DO (pin 2) | pin 12 |
| DI (pin 5) | pin 11 |
| Clock (pin 6) | pin 13 |
Schematics:

Below is an example how the connections looks like.
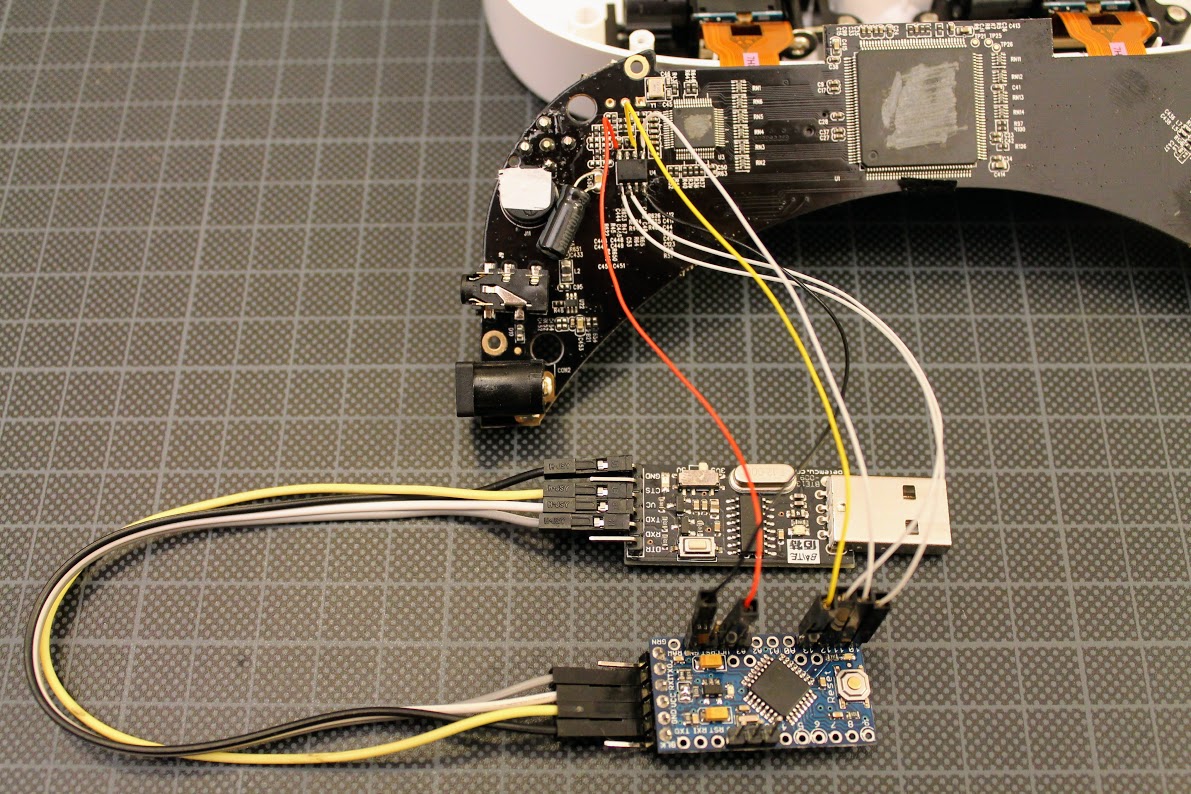
Notice I have put some paper sticker on the buzzer as it emmits constant sound while reading or writing the firmware.
Once connected, try reading the contents of flash IC by running this command:
flashrom-v0.9.8.exe --programmer serprog:dev=COM6:115200 --read flash.hex -c MX25L1005(C)/MX25L1006E
You should get similar output to this:
E:\My\RC\Flashrom\EV100>flashrom-v0.9.8.exe --programmer serprog:dev=COM6:115200 --read flash.hex -c MX25L1005(C)/MX25L1006E

flashrom v0.9.8-unknown on Windows 6.2 (x86)

flashrom is free software, get the source code at http://www.flashrom.org

Calibrating delay loop... OK.

serprog: Programmer name is "frser-duino"

Found Macronix flash chip "MX25L1005(C)/MX25L1006E" (128 kB, SPI) on serprog.

Reading flash... done.
If everything goes OK by this far, you are ready to flash the firmware. To write the new firmware to the flash, start this command:
flashrom-v0.9.8.exe --programmer serprog:dev=COM6:115200,spispeed=1M --write flash.2017-09-23.bin -c MX25L1005(C)/MX25L1006E
You should get similar output to this:
E:\My\RC\Flashrom\EV100>flashrom-v0.9.8.exe --programmer serprog:dev=COM6:115200,spispeed=1M --write flash.2017-09-23.bin -c MX25L1005(C)/MX25L1006E

flashrom v0.9.8-unknown on Windows 6.2 (x86)

flashrom is free software, get the source code at http://www.flashrom.org

Calibrating delay loop... OK.

serprog: Programmer name is "frser-duino"

Found Macronix flash chip "MX25L1005(C)/MX25L1006E" (128 kB, SPI) on serprog.

Reading old flash chip contents... done.

Erasing and writing flash chip... Erase/write done.

Verifying flash... VERIFIED.
Well done, You have sucessfully updated the EV100 goggles firmware.
Warning: Sometimes flashing does not work for the first time and you need to try several times until the firmware is successfuly written and verifyed! Needs more testing for justifying this method. Until then this is an experimantal method.
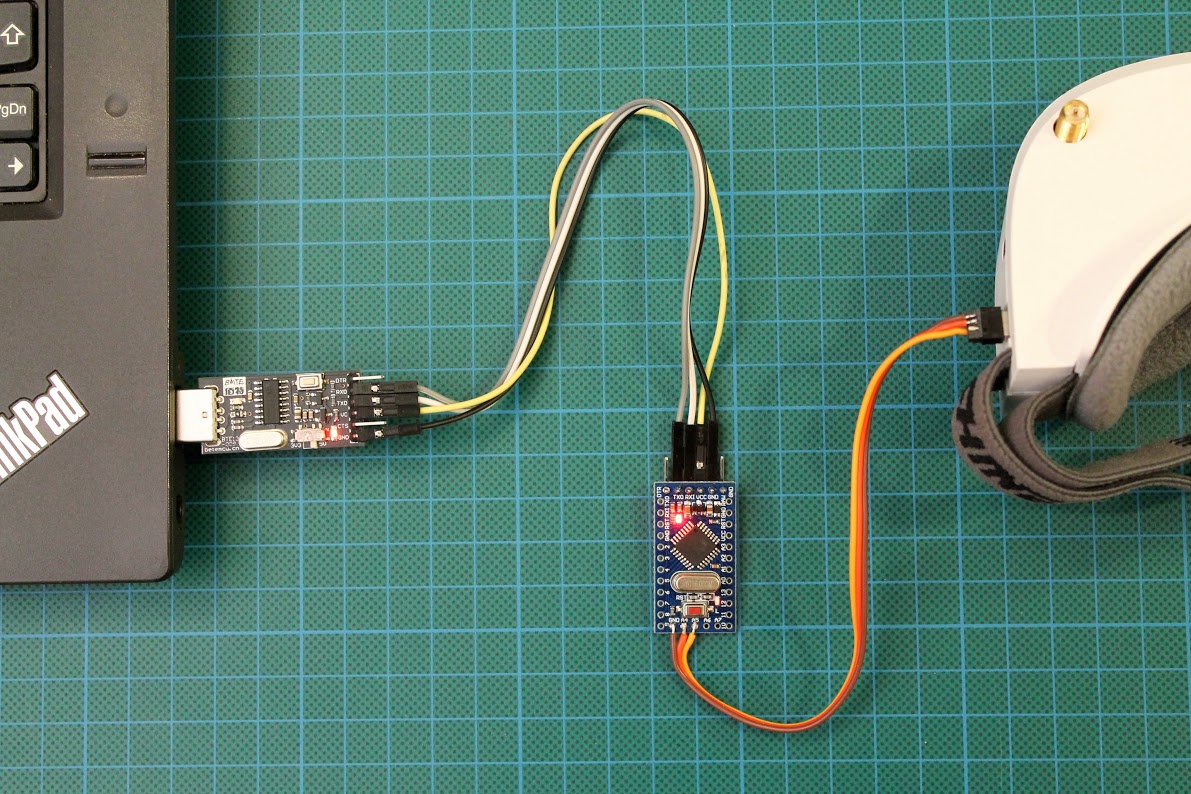
UPDATE 2017-11-30: The alternative way of the firmware flashing by using micro USB connection. No need to open the goggles!
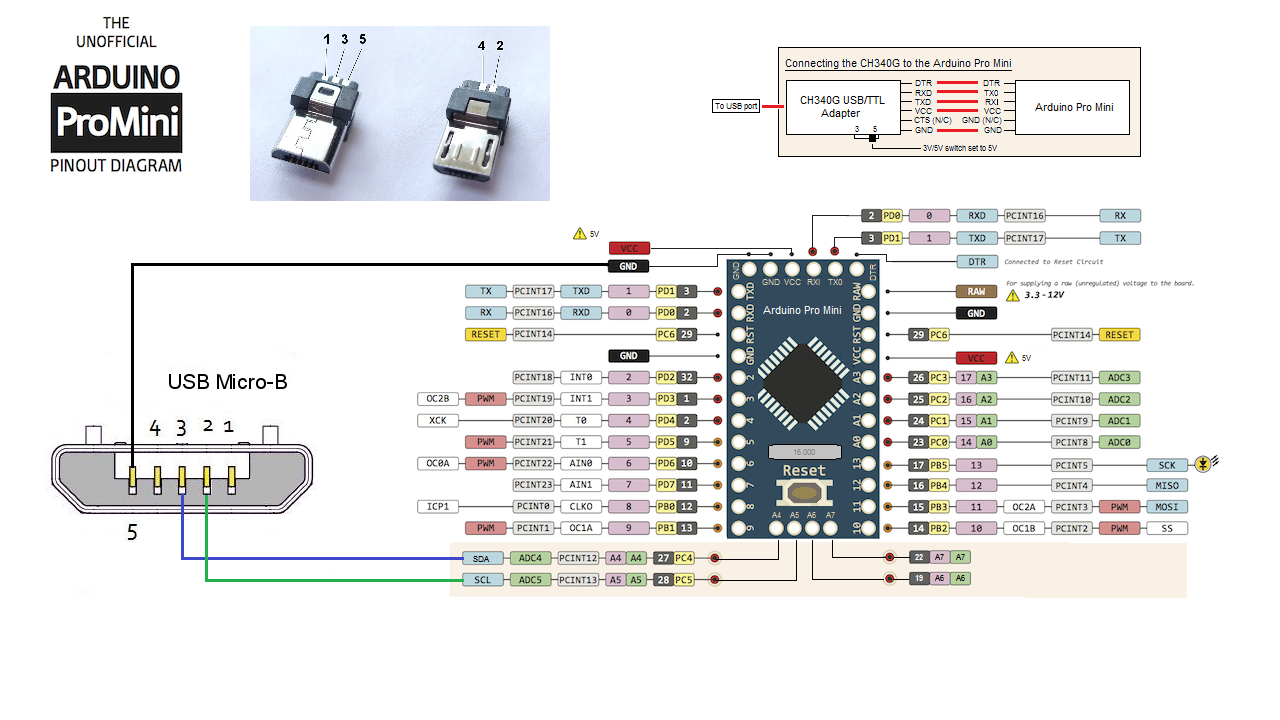
This is by far the best EV100 firmware update method. No need to open the goggles, no soldering (well almost – you only need to solder the micro USB cable to the Arduino Mini Pro board or Arduino Nano).
You will need:
Hardware
Option A:
- Arduino Mini Pro 16Mhz (or 8 Mhz should work also). This time we will use 5V;
- USB to TTL converter with CP2102 chipset (this chipset works with the higher baud rates, such as 1M);
- Micro USB plug or unneeded Micro USB data cable.
It is important for Arduino Mini Pro to have A4 and A5 pins. Also the board should have 16MHz oscillator and 5V regulator.
Possible sources:
Banggood: www.banggood.com/search/arduino-mini-pro-atmega328p-5v.html
It is recommended to use USB to TTL adapter with CP2102 or CH340 chip. (Note: some adapters will not work with the high baudrates, so you have to try).
Ebay: https://www.ebay.com/sch/i.html?_from=R40&_sacat=0&_nkw=USB+to+ttl+CP2102+CH340G&rt=nc&LH_BIN=1
Banggood: https://www.banggood.com/search/usb-serial/0-0-0-1-3-45-0-price-0-0_p-1.html?sortType=asc
Option B:
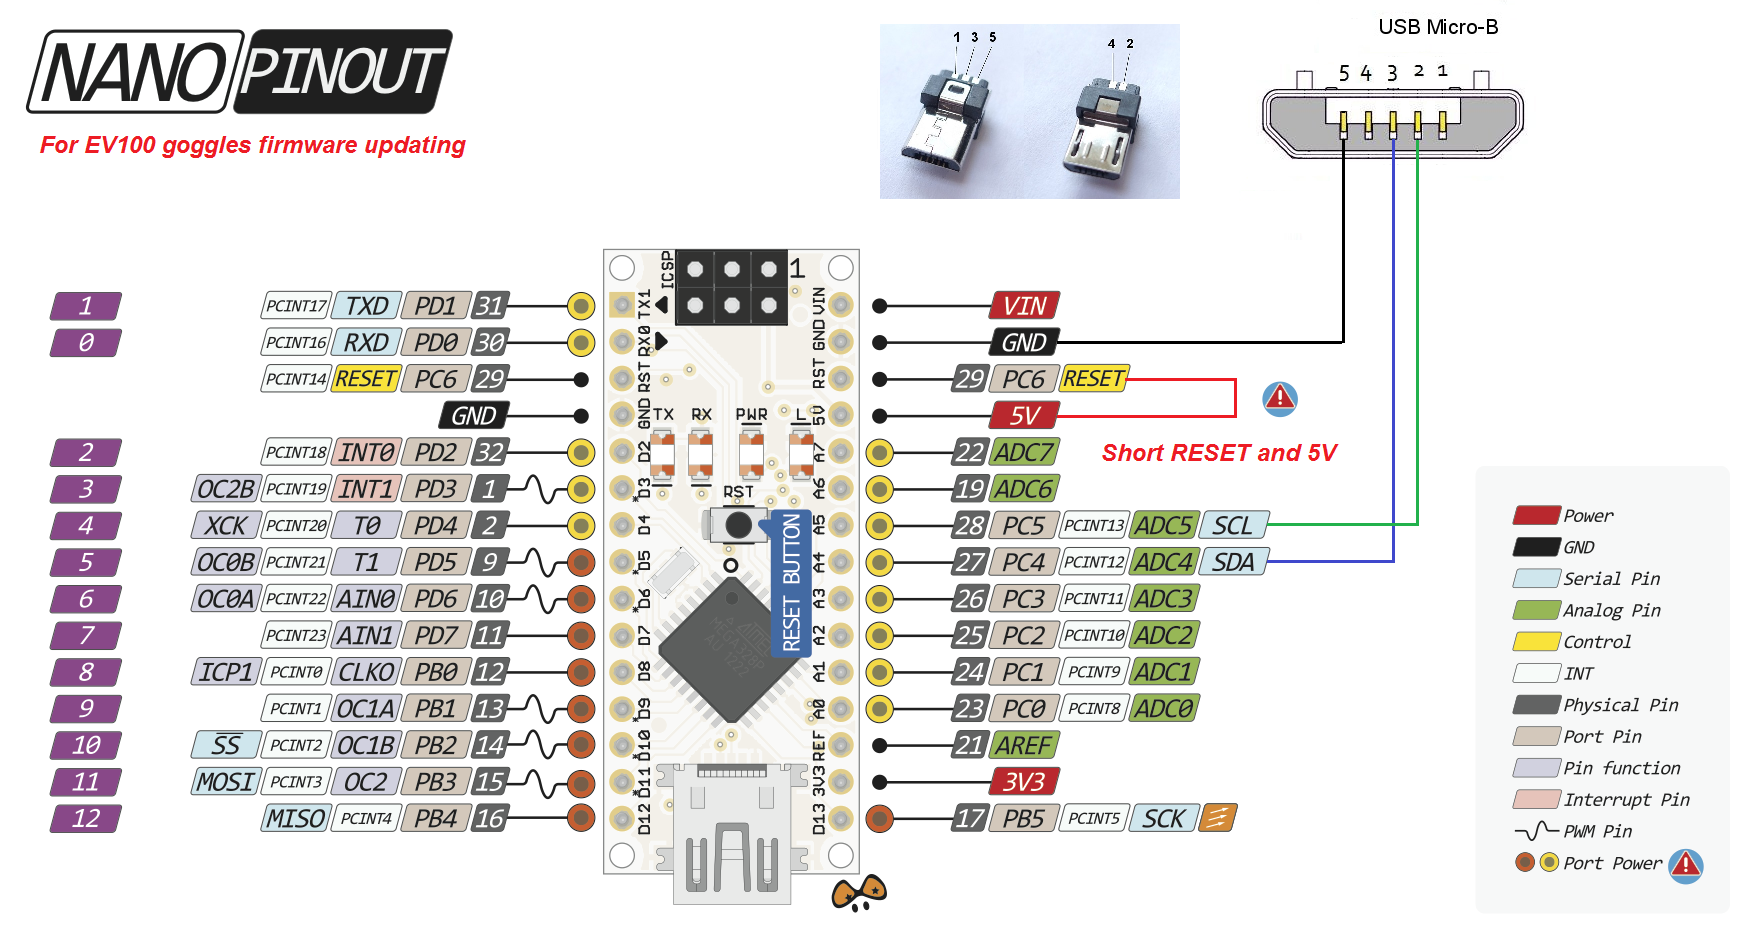
- Arduino Nano 16Mhz.
- Micro USB plug or unneeded Micro USB data cable.
Possible sources:
Ebay: https://www.ebay.com/sch/i.html?_nkw=arduino+nano+atmega328+-atmega168
Banggood: https://www.banggood.com/search/arduino-nano/0-0-0-1-3-45-0-price-0-0_p-1.htm
Software
- Postal3 serial flash programming utility (http://monitor.net.ru/forum/postal2-3-faq-info-436716.html ).
- XLoader to upload binary file to Arduino board (http://russemotto.com/xloader/ )
- Arduino firmware (PostalAVR88.hex) (download link: http://monitor.net.ru/forum/download.php?id=312162&sid=235aa3ac192224cfb496b3a9bf45c46f )
- EV100 goggles firmware file (download link: https://goo.gl/Z9ZZn4)
- Or all the software in one archive (download link: https://goo.gl/cH8Sib)
Connect the USB-TTL adapter to the Arduino Mini Pro. Use 5V as VCC power supply source. Or just plug the USB cable to Arduinoi Nano if you go with Option B.
Upload the Postal programmer dongle firmware file (PostalAVR88.hex) to the Arduino by using XLoader program.
Hint: You you hit the “Upload” button and the XLoader program “freezes” it means that Arduino bootloader is not responding to the PC. I advise to press the RESET button on the Arduino right after the “Upload” button is pressed. Arduino will reboot and enter the bootloader mode.
Solder the Cable with Micro USB plug to the Arduino pins A4, A5, GND (leave the USB power unconnected! You will have to power the goggles with battery). Use this schematic for reference:
Option A (Arduino Mini Pro + USB-TTL adapter):
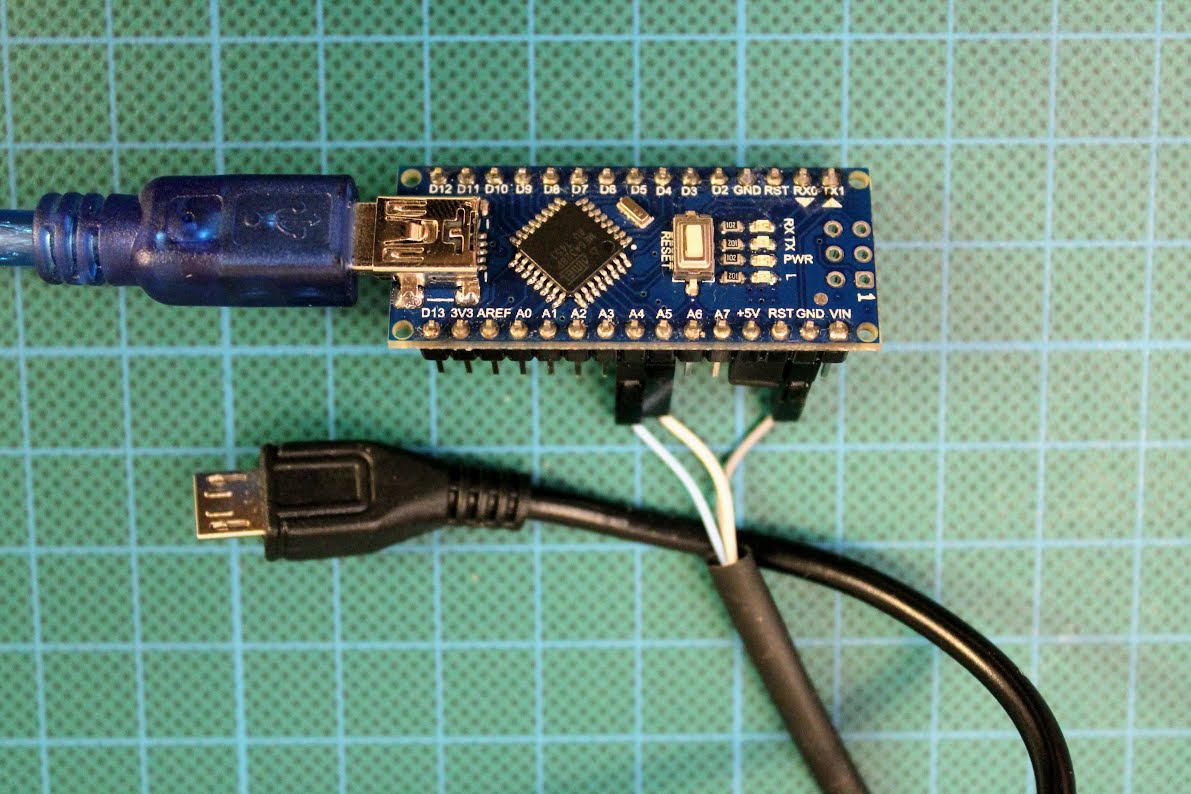
The resulting DIY flashing dongle will look like this:

Option B (Arduino Nano). Don’t forget to short the RESET and +5V pins in order to Arduino Nano work with Postal Software. Otherwise Arduino will be resetting every time Postal software tries to send anything:
The result should look like this:
Plug the the micro USB to the EV100 goggles. Plug the battery to power the goggles.
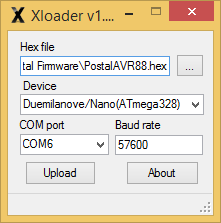
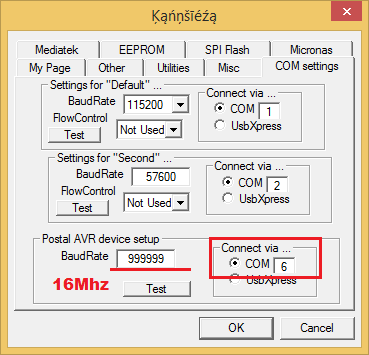
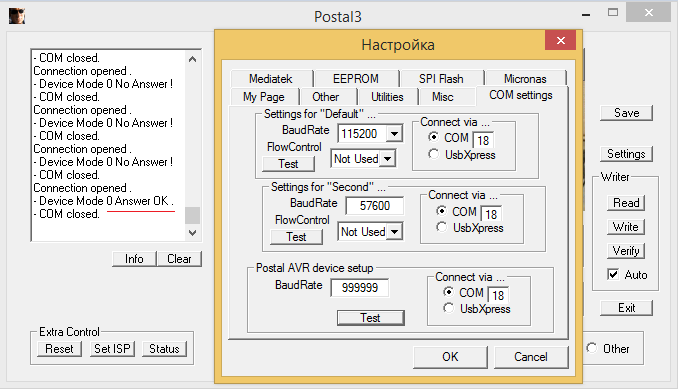
Open Postal program. Select [Settings] button. You should input the right COM port number and BaudRate:

Baudrates for various oscillators:
For 16Mhz oscillator baudrate is 999999, 8Mhz – 500000, 14.745Mhz – 921000, 7.3728Mhz – 460800
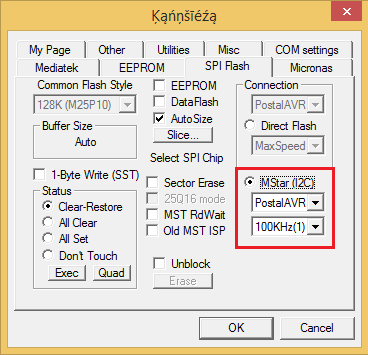
Go to SPI Flash tab and set “MStar (I2C)”:
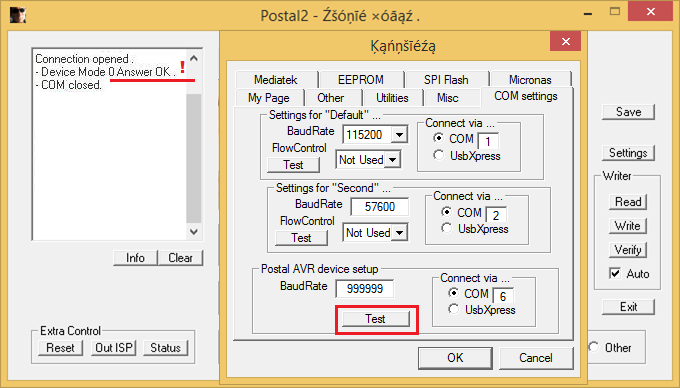
Now press the [Test] button and you should see “Device Mode 0 Answer OK.” This means the Postal utility is successfully communicates with your DIY Arduino flashing dongle:
If you have CP2102 USB to TLL adapter, you need to make some baudrate manipulation in order to make it work with Postal software:
Start the CP210xBaudRateAliasConfig.exe utility in the \AN205SW\ folder (download link: https://goo.gl/cH8Sib).
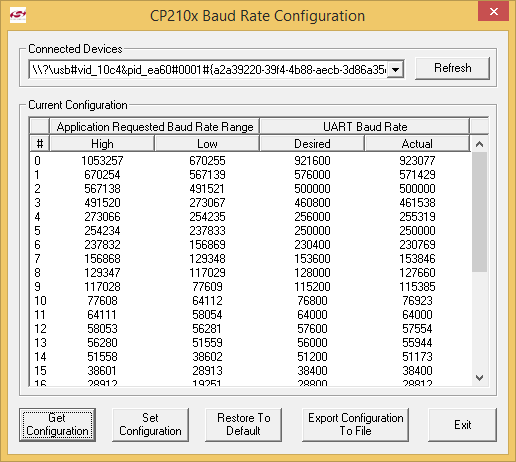
Double-click on the top line (“#0′), enter 999999:
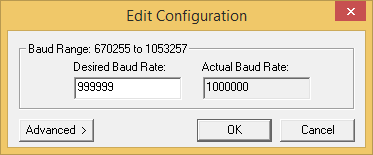
Press “Set Configuration”, confim:
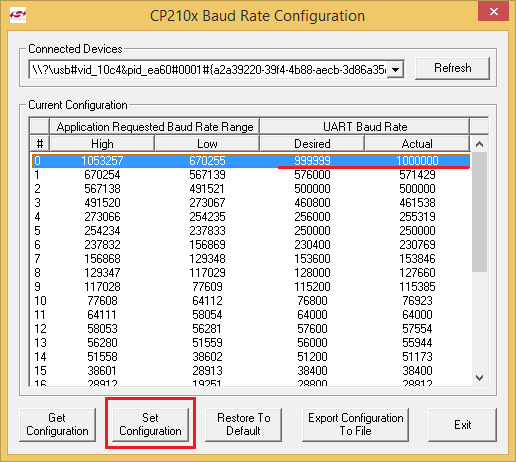
Now press TEST in the Postal utility:
Any baudrates in the range of 670255-1053257 should work with CP2102 adapters!
Press [Open] and select the firmware file you want to upload to the goggles:
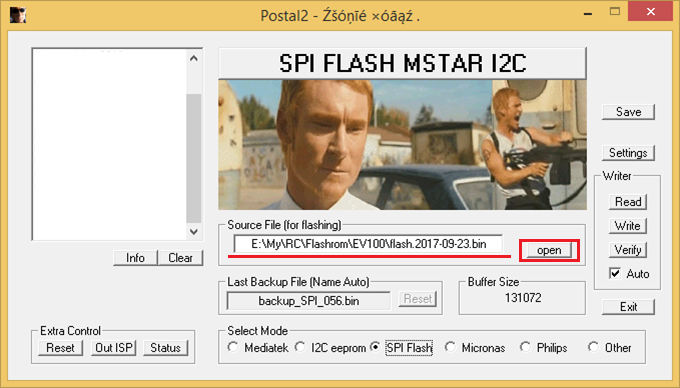
Now press the [Set ISP] button to set the goggles into In Serial Programming mode. You should hear beep, goggles LCD screens should turn black and You will see the following output „MSTAR ISP Enter OK.“:

Next press the [Read] button. You should get the goggles current firmware dump file „backup_SPI_0xx.bin“.
If everything goes right so far, press [Write] button and you will see Writing process window:
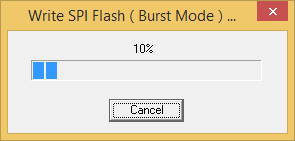
And the result is OK if status window shows „MSTAR Flash 131072 OK“, „MSTAR Verify 131072 OK“:
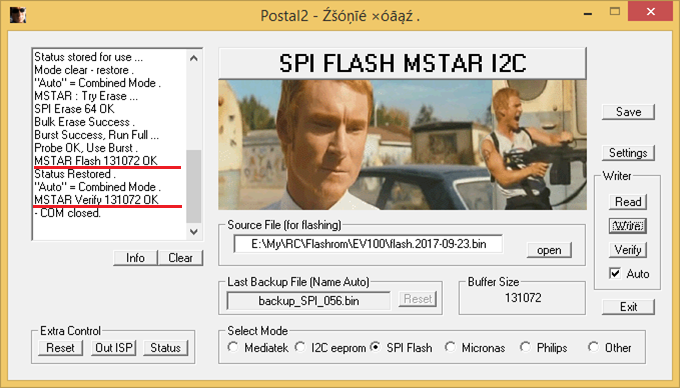
Sucess! You just have updated goggles firmware!
This is the recommended firmware upgrade method! While it is relatively safe and should work without problems, please be warned that any firmware upgrade process is dangerous and can lead to the device failure.
Note on firmware versions:
Goggles from the first two batches have MX25L1006E serial flash chip and should be flashed with 2017-09-23 firmware
Goggles from the later batches have Winbond 25×40 serial flash chip and should be flashed with 2017-10-19 firmware.
Issue #4
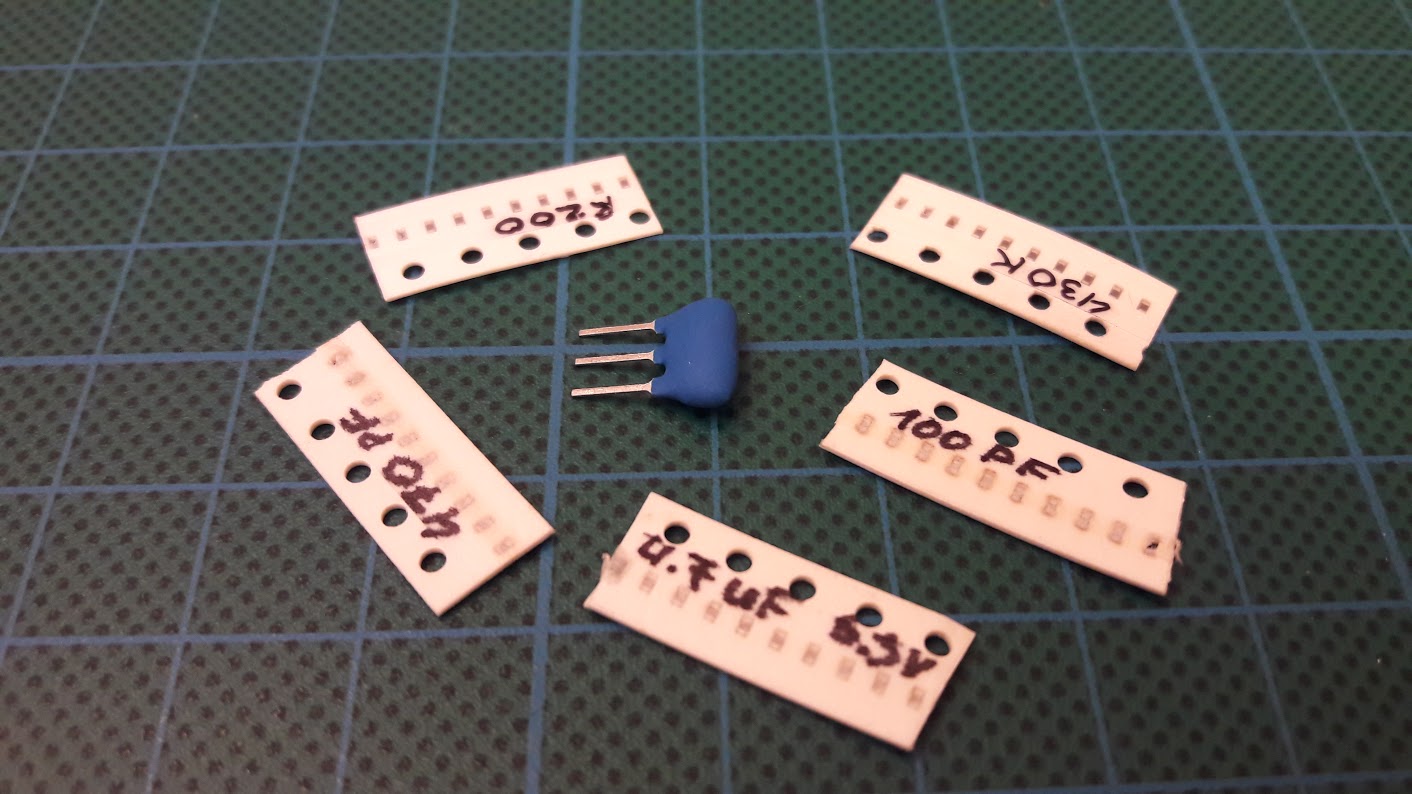
No sound from the receiver. It appears, that receiver module has some components missing. These missing parts list is (thanks to fishpepper):
| Part number | Value | Size | Part number |
|---|---|---|---|
| R1 | 200 Ohm | 0402 | CRG0402F200R |
| R2 | 430 kOm | 0402 | SizeCRG0402F430K |
| C1 | 470 pF | 0402 | GRM155R60J475ME47D |
| C2 | 100 pF | 0402 | GRT1555C1H471JA02D |
| C3 | 4.7 uF | 0402 | 0402N101K500CT |
| F1 (Cerramic filter) | 6.5Mhz | – | SFE-6.5MHZ |
Minimal order quantity for the most of the parts is 10 pcs, but the price of these components is very low. Total parts cost was around 4 Eur. And you get a spare component kits for your friends.
Now to the soldering. Missing components placement scheme:
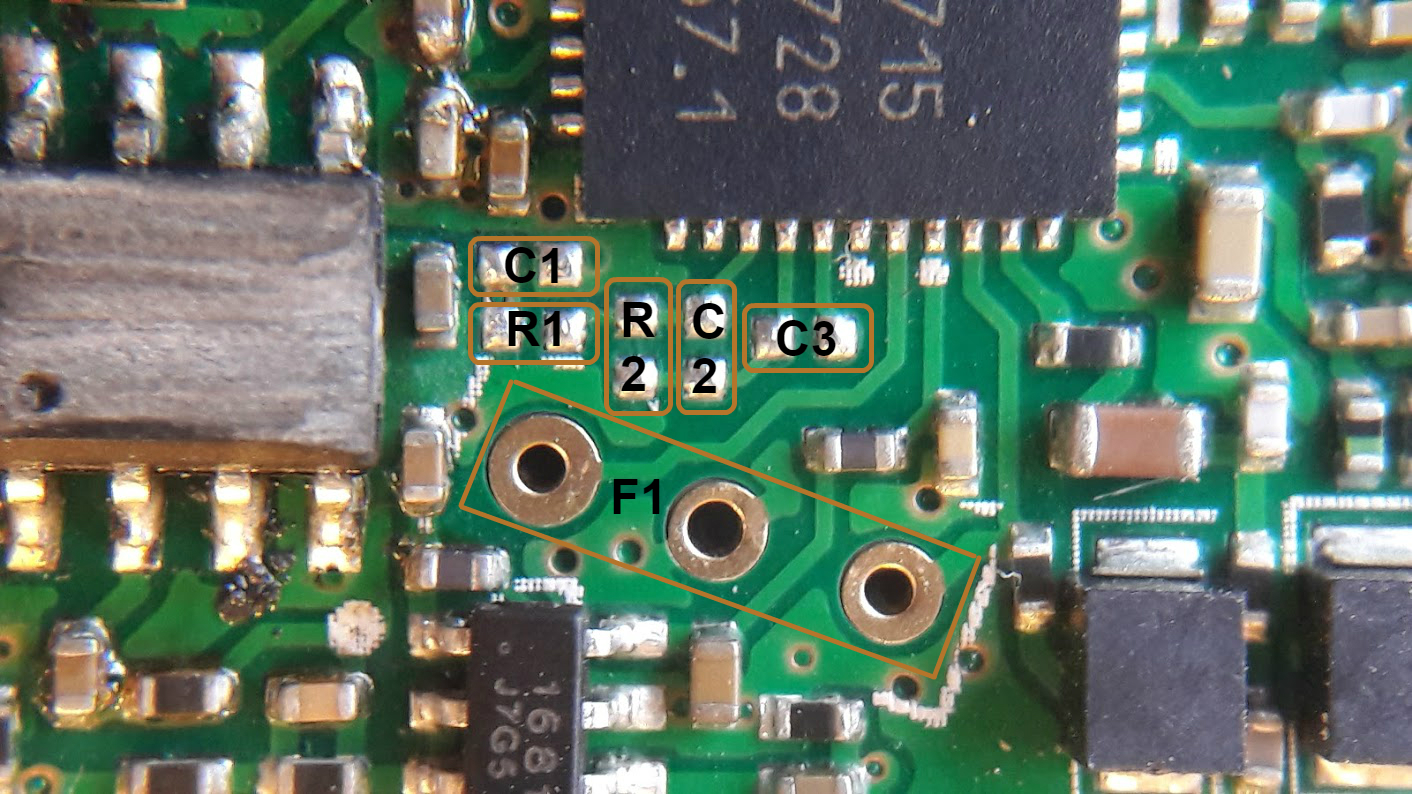
Use very fine soldering tip (example: T12-ILS), apply enough flux (I like Weller LF25 flux). Small tweezers and a magnyfying loupe is also a must!
If you solder the ceramic filter into original place you will have trouble closig the goggles case – the filter does not fit inside (thats the most probable cause why it is absent in the goggles :). So I have soldered extension wires to the ceramic filter and soldered it in this way.
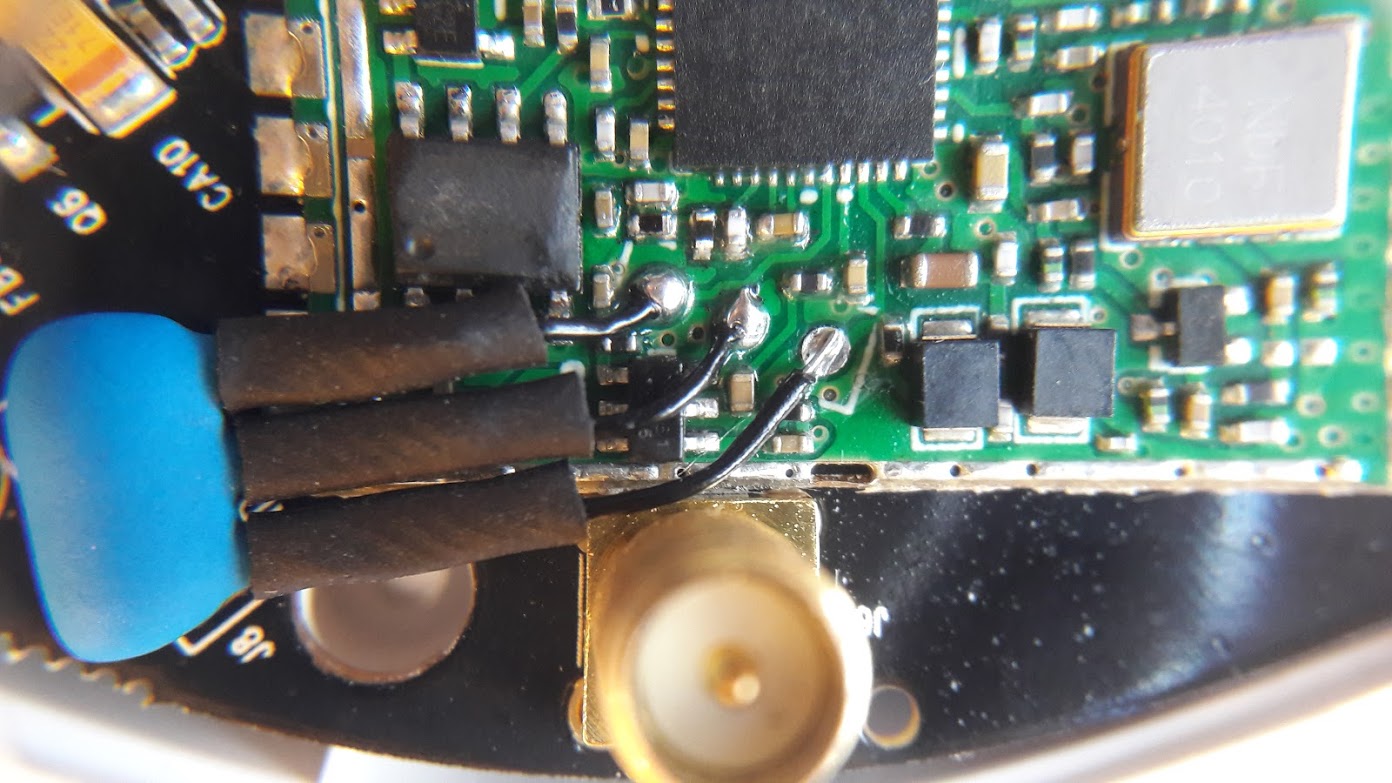
Tested and audio is working now perfectly. Note: you need a headphones with volume control as audio feed is at the max volume.
GOOD
- Low price (actually the lowest on the market)
- 720*540 px resolution
- Adjustable focal distance for people with vision correction
- Goggles are light and compact
- Picture is clear and detailed
- Receiver has good recepion
- Has AV in/out connection
BAD
- Small FOV (actually smaller than declared)
- Grey bars on the high contrast video (can be fixed and are fixed in the latest batches)
- Intermittent backouts (
probablycan be fixed and are fixed in the latest batches) - No audio from receiver (can be fixed)
- Facial foam pad is too thick (can be fixed and is fixed in the latest batches)
- Not the real diversity, but antenna diversity
- Picture color saturation is too high and no possibility to adjust
- Brightness
and contrastsettings are not saved
CONCLUSION
Despite the long list of issues, Eachine EV100 are good choice for the first FatShark style goggles. Flying FPV with these goggles is not so immersive as in other box type goggles, becouse the FOV is really small. Actually smaller than declared. I would recommend these goggles for flying mini quads while I prefer other googles with bigger FOV for flying fixed wings because of the immersiveness.
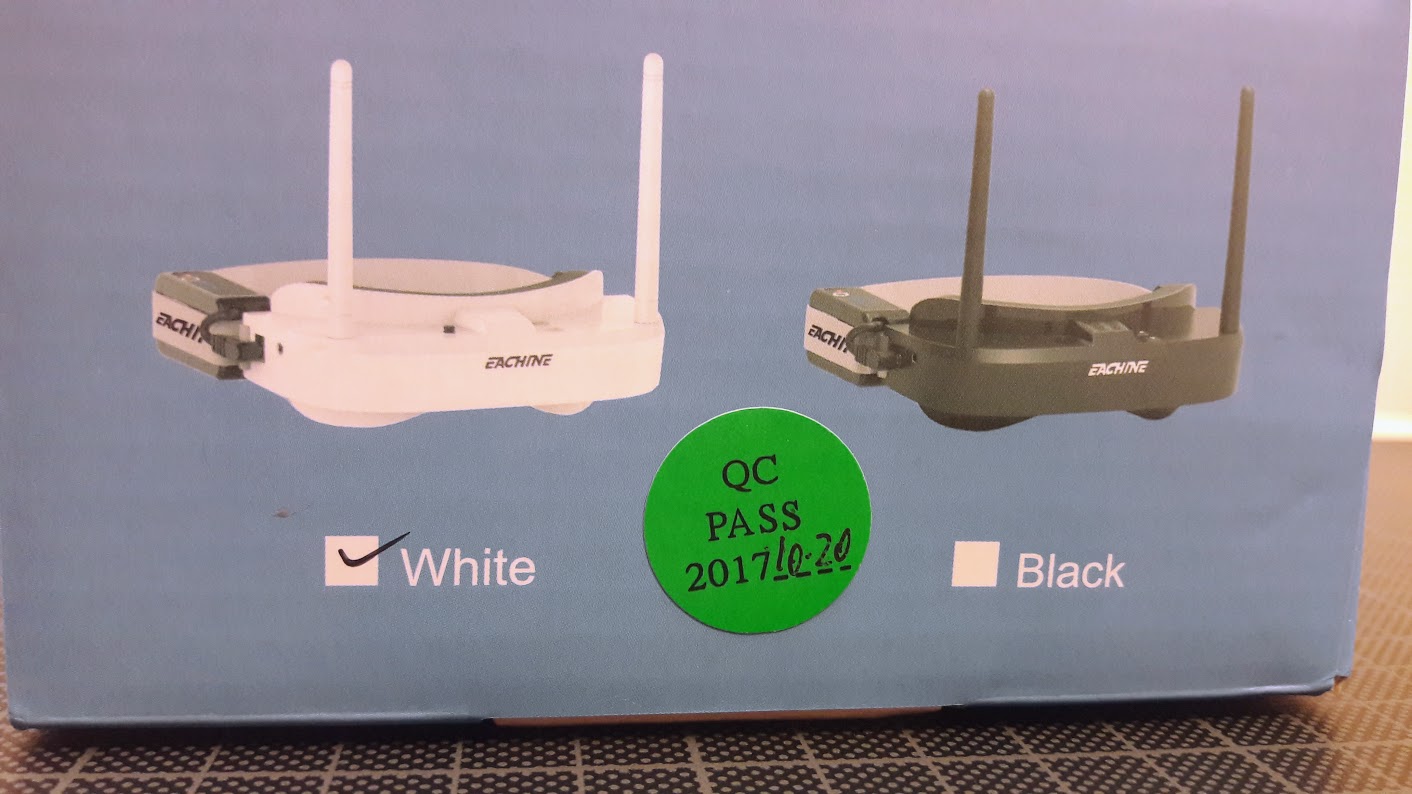
UPDATE 2017-11-06
I have received the EV100 goggles from the newest batch from Banggood that were shipped on 2017-10-27 and they came with most of the issues fixed (except the audio – it is still missing).
The box now has QC sticker (mine was dated 2017-10-20):
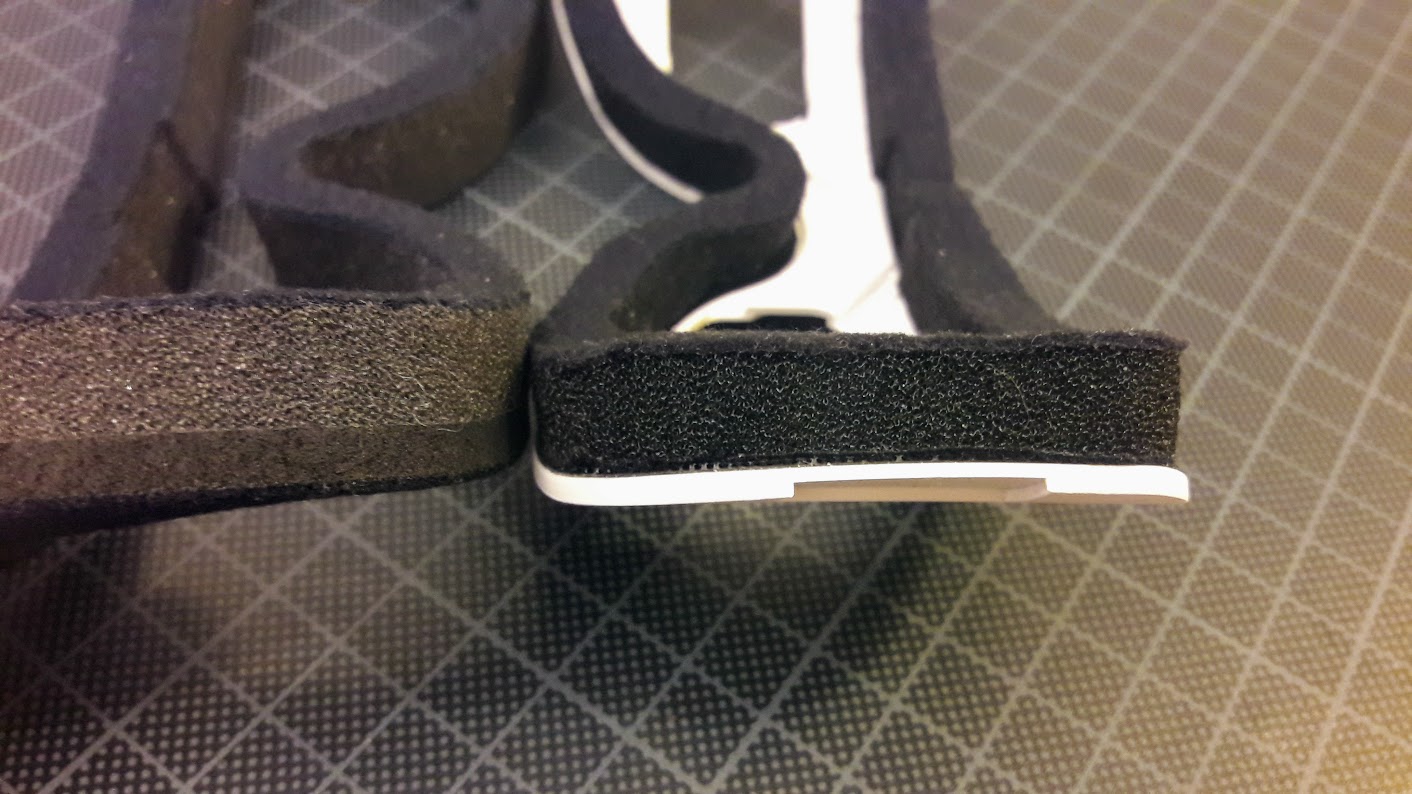
Goggles from the new batch comes with thinner and softer foam pad and they really much more comfortable:
Quick test showed that grey bars are gone, no flicker noticed!
Inside the goggles we can see the capacitor fix is allready made to eliminate grey bars:
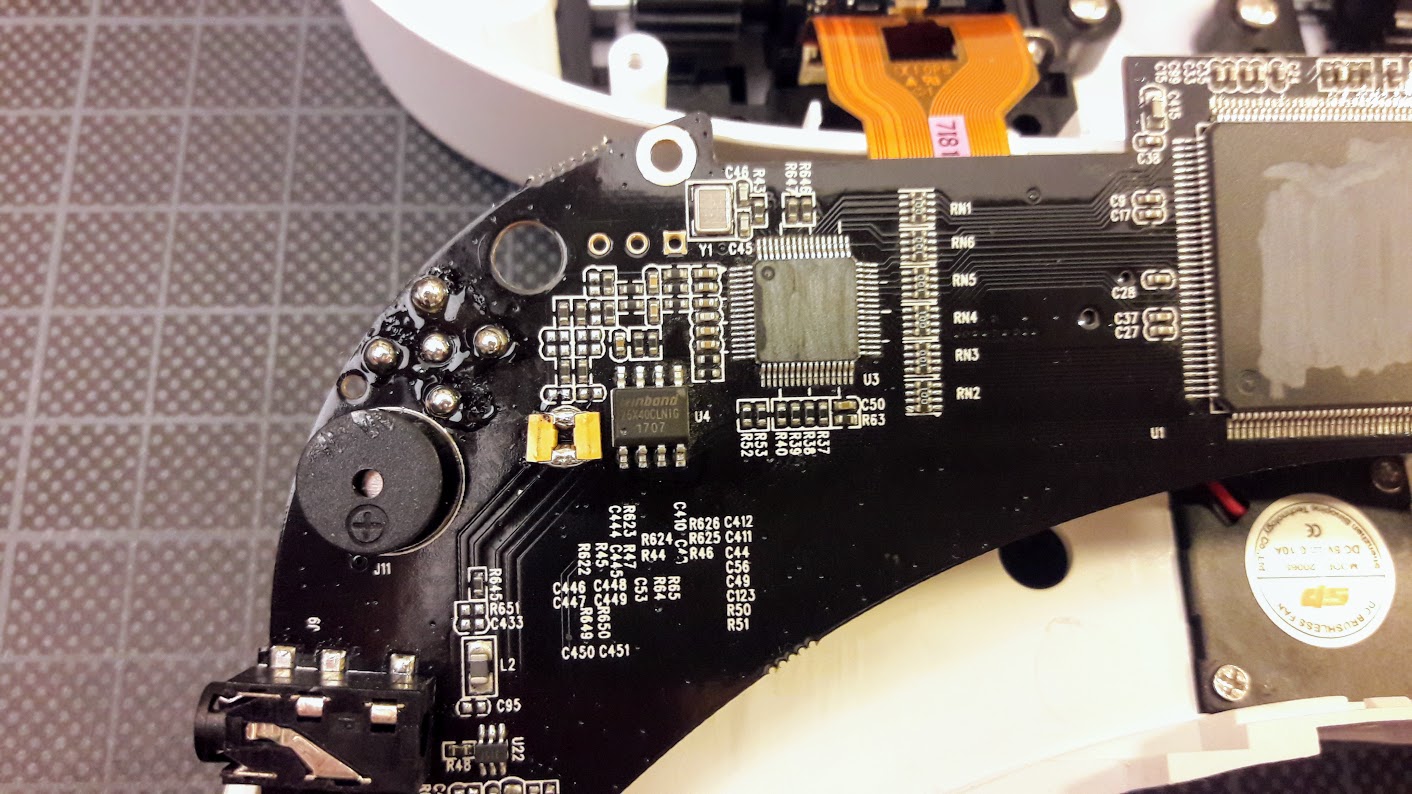
Also notice that serial flash chip has changed from MX25L1006E to Winbond 25×40 (was 1Mbit, now 4 Mbit sized).
Unfortunately receiver module has all the audio components missing, so no audio from receiver.
Also goggles still have one minor issue – brightness setting is not saved after power cycle, but the contrast is saved. That is strange and in my opinion it is a bug. But we can live with it.
With these 3 issues (foam pad, black flicker and grey bars) fixed EV100 are really good goggles! Definitely worth the money.
UPDATE 2017-11-09
Banggood has listed upgraded foam as spare part here: https://www.banggood.com/Eachine-EV100-Upgraded-Soft-Thick-Sponge-…-1223681.html
UPDATE 2017-11-30: An alternative way of the firmware flashing (see the review at the Issue #3)
UPDATE 2018-01-01: Arduino Nano boards also work as EV100 firmware updating dongle. Now it is even easier to flash the firmware! (see the review at the Issue #3)

[Last update: 2018-01-04]
-
 Review: MEPS Space SZ F7 Mini FC
MEPS (Mepsking) is a new, but emerging manufacturer, making its mark in the RC
Review: MEPS Space SZ F7 Mini FC
MEPS (Mepsking) is a new, but emerging manufacturer, making its mark in the RC -
 HGLRC Thor Pro parallel charging board
HGLRC Thor Pro charger board is battery parallel charging board with protection fuses and
HGLRC Thor Pro parallel charging board
HGLRC Thor Pro charger board is battery parallel charging board with protection fuses and
Wow this is a really comprehensive guide on the EV100 goggles. Thanks for all your research and work! My first batch of EV100 came with all the issues but I couldn’t deal with fixing it so I emailed banggood and they shipped me a replacement set with QC sticker, way easier option in my opinion.
Yes, Banggood is doing good job by replacing the goggles from the first batches with issues i’ve described.
I encourage you to try the firmware and capacitor mods on the goggles you have – there are big chances that you’ll have two properly working sets!
Hi,
I have doubs regarding what kind of filter is needed.
On fishpepper.de site he mentioned a Murata ceramic trap filter with a frequency/atenuation graph showing as it would block frequencies higher and lower as 6.5Mhz:
https://www.murata.com/en-us/products/productdetail.aspx?cate=luCeramFilteCeramTraps&partno=TPSKA6M50B00-R3
YIC SFE-6.5MHZ filter mentioned on this site has the oposite graph that looks like it would block frequencies centered on 6.5MHz.
http://www.yic.com.tw/clog/images/2012-2013/YIC-LTZ%20SFE%20SFSH%20ceramic%20filter_8.pdf
I’m not shure weather I understand the graps correctly. Did anybody made the audio work with YIC filter?
Hi, this is the exact part number of the filter I have ordered from the local supplier: SFE-6.5MHZ. It is the same filter as seen on other 5.8GHz RX modules. I have soldered it and other missing parts to the module and audio works perfectly now.
The Murata one you have quoted is the wrong part. It has the highest attenuation (blocking) value centered on the 6.5MHz.
The right part is SFE-6.5MHZ. It filters everything except 6.5MHz band (having the lowest attenuation on that frequency).
Good luck on fixing the audio! It is worth it!
Hi Montis, thanks for your detailed guide.
I have followed it to add the audio, buy all components as indicated in your shopping list but I’m not able to enable audio on my ev100.
I’m try to understand the trouble…so could be this SFE-6.5MHz that works “inverted” as requested? (I bought this https://www.tme.eu/en/details/sfe-6.5mhz/tht-ceramic-filters-and-resonators/yic/)
I have check all resistances and is ok, I cannot check the capacitors but I think is also right…I don’t know how to do.
I’m in the deep black, I made all soldering and no audio… 🙁
any suggestion?
This is my actual state: https://ibb.co/jYSvec
Thanks
SFE-6.5MHz is the right one. The pins shouldn’t be mixed – the pin #1 is input, pin #3 is output. I cannot see if you have ir not mixed this order. Also double check the soldering (or try to resolder) the components. Use magnifyer as you cannot see anything so small (I can’t). Also use a lot of flux as it helps.
I was lucky it worked from the first try. It took about 2 hours to solder these small components. But finally I made it.
I simply cannot get further than “- Device Mode 0 Answer OK .
– COM closed.” under Issue #3, Option B.
Neither does Postal2 (aka Postal3.exe) have an “Out ISP” button under the “Extra Control” section, being always “Set ISP” in my scenario.
As such, I can’t complete the firmware update on a MX25L1006E version, with the only feedback being:
“Connection opened .
No Answer from Mstar !
– COM closed.”
Am I overlooking something truly simple ?
You need to enter the MStar ISP mode (in-system-programming). You need to press the “SetISP” button (Yes, the same button as [OutISP], I have corrected the article text, thanks). The output of the successful answer should be:
“*MSTAR ISP enter OK.”
After this step your goggles LCD screens should turn black and you should be able to Read/Write the firmware.
Swapped pins A4 & A5 and it worked like a bomb ! Thanks ! You rock !
This worked for me too. The diagram has the wires the wrong way around I guess.
Thank you for feedback! I will double check the diagram.
Hi, can you please check in what orientation are the two tantalum capacitors (grey bar mod by Eachine) mounted on the new googles. This information woul’d help us mount tantalum caps correctly.
Thnx in advance!
Awesome write-up, dude. I got my EV100’s late last year and have been pretty happy with them. I’ve not experienced any of the issues above (although I have not tried audio). No black bars though. The only thing that pisses me off is the channel information that lingers on the top of the frame, and the fact that the displayed image is smaller than that being output by the connected camera – I need to move my OSD elements one ‘bar’ in from the top and bottom of the screen so that they’re visible.
My question to you is, does the firmware update fix this?
If you dont experience the intermittent blackouts, then you most likely have the latest firmware. The latest known good firmware is dated 2017-09-23. Unfortunately there is no newer firmware.
I can’t seem to get further than: Error: Cannot Open COM !
Connection error ! in the postal3 program, using the arduino nano and successfully flashed the postalAVR88 to it but I get stuck at the postal3 software…
Have you shorted the RST and +5V pins with a jumper? If using Nano you need to hook the Reset line to the active HIGH logic, otherwise you will always get Connection Error.
I have the same problem with an Arduino Nano (Device 0 No answer).
I shorted the RST and +5v.
Any suggestion? 😪
Thanks!
Solved.
I didn’t load the postal Firmware in the Arduino board (facepalm).
Good. I’m glad it worked!
Can anyone tell me if you can replace the MX25L1006E chip to a preflashed Winbond 25×40 from the repair kits?
Haven’t tried that, but it should work. Winbond 25×40 chip is almost the same serial flash chip, just with a bigger memory capacity. Pinout is the same. Also Banggood suggested to replace these chips. So no reasons why it shouldn’t work.
I also have a suspicion that Winbond 25×40 chips are just empty chips and you need to flash the firmware anyway.
I got ev100 this year.is not First batches .
I have a problem with ev100. Sometimes the screen suddenly overexposed or darkened during flight.
Is there a way to solve?
I got the same problem like you, its quite annoying. Have you solve it?
Hi, I’m looking to upgrade my firmware with the first method. Why does the arduino have to be the mini pro? I have an arduino nano with AtMega 328p processor. The board has a 3v3 output. Can I use that one or do I need to buy a pro mini with usb serial? Thanks.
Almost any Atmega328 based board should fit. See the article – there is a connection example with Arduino Nano. Good luck!
I plug in my goggles, I get a constant “beeeeeeeeeeeeeeeeeeeeeeeeeeep” i tried to hold down the button to go to debug mode, what is the issue?
There is definitely something wrong with the goggles. Try to fully charge your battery pack, also try to power the goggles via USB cable. If that doesn’t help – try contacting the support.
love your work man, i literally thankful to you, its a complete and comprehensive guide for all the issues and at the end it helps us alot…!
Thanks for your kind words! I
I was using the EV100 for a while, then moved to the EV200D. Huge improvement. Then I’ve invested in EV300D and it was huge disappointment. Still using EV200D now.
I tried to update EV100 goggles firmware
updating looks it went like on this tutorial
But I think something went wrong still
because now those buttons on my goggles don’t work
I can’t change channels or put it on AV or adjust contrast or brightness
Anyone have solution?
thx
When have you purchased these goggles? Maybe they are from some new batch with unknown changes made? Give us more details. What is the date on the QC sticker? And the main question have you made the backup of the firmware before updating the EV100 ?
I use the CH341 Programer to flash the IC and I flash it and I need a bin/hex file for the two ICs, I hope someone can help me because my goggles are completely dead because of the loss of the bin file, thank you
Have you tried to flash the firmware by the methods, described in the article?