Review: BetaFPV F4 1S VTX AIO flight controller
BetaFPV has released the third generation of their F4 1S VTX AIO whoop flight controller. This version of the F4 1S VTX AIO has 5 integrated parts into one board: F411 MCU, OSD, 4in1 ESC, SPI RX and VTX.
Lets take the detailed look at this flight controller.
Specification of F4 1S AIO FC(SPI Rx)
- Item: F4 1S AIO FC(Frsky/Futaba Rx)
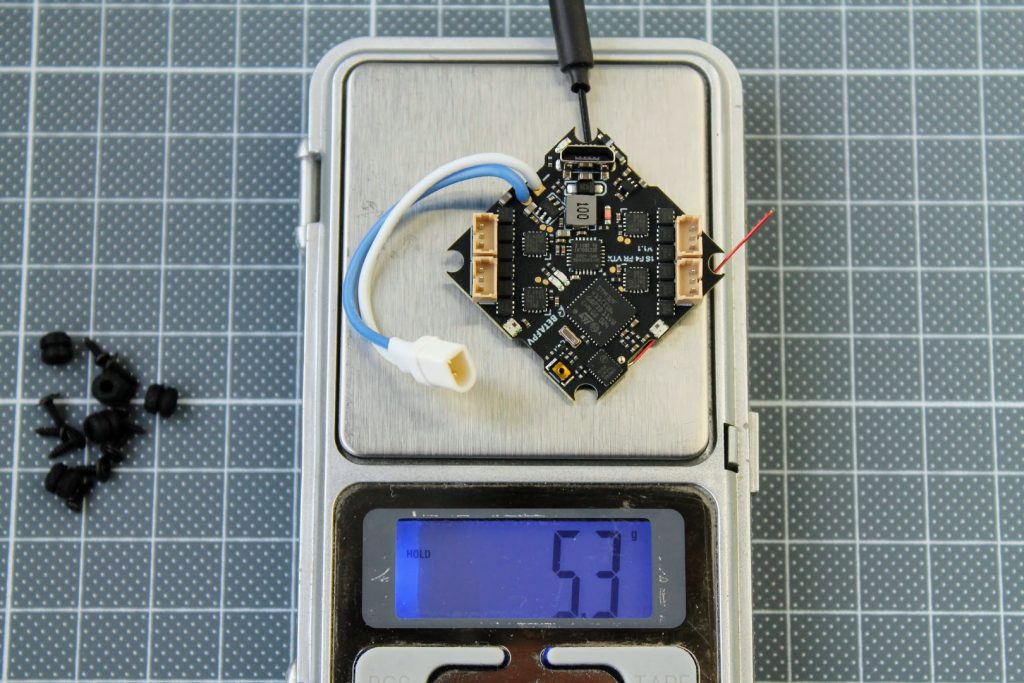
- Weight: 3.92g(without antenna and BT2.0 connector)
- VTX Power: 25mW
- CPU: STM32F411CEU6 (100MHZ )
- Six-Axis: MPU6000 (SPI connection)
- Firmware version: betaflight_4.2.0_STM32F411
- Receiver: Support Frsky Receiver/ Futaba Receiver
- Motor Pin Connecter: 1.25mm Header Pins
- Mounting hole size: 29mm x 29mm / suitable for almost all kind of whoop frame
Specification of F4 1S AIO FC(No Rx)
- Item: F4 1S AIO FC(No Rx)
- Weight: 3.83g (without antenna and BT2.0 connector)
- VTX Power: 25mW
- CPU: STM32F411CEU6 (100MHZ )
- Six-Axis: MPU6000 (SPI connection)
- Firmware version: betaflight_4.2.0_STM32F411
- Receiver: Support External Receiver, SPI Receiver, including Frsky XM/XM+ receiver, Futaba receiver, Crossfire receiver and DSMX receiver
- Motor Pin Connecter: 1.25mm Header Pins
- Mounting hole size: 29mm x 29mm / suitable for almost all kind of whoop frame
Specification of ESC
- Built-in ESC with 5A continuous and peak 6A current
- Input voltage: 1S Lipo
- ESC firmware: O_L_5_REV16_8.HEX
- OSD: Built-in BetaFlight OSD (STM32 controls OSD chip over SPI in DMA mode)
- Signal support: D-shot150, D- shot300, D-shot600, Oneshot125, Multishot, PWM
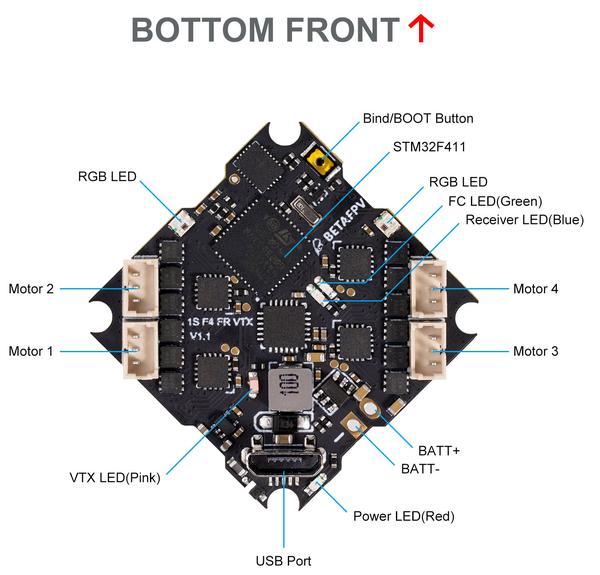
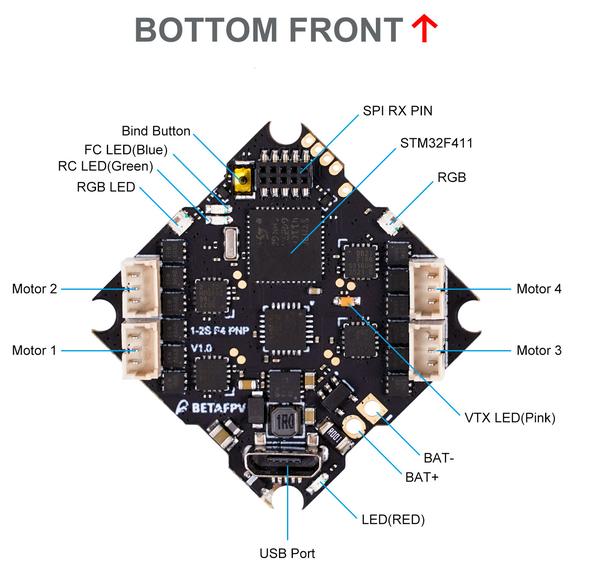
- 4 Indicators: Receiver indicator (Blue)/Flight control status indicator (Green)/Flight control power indicator (Red)/VTX indicator (Pink)
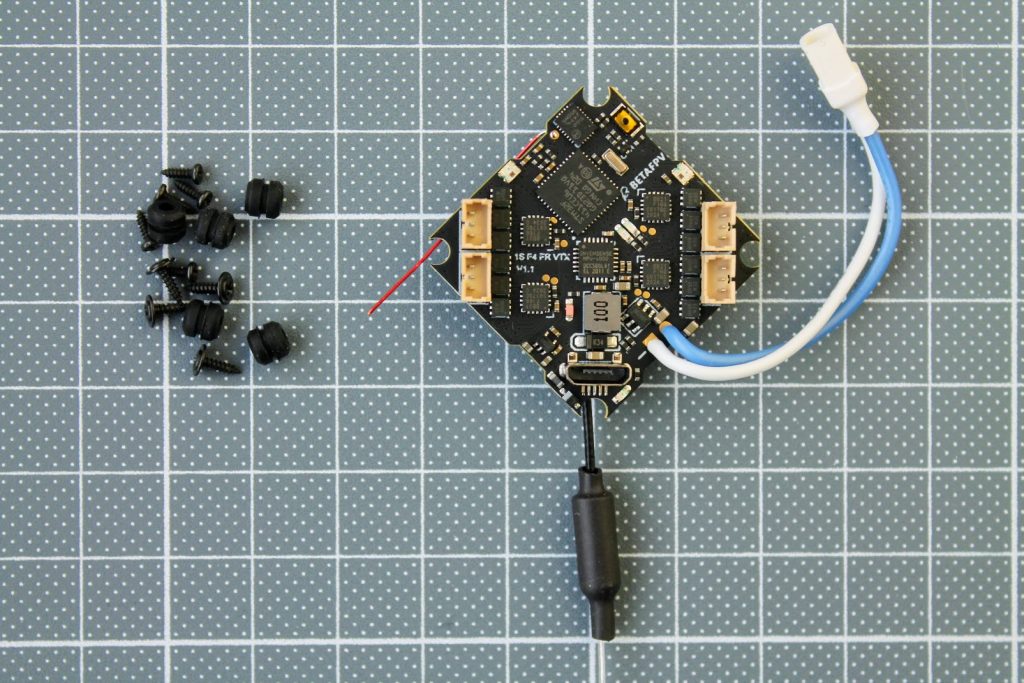
Package contents
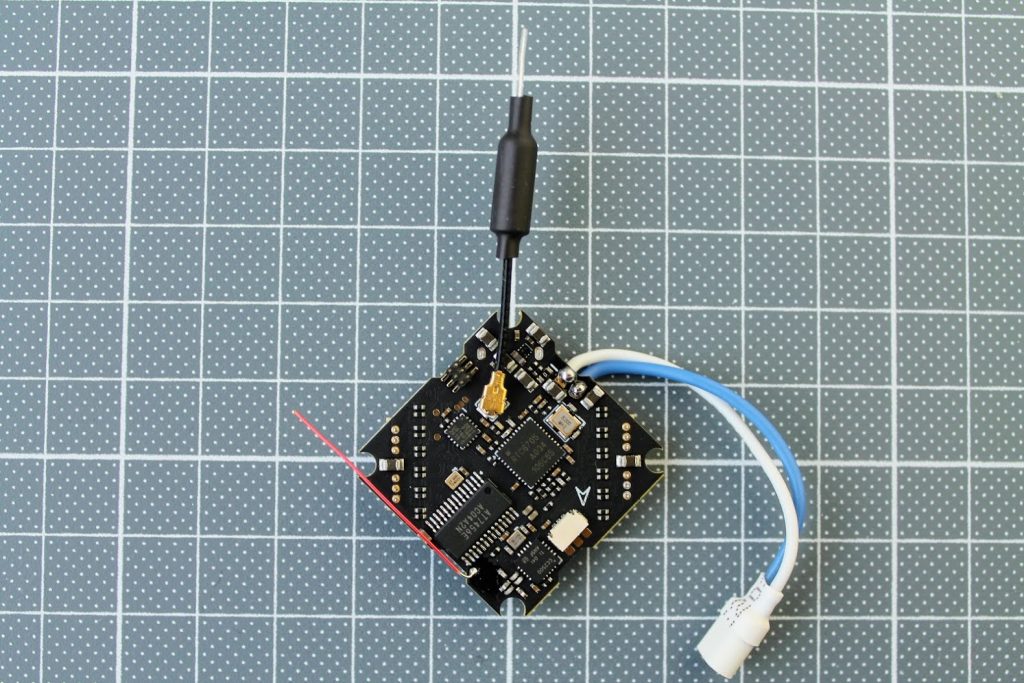
You will get the F4 1S AIO VTX flight controller with BT2.0 pigtail and linear VTX antenna preinstalled. Also a bunch of the screws and silicone rubber grommets.
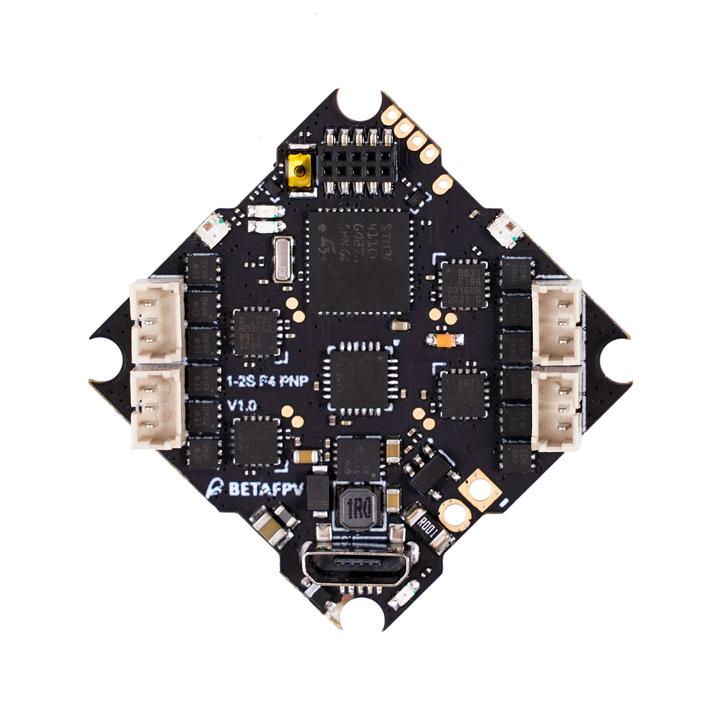
BetFPV F4 1S VTX AIO
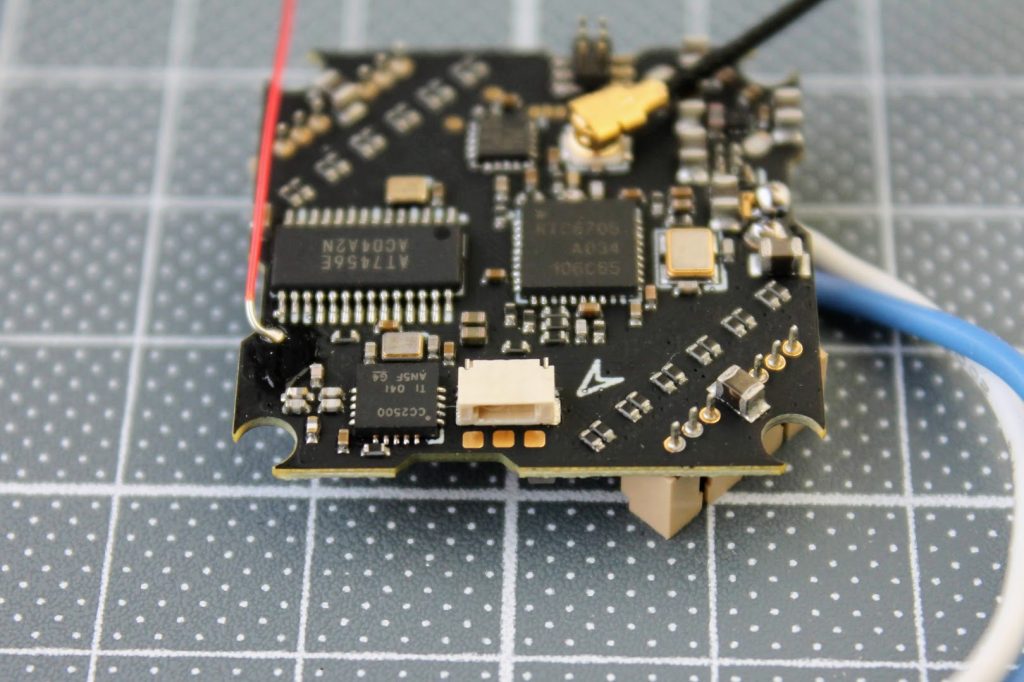
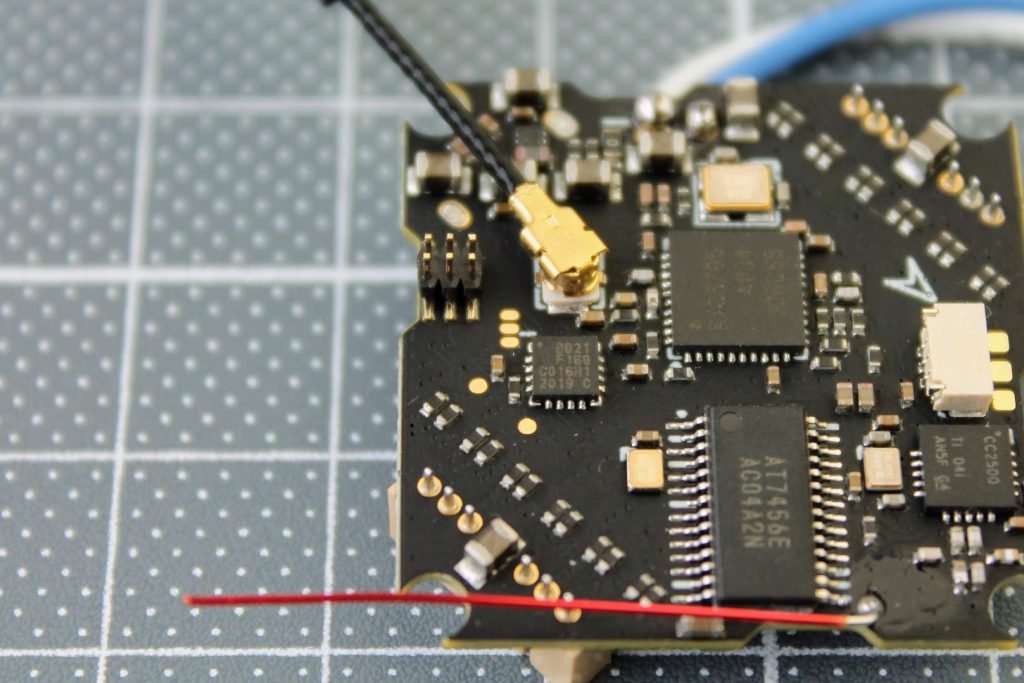
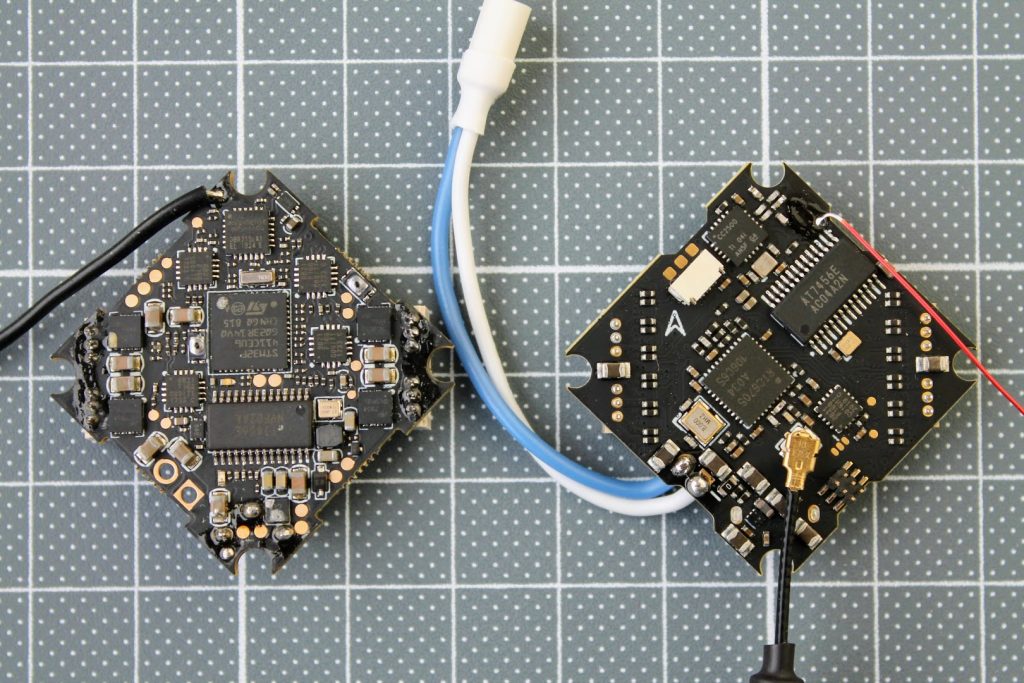
You can find the RTC6705 VTX, CC2500 SPI Receiver and OSD chips on the board. There is simple wire receiver antenna and the IPX (u.fl) antenna connector. There are only 3 solder pads for the camera (+5V, GND, CAM) on the top side of the board. This shows the plug and play nature of this FC.
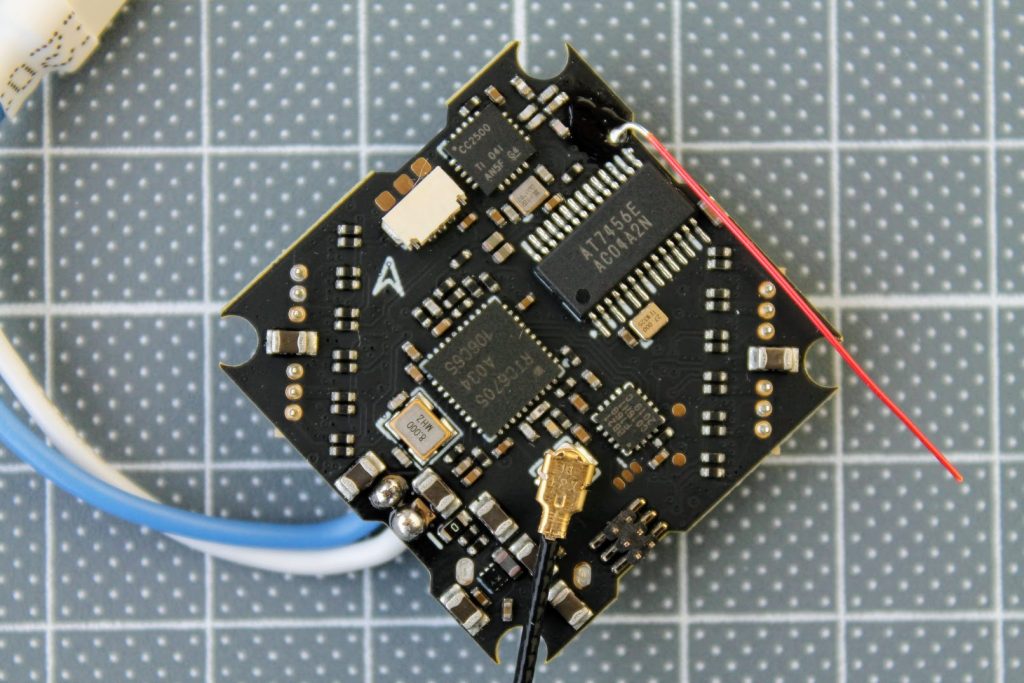
On the bottom side, near the top of the board, you can find the SE2431L chip. It is Low Noise Amplifier (LNA) by Skyworks, and is responsible for amplifying the receiving control signal. This means the built in receiver range is better than for instance on Happymodel CrazybeeF4.
The board comes with already pre-soldered BT2.0 battery pigtail and the u.fl VTX linear antenna.
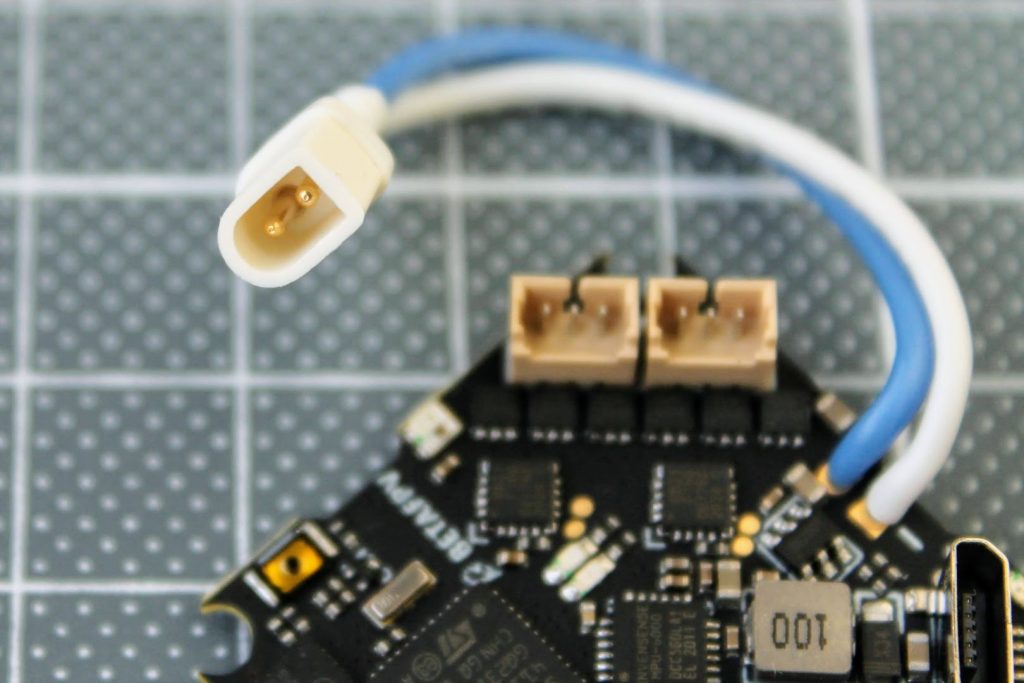
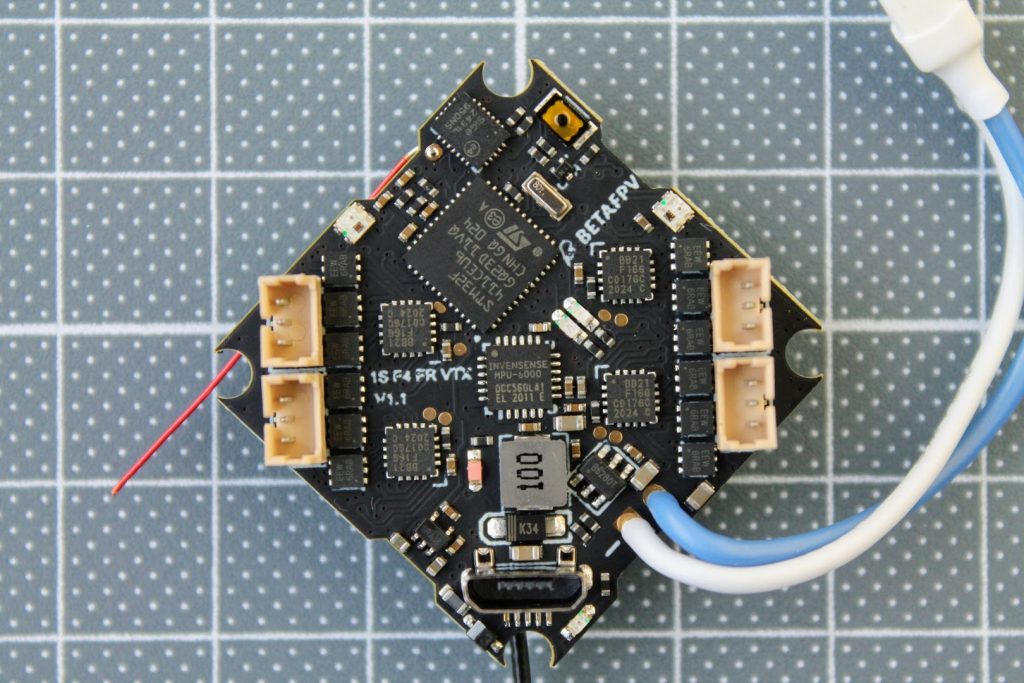
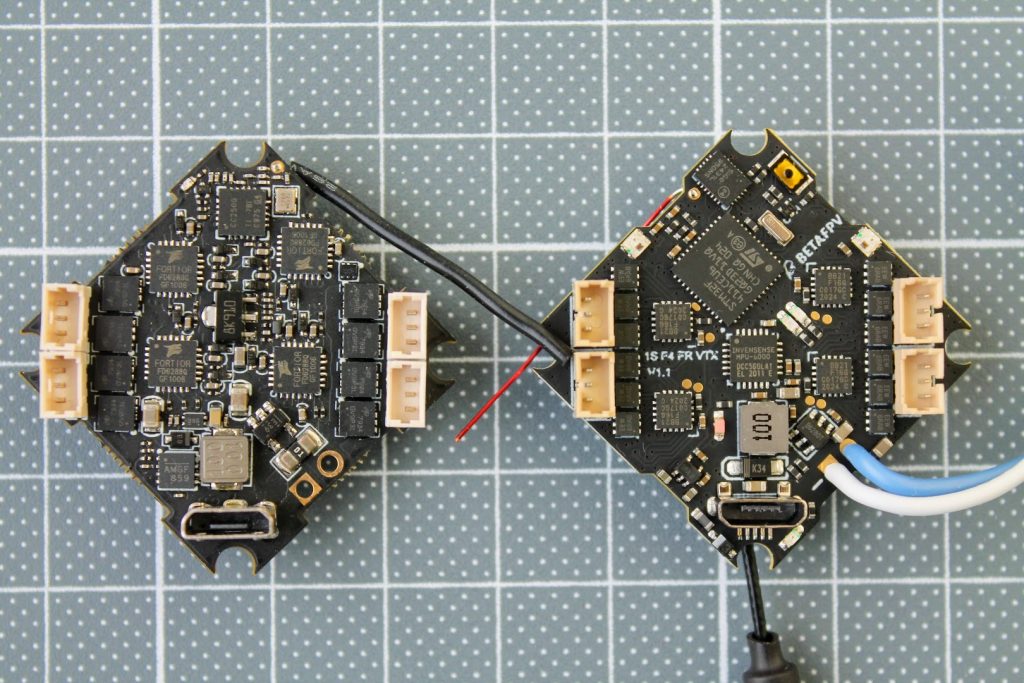
Flight controller has socket for plugging the camera with JST0.8 connector. The compatible cameras with the preinstalled JST0.8 connectors are Co1 and C01 Pro cameras.
There is also a 6 pin header on the flight controller for connecting the BETAFPV Nano HD Camera (a tiny whoop variant of the Caddx Baby Turtle).
This makes the FPV camera and HD FPV cameras plug and play compatible with this flight controller. No need for soldering!
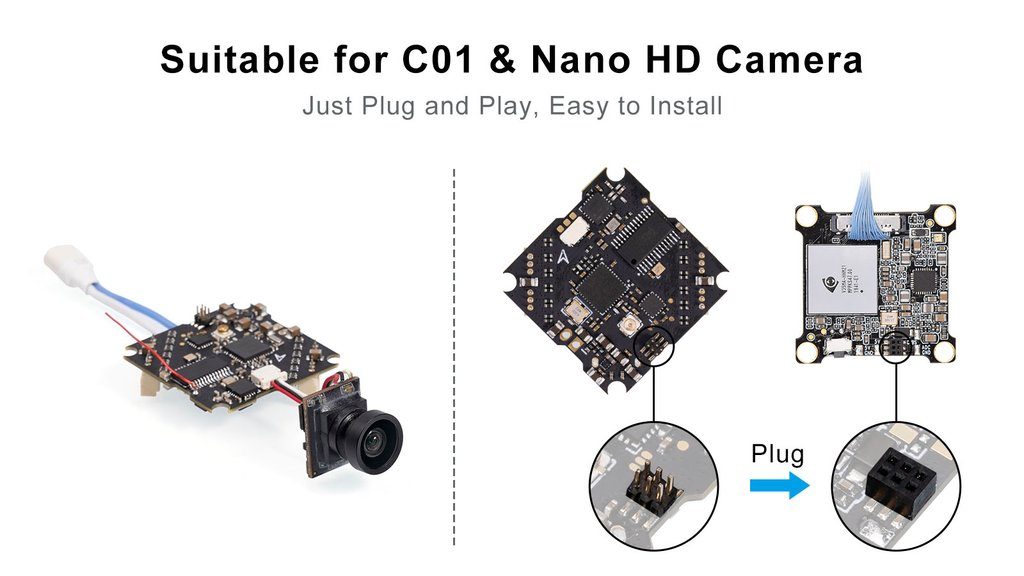
This board allows to build the whoop without the need of any soldering. All you need to build a whoop/toothpick is already on the board – just plug in the motors and C01 or C01 Pro camera. An you are done!
The weight of the flight controller with BT2.0 pigtail and the VTX antenna is 5.4 g.
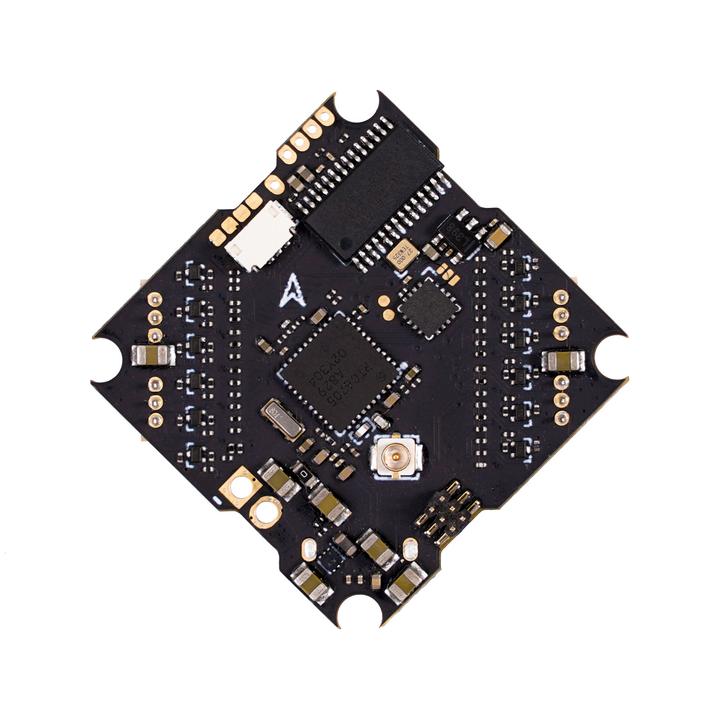
Comparison with the Happymodel CrazybeeF4 FR V3.0 board.
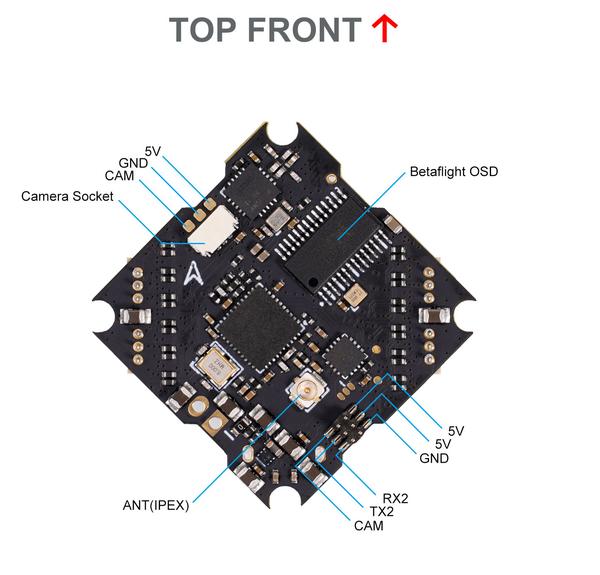
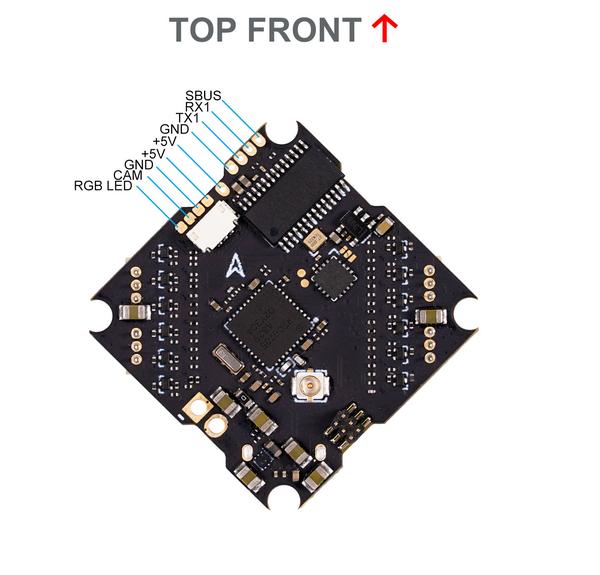
BetaFPV F4 1S FR VTX AIO flight controller with integrated SPI Frsky receiver pinout:
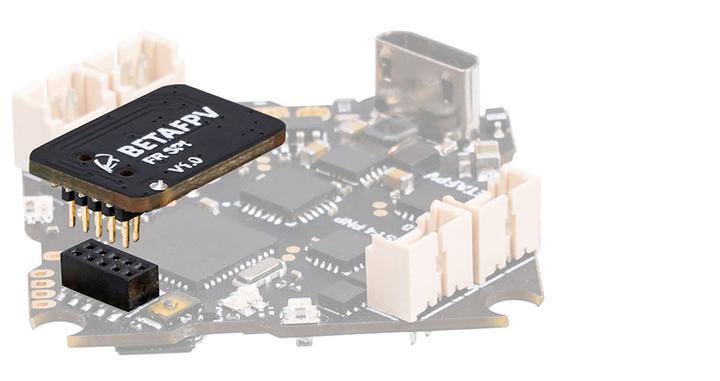
There is a BetaFPV F4 1S VTX AIO flight controller without integrated receiver.
It has additional solder pads for external receiver and the additional socket for direct plug and play BetaFPV FR SPI receiver module.
Pinout of the BetaFPV F4 1S VTX AIO flight controller without integrated receiver:
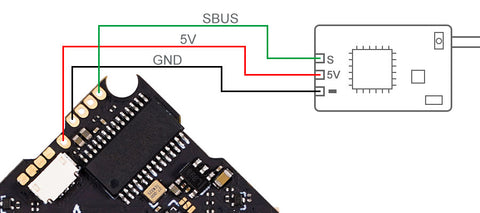
Connection diagram with the Frsky XM+, FS-RX2A and Futaba-X-BOSS AC900 external receiver.
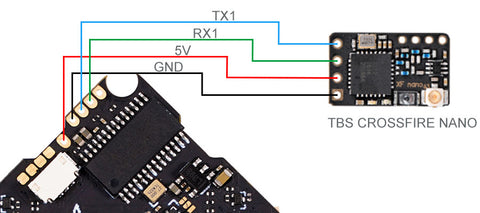
Here is the connection diagram with the TBS Crossfire receiver.
Here is the connection diagram with DSMX FullSpeed receiver.
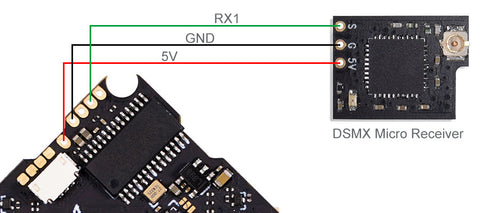
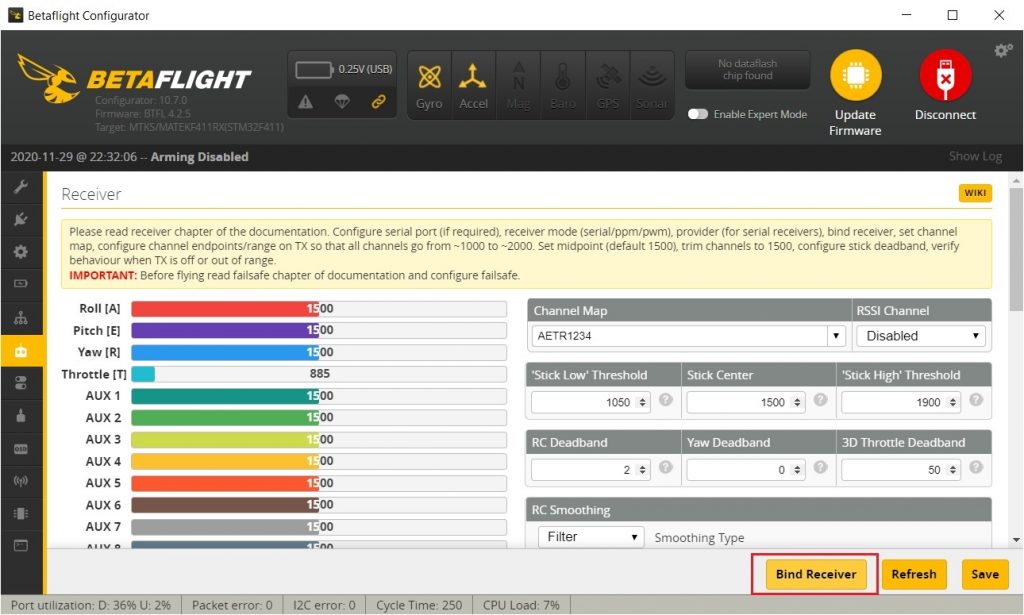
Binding
In order to bind the SPI receiver you can use any of these three methods:
- Power the flight controller and then press the BIND/Boot button. The binding process will start.
- Connect the flight controller to the Betaflight Configurator, select the Receiver tab and press the [Bind Receiver] button. The binding process will start.
- Connect the flight controller to the Betaflight Configurator, select the CLI tab, in the command line write the
bind_rxcommand. The binding process will start.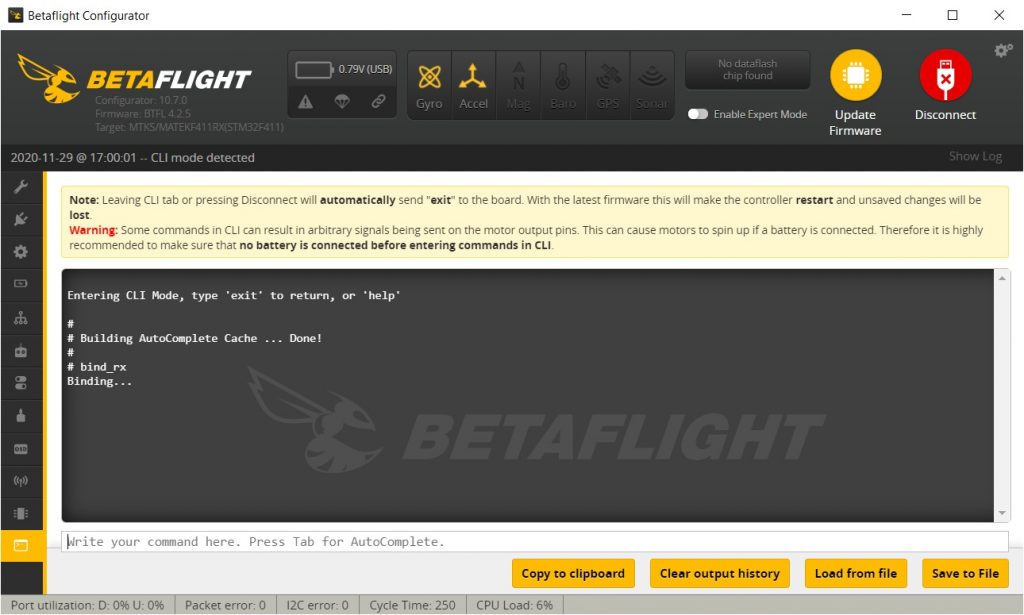
Available @ BetaFPV: https://betafpv.com/products/f4-1s-aio-brushless-flight-controller
-
 Review: MEPS Space SZ F7 Mini FC
MEPS (Mepsking) is a new, but emerging manufacturer, making its mark in the RC
Review: MEPS Space SZ F7 Mini FC
MEPS (Mepsking) is a new, but emerging manufacturer, making its mark in the RC -
 HGLRC Thor Pro parallel charging board
HGLRC Thor Pro charger board is battery parallel charging board with protection fuses and
HGLRC Thor Pro parallel charging board
HGLRC Thor Pro charger board is battery parallel charging board with protection fuses and
Where can you find the file for the ESC Firmware (O_L_5_REV16_8.HEX)?
I installed JESC 48 on this FC and now the motors are acting weird.
You can find the 16.8 revision BLHEli_M firmware here:
https://github.com/JazzMaverick/BLHeli/tree/JazzMaverick-patch-1/BLHeli_S%20SiLabs/Hex_files_16.8
You can also use BLHeli_M configurator for uploading the BLHeli_M firmware here: https://github.com/Asizon/blheli-configurator/releases/
I just got this F4 1s A10 flight controller with plug in fr sky receiver. The bind button does not seem to work. (Green Led keeps flashing). In Betaflight configurator the receiver tab does not have the bind button and when I type “bind_rx” it says that the command is not supported. I tried pushing the bind button and then connecting the battery but this did allow me to connect my radiomaster t16s either.
I am not sure what to try next. Can anybody suggest a solution? Thanks
I guess you have Betaflight 3.7 preinstalled on this board thats why CLI command does not work.
Try binding in D8 mode.
Hi, thanks for the review. I’ve got the F4 1S AIO FC(SPI Rx). Is it possible to use an external receiver with it? Like a Crossfire nano? not obvious from the pics how to connect it though. Thanks
Hi, you should have bought no rx version if you wanted to use external rx. It is doable with your board also, bur it’s tricky. There is small 6pin header on the board. Two pins are RX2/TX2. If you could manage to tap the wires to these pins, then you could connect the external rx.
has anyone had a problem with the video cutting out on betaflight or the voltage not reading in emuflight?
I had that problem too, are you flashing the “MATEKF411RX”? This board seems really good as long as you keep it stock and just drop your tune.
I’m having a lot of problems with it.
Target for all 3 of mine is betafpvf411rx (no receiver version).
Flashed btfl 4.2.8. 65mm/18000kv. RPM filtering with JESC 2.3 working.
Added 16v/100uf capacitor.
Video does not cut out at all. Voltage over OSD and Frsky fport telemetry reading fine.
No major problems but I did assume current sensor even though it’s not advertised lol.
Did anyone get the Betaflight TX lua scripts working with this board? I have a Radiomaster TX16s and receive telemetry from the board. The Betaflight scripts also get past the ‘initialising’ phase, but all value afterwards show ‘—‘ and I cannot change them. Any ideas?
I have alot of problems wiht this board PNP version, the vtx cuts out ore getting bad video wobling wehn flying very bright areas